From Carb to EFI, with Ignition Control, on just a fistful of dollars…
Objective of this Article
This article will walk you through the process of installing a MegaSquirt EFI system on a classic carb’d vehicle attempting to go the least expensive route possible using junkyard parts and DIY ingenuity. We’ll be using an MegaSquirt-II v3.57 ECU. This is Part 2 of the process, in Part 1 we completed the initial Fuel Injection Conversion, converting the car over to an EFI ‘fuel only’ setup leaving control of the ignition in the hands of the old school distributor initially. This is easy to do for the first-time EFIer and takes much of the intimidation out of the process. Now with that foundation laid the ignition control will be pretty simple to add as well so here in Part II we’re going to take control of the ignition with the MegaSquirt-II as well.
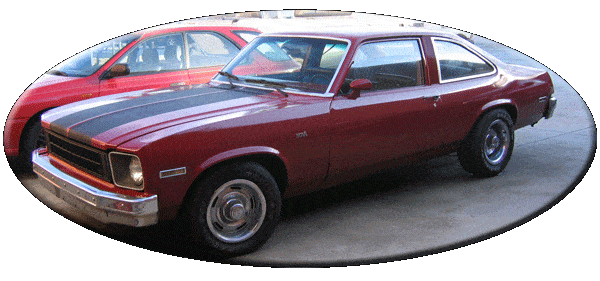
We chose a 1977 Chevy Nova with a 350 small block as our subject, but the principles laid out here can be used just the same on a big block Chevy, or a Ford or Dodge small or big block engine, inline engine, a foreign motor… a motor is a motor is a motor. You may not be able to use the same exact distributor we snagged as we took one from a computer controlled smallblock Chevy that was actually originally used with the same TBI system that we grafted onto this car. But if your motor was ever used with a computer controlled ignition you can likely snag those bits and follow our lead to do something similar. Or there are always other options, such as modifying your stock distributor to lock down the mechanical ignition advance (vacuum and centrifugal) and then using it with computer control. Or fitting a crank trigger wheel to your engine and either using your distributor to spread the spark around, or converting to a coil pack ignition system. We’ll cover what we did on our car in detail, but then we’ll also cover your other options.
Note that though this is one example of a Carb-to-EFI conversion using a MegaSquirt-II this system can be used on just about any vehicle, using TBI or Multi-Port injection, even Central Port injection if you so choose. We’ve kept the focus on these first two articles on converting to EFI as affordably as possible, in stages allowing the first time EFI to take on EFI in steps that will help take much of the mysticism out of the process. We’ll be doing further articles including converting to Multi-Port EFI soon which will involve more cost, and provide more performance. Stay tuned.
As always, we highly recommend you dig into the MSExtra Manuals in addition to these articles. It’s a big read, but it’s a valuable resource that our guides are meant to supplement and not replace.
What we did: Stock GM TBI Era Distributor
Back to the Boneyard…
Digging up the Distributor and Coil
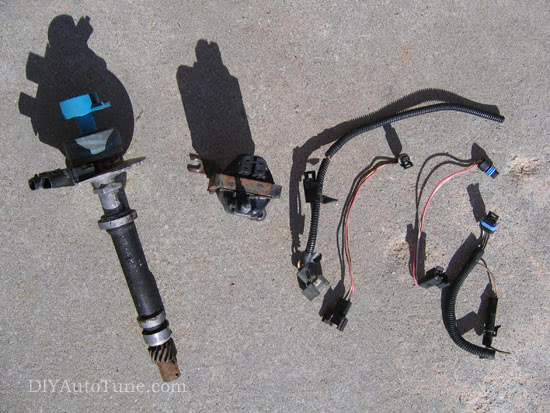
I headed back down to the local pull-a-part looking for Chevy/GMC vans again as this seems to be the most prevalent source of GM TBI era bits for Chevy V8’s. Look for VIN ‘K’ vehicles for SBC 350 motors, though for the ignition parts the 305 bits would have been just fine I imagine. I found a distributor, coil, and all pigtails with a foot or so of wiring attached. Paid my $31 for them and was on my way. On the way back to the shop I stopped and picked up a new cap and rotor for them. That was $29, about as much as I paid for the dizzy and coil ;). So I was $60 in. Not bad.
By the way- make sure your dizzy has the HEI module inside of it, I saw a few with this missing. And check for broken clips on the pigtails, there’s always another van you can snag them from if you need it. You can probably find the same pigtails in the 6cyl vans in a pinch.
Distributor rebuilder Pierre Payant contributed a couple of tips about common problems to check for on used HEI distributors:
First concern: the distributor uses a plastic base to secure the cap. The ears on that base are very-often cracked or broken… These distributors are nearly impossible to fix inexpensively, so checking the cap-mounting ears is very important. Junkyarders should remove the cap and check for damage before they pull and purchase. Also, using caution whenever reinstalling the cap is of paramount importance… this is old, heat-cycled plastic and those tabs are easy to break. It doesn’t take a lot of fastener torque to secure a distributor cap, so don’t go crazy.
The other thing to check is the factory ignition coil used with this setup. These are notorious for voltage leakage from the coil’s windings through the case to the laminated surround plate, which will cause intermittent misfires under load that can drive a person to drink trying to diagnose. The problem is easily seen, though, by inspecting the coil itself. If the plastic coil case has what appear to be “hard-water” stains (dry white or grey marks) near the laminated surround, it shouldn’t be used as the coil has been grounding itself and will continue to do so. The problem with this leakage is that it seems to only happen under a load, making it nearly impossible to diagnose in the shop. High-performance aftermarket coils seem less susceptible to this problem while GM and parts-store replacements seem to eventually fail in the same manner… though these E-coils rarely outright die.
I thought you might want to insert this information in your ignition article to avoid heartbreak or frustration among the frugal Chevy guys duplicating your setup.
Thanks, Pierre!
Checking out what I’d found
All appears to be in good shape. The distributor has an 8-pin HEI module inside of it. Two of the eight pins go straight to the VR sensor inside the distributor. Then there is a 2 pin connector and a 4 pin connector on the outside of the distributor, both mushroom shaped. You did get the pigtails for these right?
Installing the Distributor (don’t pull the old one out yet!)
You install your distributor pretty much the same way you would any other time. There’s one notable exception– you get to choose which distributor terminal is #1 now. To reduce the chance of confusion, and because your plug wires are probable already laid out for it, I’d choose the distributor terminal that’s in the same position #1 has always been in. Here’s a step-by-step though….
- First get your #1 cylinder at TDC on the compression stroke. The easiest trick to do this is to pull the spark plug out of the hole, cover the plug hole with your finger tip (not in the hole, over the hole sealing it) and have someone ‘just bump’ the ignition until it pops your finger off the plug hole with a burst of air. You’re close to TDC now. Look at your damper timing markings and use a socket on the crank pulley bolt to line it up just right at TDC.
- Pull your old distributor out. If you waiting until now to pull it out your life will be easier as the slot in the top of the oil pump shaft will be lined up just right to drop in the new distributor. If not then you’re going to have a bit of fun with a long screwdriver or pry bar lining that thing up before the next step. Don’t drop the screwdriver.
- Determine which way you want the electrical connectors on the HEI8 distributor to point out. I pointed mine directly out towards the passenger fender.
- Insert the new HEI8 distributor with the electrical connectors pointed where you want them, and the rotor pointed just a few degrees COUNTER-clockwise of the #1 plug position. As you sink it into place it should seat all the way down and the rotor will rotate a few degrees back clockwise now leaving it pointing at or near the #1 terminal (or where that terminal will be when you install the cap).
- Snug the distributor into place, you don’t have to crank it down yet, you’ll set base timing a bit later and will need to twist it a bit.
Mount the Coil
Find a suitable place and mount the coil. Many aftermarket intake manifold have holes drilled/tapped in the factory location for this coil right next to the distributor. If your throttle bracket isn’t in the way then this is the perfect place to mount the coil. If it is in the way, or you need to put it somewhere else for another reason, then find a good spot and mount it up. I’m more into function than form myself and just mounted it to the firewall right next to the distributor. Keep in mind the wiring length you’ve gotten from the junkyard for the Coil-to-Module wiring (which you could extend if you wanted to really). Also note that the coil bracket needs to be grounded. Bolting it to the engine is perfect, in my case it’s working fine bolted to the firewall with that as a chassis ground.
How do I wire it up?
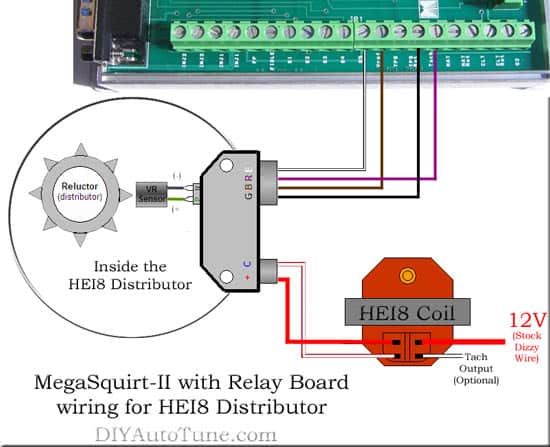
Pretty straightforward setup here — Note I’m only showing the ignition related wiring attached to the relay board here. If you were previously running a fuel only setup similar to what we detailed in this article then you had a wire run from the TACH terminal on your old distributor to the TACH terminal on the relay board. You’d remove that (and it’s shielded wire that was connected to a ground on the relay board). Then you’d wire the new setup in as shown above.
-
COIL 12V POWER: It’s pretty simple to use the stock 12v wire that used to connect to the factory distributor.
-
COIL to MODULE WIRING: This is two wires (C and + in the diagram above) with factory connector on each end. Just plug the coil into the HEI Module, that’s it.
-
COIL to ECU WIRING:
-
G (Ground): Wire to TPS Ret on the Relay Board
-
B (5V): Wire to VREF on the Relay Board
-
R (Signal from Reluctor/Module to ECU): Wire to TACH on the Relay Board
-
E (Signal from ECU to HEI Module to fire the coil): Wire to S5 on the Relay Board (S5 goes back to pin36 on MegaSquirt)
-
One note: You might notice in the MSExtra MS2 Manual, the recommendation to wire the B wire (5V) through a relay that makes this 5v signal hot when the engine is running, but not when it is cranking. Let me explain why– this 5v signal tells the HEI module to allow the ECU to control the timing. When the ECU is NOT getting a 5v signal it goes back to base timing (whatever you set with a timing light here in a few minutes). The stock ECU does NOT send 5v when cranking so that the engine cranks at base timing. Wiring this as per the manual creates the same type of behavior. My wiring recommendation above goes about this differently, but works well nonetheless. The difference is the computer is controlling timing during cranking. This shouldn’t cause a problem as long as the computer is configured properly, and in my tests I’ve had no negative effects at all.
Ignition Timing Connector- The factory wiring you snagged had a single wire disconnect on the B wire (wired to VREF on the Relay Board). This is there to allow you to set base timing as controlled by the module. Go ahead and disconnect this leaving this circuit open for now. This will allow the car to be started at module base timing, you can then set the base timing with a light (with the old dizzy twist) and then you’ll connect this connector back up, giving the computer control.
Reconfiguring your MegaSquirt for HEI8 Ignition Control
First off, don’t let this part scare you off. We’ll do it for you for a few bucks if you don’t want to do it. But the configuration the MegaSquirt-II ECU’s ship in, while suitable for some ignition systems and for fuel-only control like in the first article in this series, needs to be reconfigured (or modded internally) to control your HEI ignition. Thankfully we’ve been able to make this incredibly simple, particularly if you’re using a MS2 v3.57 ECU purchased since the release of this article. We’ve updated the ECUs themselves and released a ‘mod-kit’ that makes converting these units for HEI use as simple as it possible can be.
First, you’ll need to order the MK-HEI Mod-Kit from our website. This included some header pins you won’t need, but more importantly it includes to jumper wires, one of which has a resistor in the middle of it. In text steps, this is what you do on a v3.0 or v3.57 board:
- Remove the TachSelect to OptoIn jumper, and the XG1-XG2 jumper. You won’t need them anymore while running HEI ignition.
- The Red (resistor) wire runs from the #3 pin (OptoIn) to the 5v Pin near the MS2 Daughterboard.
- The Green (no resistor) wire runs from the TachSelect pin (middle of JP1) over to the XG1 pin.
- That’s it. But for the more visually inclined learners, how about a video?
Here is a helpful video for the visually inclined.
Don’t turn the key yet! (not even part of the way)
Before you power anything up, you need to reconfigure your MegaSquirt-II for your new ignition system. You can do this in the car, with your laptop connected to the MS-II. But before you do anything, disconnect the connectors on the coil and distributor that you just installed. This is to make sure that nothing (HEI module or coil) is damaged while you are configuring these settings in the event that something is improperly configured when you first power up or anything while you’re messing with the settings. Then once you’ve confirmed the settings are correct you’ll plug everything back up.
You can access these settings on the Ignition Setup>Base Ignition Settings screen. Make sure you BURN TO ECU any changed settings. You’ll also need to power cycle the ECU for these settings to take effect if you need to change them (any settings in red require this). Here are the settings you’ll be changing and/or confirming:
- Ignition Input Capture: Falling Edge (Assuming you used our MK-HEI modkit which inverts the input signal. If you did your own thing this setting could be different)
- Cranking Trigger: Trigger Rise
- Coil Charging Scheme: Standard Coil Charge
- Spark Output: Going High (Inverted)
Once you’ve configured these settings and Burned them to the ECU, you can power off the car (at the key) and plug the coil/module connectors back in.
Most of these settings match the default settings in the base map, one is different, and you should always verify. The wrong settings here can damage your HEI module, your coil, or just cause really erratic ignition timing. That’s why I had you unplug the connectors to your coil/module until you made sure the settings were correct for the HEI ignition system you are using. Note that if you’re following this article but using a different ignition system, you can still follow the general guidelines of this article, but the configuration of the ECU hardware and software settings may need to be different for whatever ignition system you are using. Feel free to contact us and we’ll help you sort it out.
MegaSquirt Ignition Control EFI Conversion Installation Help
Starting the car for the first time
Up in the wiring section I suggesting leaving the Ignition Timing Connector disconnected after you wired everything up. This will allow you to crank the engine up at module commanded timing without the ECU controlling timing yet. Ignition timing will be at a fixed number of degrees and will not move at all as there is no advance mechanism in this distributor, that’s why you will need the ECU. But for now, the Ignition Timing Connector is disconnected.
Start the engine. It should start fairly easily. The timing won’t be spot on, and you may have to adjust the distributor a bit to advance the timing a little if you had it turned too far retarded to run well, but it should fire up. Our car fired up on the first try, and there’s nothing magic about it being our car. Not all setups will be this easy to get fired up, but this HEI8 distributor is one of the easiest.
So what if it doesn’t start? (Troubleshooting)
If you’re doing a similar install to this (GM HEI8 dizzy), you’ve got good parts, and you’ve got things wired up as above it’s going to start. If for some reason it doesn’t, first things first– make sure the MegaSquirt EMS is getting a TACH/RPM signal in the tuning software. Your engine will never start if the ECU isn’t seeing the engine turn over as it won’t fire the injectors or the spark plugs until it sees RPM (even though right now the ECU isn’t controlling the spark because you’ve disconnected the Ignition Timing Connector, it is still controlling the fuel). If you’re getting a steady TACH/RPM signal in the tuning software (should be 200-300rpm when cranking), then check over your wiring comparing it to the diagrams above. Make sure you’ve wired everything up properly. Now check it again, it’s easy to overlook mistake when you’re checking your own work, most of us tend to scan over details assuming we did things right rather than really look close. If the wiring is right, check and see if you have spark at the plugs. You probably know a trick to do this, screwdriver in a spark plug boot works well. Then placing the shaft of the screwdriver close to something that’s grounded such as a valve cover or almost anything metal that’s under the hood. Keep your hands away and turn the key looking for a spark to jump from the screwdriver shaft to the grounded metal. If you don’t have spark, check for power to the coil, and recheck your wiring. You might have a faulty HEI module or even VR sensor in the distributor. Remember, at this point the ECU is not in the picture at all because that Ignition Timing Connector is disconnected. If you have power to the Coil and the HEI module (which gets power through the Coil), and the engine spins, it’s going to spark. Get this working and get the engine running on module based timing before you continue.
Setting the timing (step 1)
This is pretty straightforward, with the Ignition Timing Connector disconnected (B-VREF wire) use a timing light to set the base timing by loosening the distributor and twisting it to set the timing and then tightening it back down. I like to set this to 10deg BTDC. Anywhere from 0-10 BTDC should be fine. If you have a timing light without advance capability, 0 is probably easier. If you light lets you dial in 10 degrees then that works well. I’d let that make the decision. This isn’t the most critical timing adjustment, the next one is what matters.
Setting the timing (step 2)
Now that your base timing is set with the module controlling timing at a static figure, plug the Ignition Timing Connector base together to allow the ECU to control timing and it’s time to truly set your ECU controlled ‘base timing’. This is what ensures that the timing that the ECU is commanding is actually what you’re seeing at the crankshaft, so it’s very important.
Open the MegaSquirt Tuning Software and look at the Ignition Advance gauge. Start the engine and let it warm up. You want to make sure the your ‘commanded’ ignition advance, that is, the advance the ECU is sending, and that your monitoring on that gauge in the tuning software, is at a fairly stable number. The simplest way to do this is to open the ignition table and set all of the cells in the area the engine is idling at to a single number, such at 10*BTDC. This way you won’t have to worry about the engine drifting about from cell to cell when you’re setting the timing in a moment.
So now to set the timing, from the tuning software open ‘Ignition Setup > Base Ignition Settings’. With a timing light on the engine, you’ll be adjusting the ‘Trigger Offset’ setting on this page to make it the commanded timing (10*BTDC if you flattened the table out like I mentioned a moment ago). Each time you make a change to the Trigger Offset you’ll need to click ‘Burn to ECU’ to save the change. Feel free to play with it a bit- adjust the Trigger Offset up 2-4 degrees and see what happens at the timing light. Adjust it back down 2-4 degrees and see what changes at the light. When you’re finished, the goal is to have adjusted the Trigger Offset so that what the timing light reads at the engine matches what the computer is commanding.
IF YOU JUST ZONED OUT THEN READ THIS LINE: OK, I know that’s a lot of directions. Let me repeat the last line in that paragraph as it’s all that really matters: When you’re finished, the goal is to have adjusted the Trigger Offset so that what the timing light reads at the engine matches what the computer is commanding.
Once that is done, the base timing is set. If it’s still not clear, no worries — I’ll cover it in the video below.
Look Mom, my Laptop is controlling my Ignition Timing!
My mom always told me not to play with fire. I didn’t listen very well. I remember when I discovered you could even light the asphalt road in front of our house on fire with a propane torch if you help it on there long enough (small flame, goes out really fast). I think I was about 13. Anyways, now you get to play with computer controlled fire. As you saw above when setting your timing adjusting the Trigger Offset effected the ignition timing as seen by a timing light. You might have even detected a small change in idle speed when doing this. Now open up the tuning software and save a copy of your current Tune File (Project>Save Tune in TunerStudio). Now with the engine running open up your ignition table in the tuning software (Basic Tables>Spark Advance Table in TunerStudio). You will see the dot near the bottom left of the map where the engine is idling. You can increase or decrease the ignition timing here and see that increase or decrease of timing with the light, and hear/see what that increase or decrease in timing does to engine idle speed. For instance, if you’re idling at 15 degrees, go ahead and grab (multi-select – see video below for more info) all of the cells around where the engine is idling, hit the (-) button at the top right of the screen, and subtract 10 degrees from those cells in the table. You should immediately hear the engine idle down. Now with thos same cells selected, hit the (+) button at the top right of the screen, and add 10 degrees those cells in the table and it will idle back up to about where it was before. Go ahead and add another 10 degrees there if you want to and it should idle up futher. You can confirm all of this with a timing light too if you want. When you’re finished, subtract the 10 to get back down to where it was when you started. If you goof it up or loose track of what changes you made, you can always go up to Project>Load Tune and load the file you saved at the beginning of this section before we started mucking around with this. That’s why we saved it.
The Video
This covers the highlights of this article, walks through the configuration of your ECU, the first start, setting the timing, and playing around with the tuning software to help you get the hang of things a bit. I hope you enjoy it.
| Want to learn more about EFI Systems and specifically more on how to tune the fuel and ignition on your MegaSquirted Monster? Matt Cramer (lead tech here) and Jerry Hoffmann (founder/owner) wrote a book on it! Check it out on Amazon.com! |
Tuning your EMS
Now you’re ready to tune the ignition tables on your EMS, while monitoring your air/fuel ratio to make sure it’s the same as before (if all you’ve changed is the ignition system the AFR shouldn’t change from where you had it before). There are several books that go into more detail although to be quite honest, ignition tuning is a more closely guarded secret by professional tuners than fuel tuning and as such there is less specific information out there about it currently targeted towards the average DIYer, part of this is for good reason as to fully tune every cell in your ignition table properly you really need access to a steady state load bearing dyno. There are books available now that provide at least ‘some’ information on the topic. Lastly you can always take it to a pro.
Back on the Dyno
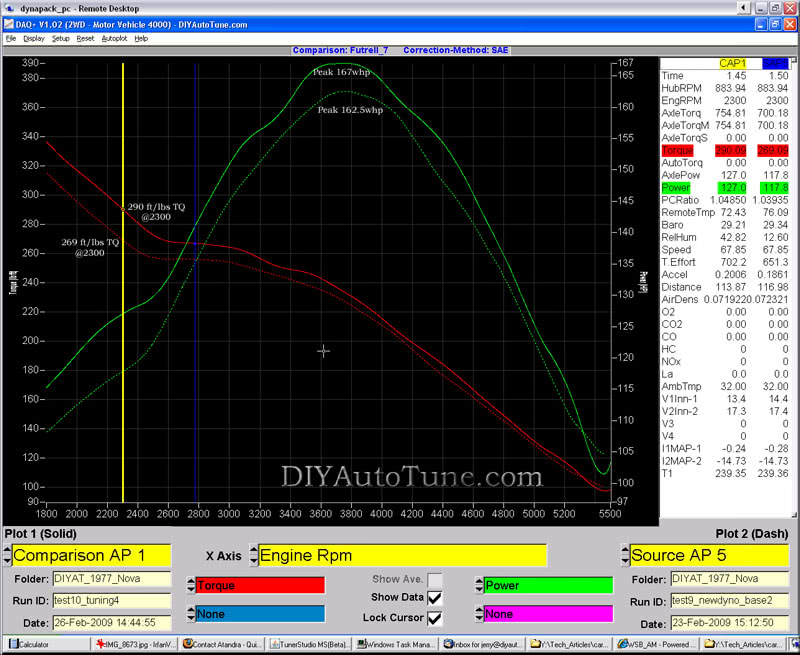
I honestly haven’t spent all the time I’d normally spend on tuning the ignition timing, really not taking full advantage of what computer controlled ignition makes possible, which is maximum available torque at all throttle positions and rpm points. That means I’d spend time tuning part throttle at every load point and RPM point to make sure I’m getting the maximum amount of torque available everywhere. I’ll do this when I’m finished with this car, but for now I roughed it in pretty quickly. I basically used the base map in the MS-II which was built on a SBC though on a different SBC with slightly different needs, and I just scaled the top rows up/down a bit to get the maximum torque/horsepower at WOT (wide open throttle) on the dyno. Turns out down was the way to go as the default map had a bit more advance in it than my motor needed. I then smoothed these rows into the lower load ranges a bit. Turns out my engine is happiest, making the most torque, at about 33.5-34 deg BTDC through most of the rev range at WOT. I was able to bring this advance in a little quicker than the old mechanical distributor did which helped bring in some extra torque at low rpms. Peak horsepower numbers were about the same as before with a mild 3whp increase. The small TBI is probably the holdup here as discussed before. That and the mild motor it’s sitting of top of ;).
So with computer controlled timing after tuning we picked up more power all across the board as compared to the stock mechanical/vacuum advance distributor. We picked up 4.5 whp at peak, and a consistent 21-22ft/lbs of torque from peak to 2300rpm and a consistent increase all across the board.
Impressions
My impressions haven’t changed that much from the results of the first article as far as how the car runs, the drivability is amazing for a classic car like this. I’ve never seen a carb’d car that you could just reach through the window on the coldest of mornings, without touching the throttle, turn the key, and have it pop right off. Then get right in without wasting any time and drive off. Car runs great. And now, with the computer controlling the ignition, we’ve got all of the power back even at the top end, and more torque than we’ve ever had out of this motor. I’m looking forward to trying a bigger TBI and then a Multi-Port EFI setup. Then we get to start building up the motor a bit. This series isn’t over, there’s more to come.
Parts Used in this Article
This is not a complete list of every little bit part you’ll need, but rather what we offer as well as the major TBI components
Engine Management System
- MegaSquirt-II Engine Management System
- MegaSquirt MK-HEI ModKit (for HEI Ignition Control)
- MegaSquirt Relay Board
- MegaSquirt Relay Cable (MSRelayCable)
- Wire Bundle (LG-WireBund)
Fuel System
- Walbro GSL392 255lph Inline Fuel Pump
- Walbro 400-939 Fuel Pump Install Kit (includes brackets, terminals, and barbed fittings, we ended up using some AN fittings like these)
- Fuel Filters (Pre Pump and Post Pump)
Tuning Tools
- Innovate MotorSports LC-1 Wideband O2 Sensor
- Note: The LC-1 has been discontinued and replaced by the LC-2.
Throttle Body Injection (TBI) EFI Hardware
- Junkyard TBI unit from 1992 GMC 2500 Van with 350 Motor
- Included injectors, several inches of all attached wiring, and fuel hard lines
- TBI Adapter Plate, Summit Racing Part# TRD-2210
- Junkyard HEI8 Distributor and Coil from a:
- 1987 – 1992 TPI Camaro/Firebird V8
- 1987 – 1993 Chevy Full Size V8 Cars
- 1987 – 1995 Pickup Trucks and Vans with V8’s.
- I grabbed this one from a Chevy Full Size Van, Vin K (any V8 HEI8 distributor should work).
So you want our tuning map?
Again we’ll share our map after this stage of the build, but don’t get too excited; you can copy our homework sure, but you’re likely to have to change some of the answers a bit. Here’s a copy of our .msq file, the full configuration of our dyno-tuned map from the above project. It’s not going to be perfect for your car, but if your car is very similar to this test car it might be a good foundation. To be honest, most of you won’t really need this, the base map that comes on the MS2 fired our car up with minimal configuration as I showed in the video above, but I wanted to share this as it may help some of you or inspire a bit of confidence or whatever.
DIY’s 1977 Nova Project Fuel/Ignition Control (Article Part2) .MSQ File (right click and choose Save As, remember where you save it, then when connected to your ECU you’ll be able to ‘FILE>OPEN’ this file)
Note, this was built on a Small Block 350 Chevy motor from a 76 Monte Carlo (swapped into this Nova). Edlebrock Performer Intake. GM TBI from a 350 Chevy (65lb injectors). GM HEI8 Small Cap Distributor installed as per the above article. MS2 ECU Configured as per the above article. Headers into 3″ Exhaust and Flowmasters. Stock heads and cam. This was built, and should only be used on, a MegaSquirt-II with firmware 2.888.
I DO NOT recommend you drop this file on your car and go any more than I would with the base map. Each individual tuner, whether that’s you or a professional, is responsible for making sure the EMS is properly tuned before driving!
BONUS: Should you upgrade the coil?
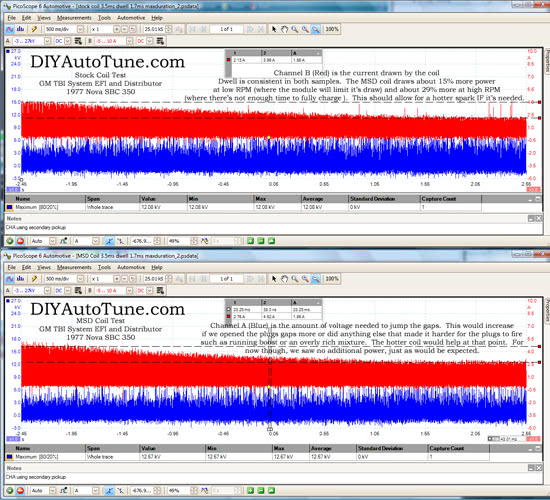
So you might wonder if you should drop a wonder coil from your favorite parts house on here with this setup to see if it will help you out. After all, these HEI8 ignition systems came on late 80’s and early 90’s trucks and vans. Not exactly sports cars. I got a little sidetracked and ended up testing what you’d get out of a common coil replacement, and the verdict? You’re probably fine with the stocker, but here’s what there is to be gained. Coil tested was MSD part# 8226
What’s coming in future articles?
- More Ignition Control Options — You don’t have to do what we did here though if you’re running a Chevy, this is easy and hence that’s what we recommended. We’ll show you some other options though as well that will work on a Chevy or any number of other engines.
- MPFI Conversion – Holley Stealth Ram system is on order. This will add cost, we’ll find out if it’s worth it and let you know.
- Turbos?
Links to all Articles in this Series:
Carb-To-EFI Conversion: One Step at a Time – 1977 Chevy Nova with SBC 350
Carb-To-EFI Part1: GM TBI Fuel Only
Carb-To-EFI Part2: Adding Ignition Control (HEI8)
Carb-To-EFI Part3: Converting to MultiPort Fuel Injection (MPFI)
