Today's "Technical Tuesday" article is brought to us by one of our own in-house QA techs Carl Eichel. Through his experience as part of the technical support team at DIYAutoTune.com, he is going to walk us through troubleshooting a "crank no start" condition with your MegaSquirt install. Whether this is your first time, or a seasoned pro when it comes to standalone EFI installation, you're sure to find some helpful tips and tricks here to get up and running as soon as possible.
This is one of those “if I had a nickel” tech support questions, so let me help you, to help me, to help you. By preparing you to troubleshoot this condition on your MegaSquirt-equipped project, while also providing us here at tech support with all the right information if you’re still having trouble tackling it on your own!
Basic Needs
So first a very basic recap on how an internal combustion engine works. For an engine to run, it needs 3 basic things:
1.) Compression. (not an ECU-controlled parameter, so we won’t talk about this further, just do a compression test if necessary).
2.) Mixture. That yummy go-fast soup of fresh oxygen-containing air and just the right amount of atomized droplets of fuel to go BOOM!
3.) Ignition. You need that spark to start the fire and, of equal importance, you need it to happen at just the right TIME!
As the name implies, Electronic Fuel Injection (EFI) is very, VERY good at metering just the right amount of fuel. But how much is this ‘right amount’ for YOUR engine? The short answer is about 1/14th of the amount of oxygen going into it. This then leads to the obvious question of how does the MegaSquirt ECU know how much oxygen is going in? Once it knows that, it just divides that number by 14 and opens the injectors long enough to squirt in that much fuel, so let’s dive into figuring out that oxygen part! The first step is the basic engine parameters. This is the FIRST thing you need to get right in your tune, and it’s all captured under a variable called Required Fuel:
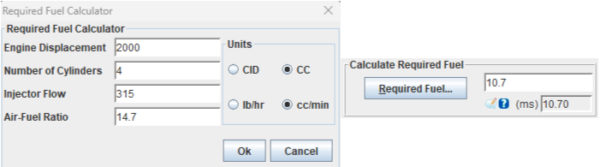
Here, we start with the engine displacement and number of cylinders. In this example, we have a 2.0L 4-cylinder, so each cylinder has a volume of 500 cm^3 or 500 ccs. It also is using 4 total injectors, one injector for each cylinder, and each injector flows 315cm^3 per minute of fuel when open. This gives us a Required Fuel value of 10.7ms. That means at full throttle when our 500cc cylinder is getting COMPLETELY filled with 500cc of air, then the injector needs to squirt for exactly 10.7ms to give us that perfect mixture. But of course that’s just the ‘baseline,’ obviously at idle the engine will be pulling in much less than that full 500ccs of air into each cylinder.
So, what we really need is for the ECU to know two things. What percentage of the total possible amount of air the engine is currently taking in, and how long will the injectors need to be open to supply the correct amount of fuel for that percentage?
MegaSquirt: Math not Magic
Fortunately, these things are both pretty easy to measure. How MUCH of our possible 500cc of air is coming in is measured by the Manifold Absolute Pressure (MAP) sensor. And the WHEN to inject fuel is really easy – since we squirt 50% of the total fuel amount needed every crankshaft revolution, as a 4-stroke engine takes 2 revolutions for one full cycle (intake, compression, power, exhaust). This gives us 50% +50% = 100% every cycle, so all we really need to need to know is engine RPM and manifold pressure. In our example 2.0L car, let’s say we’re cruising at 3000 RPM and 40kPa MAP. This means we want 40/100kPa = 40% of our (10.7ms) required fuel = 4.28ms long injections, so we would want to fire them: 3000/60 = 50x per second or every 20ms.
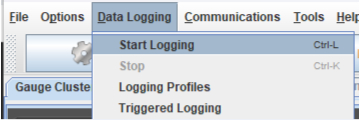
Now getting back on point, how can you CHECK this stuff to make sure it’s all working correctly, or more specifically find what isn’t working? As mentioned above, the first thing to do is verify the basic engine settings are all correct. Next, it’s time to take a datalog while cranking the car for a few seconds to really see what’s going on. The MegaSquirt ECU will log all of the sensor input it ‘sees’ so that you can verify if it all looks correct. Just click the ‘Start Logging’ button, crank the car for 5-10 seconds, and then stop the datalog again:
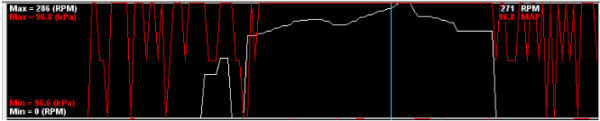
Open the datalog with Megalogviewer and check the MAP and RPM signals. When you turn the ignition on but the car isn’t running, MAP should just be equal to atmospheric pressure, something around 90~100kPa (depending on your elevation above sea level). If it is, great, it’s hooked up and properly calibrated. Also, try cranking and make sure it drops a little, maybe down to 80~90kPa or so during cranking, to verify your signal line, ( the vacuum hose from the intake to the sensor inside the ECU ) is not somehow kinked, blocked, or just not connected. Obviously, you also want to see the RPM come up to some reasonable value for cranking speed, usually a few hundred RPM. If it stays at 0 or jumps to 5000 then clearly something’s wrong.
If on the other hand, the MAP drops nicely while cranking but RPM stays at zero, then it’s time to switch over to the composite logger to further diagnose the RPM signal. See one of our other tech articles for exactly how to do that here: Using the Tooth Logger and Composite Logger.
Testing Fuel Outputs
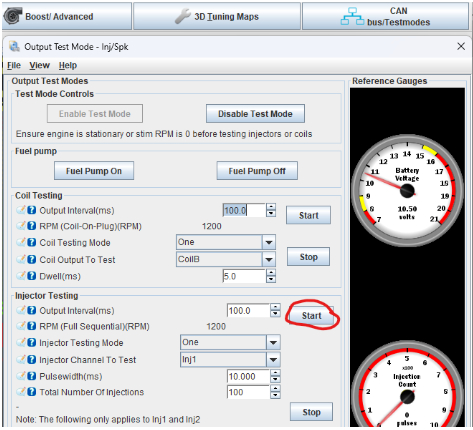
Good inputs from both MAP and RPM? Time to move on to checking the outputs! There are really only two for fuel – the fuel pump and the injectors. Every time you turn the ignition on, the first thing the MegaSquirt does when it powers up is it runs the fuel pump for about 2 seconds in order to prime the fuel system. Just listen for the sound of the fuel pump priming to confirm it’s working correctly. Then, using the Output test Mode – Inj/Spark option in the far right Testmodes menu, you can manually trigger each of the injector channels and listen to make sure you hear your fuel injectors clicking!
That pretty much covers the air-fuel mixture. To recap, it’s really just 4 things to check:
- Fuel pump – does it prime on power up?
- Fuel injectors – do they click in test mode?
- MAP – reasonable value that drops while cranking?
- RPM – reasonable value while cranking?
Ignition System Outputs
If all that is fine but it doesn’t want to get going at all, even poorly, then you most likely have an ignition issue, so let’s tackle that next! Similar to the air-fuel mixture, you need the output(s) of the MegaSquirt ECU working to fire the coil (or coils as the case may be), you need it to happen at the right time (RPM signal), but now you also need to make sure it’s happening to the correct cylinder. We can’t pull the same ½-spark-every-revolution trick as we can with the injectors, and this is further complicated by the fact that there are many different types of ignition systems out there. So really the first question here is what type of ignition system are you running, is it:
- A single coil with a distributor?
- A wasted-spark coil pack?
- Individual coils-on-plugs (CoP)?
Without doing a deep dive into all three, suffice it to say this just determines the number of ignition outputs we need to check. Just one for a single coil, ½ the number of cylinders for wasted-spark, or equal to the number of cylinders for individual “Coil on Plug” setups. In the same Test Mode as for injectors above, you can also manually test each spark output from the MegaSquirt unit and listen for the soft clicking or popping sound of the plug firing. Some prudent warnings and tips here though:
- Do NOT do this immediately after testing injectors, as you may have a cylinder full of fuel, ready to go FWOOOMP! Pull the fuse or injector connectors and crank some fresh air through first.
- Make SURE you have your spark output setting correct, 95% of the time it should be set to Going HIGH and not Going Low!
- Don’t over-dwell your coils, keep dwell about 4-5ms.
- Don’t touch an active plug and/or wire, ZAAAPPPS hurt!
- If you have a distributor, it’s easiest to pull the coil wire or “High Tension” lead off at the distributor side and put a plug in that end, rather than trying to get the rotor to line up with a given wire.
- If you have a wasted-spark coil pack, BOTH ‘paired’ plugs for a given output need to be installed/grounded for that ignition circuit to work.
- MegaSquirt outputs go in alphabetical order, A-B-C-D. . ., which you need to match to your firing order, which is VERY UNLIKELY to be the same 1-2-3-4 pattern. If you’re firing order is 1-5-3-6-2-4, then your ignition outputs will need to be A is #1, B is #5, C is #3, and so on.
With a good RPM input signal and outputs verified to be working, the only thing left is timing. The best way to check this is with a good old-fashioned timing light! ‘Lock’ your timing to a fixed value that matches any timing marks that you can read on your crank pulley/flywheel/etc:
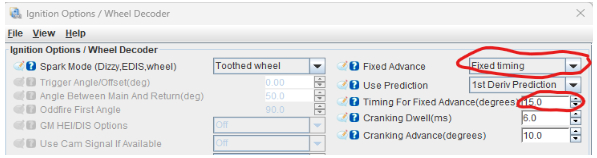
Then again crank the engine over and use the timing light to compare the commanded fixed timing from the ECU against the actual engine timing light reading. Then go back and fix your tooth #1 angle or firing order accordingly!
If after all this you’re still stuck that’s OK, you can always contact us for help, but now you’ll be well-armed with the above results, and we won’t lose a day by first exchanging the standard “Help my MegaSquirt equipped car cranks but won’t start” and “Sure no problem, please send my your tune and data logs” emails.