Greg Banish, Calibrated Success
Let’s face it, rewiring a classic car for complete sequential fuel injection is a daunting task for many weekend garage enthusiasts. Even after all that wiring is complete, we still have the task of setting up the controller and then calibrating the many tables that govern the actual fuel delivery and ignition timing across a wide range of operating conditions. This turns off a lot of beginners and they simply opt to keep their carburetor and analog ignition system for perceived simplicity.

If you have worked in business or leadership, perhaps you are familiar with the term “Pareto Chart”. Simply put, it states that 80% of our results often come from 20% of our input. The trick is to find out where that 20% lies and focus our energy there when working on something. Skipping past the online MBA course, let’s just apply that to what we’re doing in the shop instead. My opinion above was that we could probably get 80% of the benefit from converting a carbureted car over to a complete standalone fuel injection system (like the latest MS3Pro family) by simply taking over the spark timing with a simple Microsquirt controller.
A while ago, my friend Dave Buckshaw and I were in the midst of our usual late evening automotive thought bubbles in his workshop when we took up the question: “Is it better to replace the carburetor with fuel injection only or replace a traditional distributor with a computerized controller only?” Do we really get more improvement from better control of the air-fuel ratio, or from better control of the spark event? I had a strong opinion on this and insisted that most of the benefit would come from the latter. Ignition Timing all the way.
Simple Systems
Carburetor holdouts are not completely wrong. Carburetors actually do a decent job of getting fuel delivery somewhere in the ballpark. Lots of carburetors can be pulled right out of the box and thrown on an engine with minimal adjustment and deliver fueling somewhere close enough to ideal for that engine to run. Changing jet sizes or bleeds from there is a familiar task for many old-school hot rodders as well. If the carb settings get us somewhere around “14ish”, it runs pretty well at idle and part load. If the secondaries get us to somewhere around “12-13ish” at WOT, it makes decent power too. The biggest hangup is usually with significant weather changes, but many of these cars are only driven in fair weather anyway. I have not met too many guys that re-jet their Holley double pumper for winter storage.
Ignition Timing is King
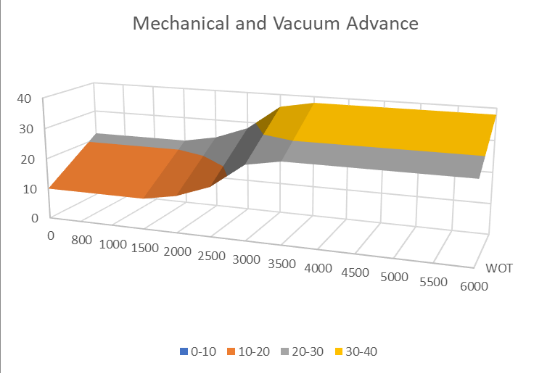
When we go to the dyno, we quickly discover that even across a range of WOT air-fuel ratios, the spark is king when it comes to making power. Using pump gas, we are almost always knock limited on how much ignition timing we can run, which then determines how much torque or power the engine makes. Using the crude mechanical and vacuum advance controls of older distributors meant that we only had a few adjustment points with which to work.
Base timing was often not quite right for idle, but required vacuum advance for low-speed cruising. There was no active timing control for idle speed that would help center us on a target RPM. With a mechanical advance, we got all the extra speed-related timing by about 3000rpm. We were limited by knock near peak torque too. This means that whatever total timing we had at peak torque was probably also the same as what we’d have near peak power and even up to redline.
I need to pause for a moment to remind readers that picking ignition timing is really all about matching the peak in-cylinder combustion pressure to a point in the cycle where it has the most leverage on the crankshaft during the power stroke. This almost always correlates to a location of peak pressure of about 12-15° ATDC. (CA50 of 7-9° for you engineering geeks) We move ignition timing to compensate for different burn rates associated with engine speed, cylinder filling, temperatures, dilution, and more. Whatever timing value we use to get this is called MBT (Max Brake Torque) timing because it results in the best possible torque for that exact condition.
We almost always find that adding in more ignition advance above the torque peak RPM adds power up top. This is because the actual load in each cylinder event is dropping slightly as we pass peak torque, which slows down the combustion process a bit. We take advantage of that in modern EFI systems by advancing the timing to get the burn to happen at an earlier point in time where it has more leverage on the pistons to make power. With a mechanical advance, these more complex curves are not possible.
What if We Added *Just Enough* Complexity to Make It Cool?
Here’s where the magic of electronic controls has the opportunity to shine. Using a computer-based controller, we can draw whatever ignition timing curve we want at WOT across the whole rev range. We can also vary the amount of advance at light load to improve cruising fuel economy and part-throttle responsiveness. We can even use timing as a lever to give us better idle control. The added number of breakpoints gives us more resolution in both axes. Even better, we can add other control factors such as intake air temperature or coolant temperature too.
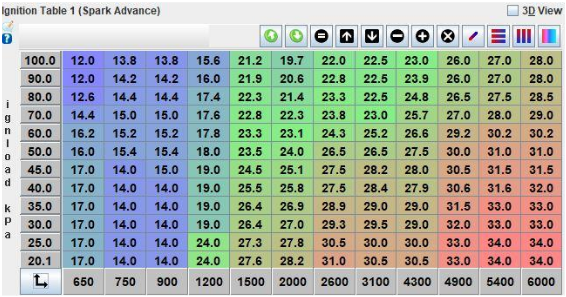
Using the increased resolution, we can now program the ignition control to bring the engine to either MBT timing or the knock limit almost everywhere. This lets us extract much more power and efficiency from our engine. We then are able to protect our engine from damaging knock near peak torque, while adding some of that timing back in at 5000rpm to free up horsepower that would have been lost if we were limited to whatever maximum timing we could run at only 3500rpm. Safely adding another 5-6° of timing (or more, depending on the engine) at peak power can mean solid double-digit increases in power to the wheels.
In cases where we have a larger cam with significant overlap, we can find it very helpful to add even more timing advance at light loads and low RPM. This can be done without over-advancing the timing at medium speeds where the ram tuning begins to work better. A load-bearing dyno is great for dialing all of this in later.
Take Control
Installing all of this is actually pretty easy. The Megasquirt family of controllers already accepts a wide range of distributor signals. If we’re running a single coil to a distributor, we don’t need the complexity of a separate crank and cam sensor combination. We can settle for almost any distributor that makes a trigger signal for each cylinder and set it with a timing light as before. Dave used a drop-in Ford TFI distributor on the 302 in his 1967 Mustang. When we did a similar upgrade to a 1970 GTO Judge with a Pontiac 400, we were able to drop in the electronic distributor from a 301. There is a good junkyard option out there for almost any application. The forums provide a wealth of knowledge here too. The punchline in the garage quickly became “8 wires!”
Of course, if you’re really looking to get more, the option still exists to run more coil packs or coil-on-plug ignition for superior spark energy.
Cold, Hard Facts
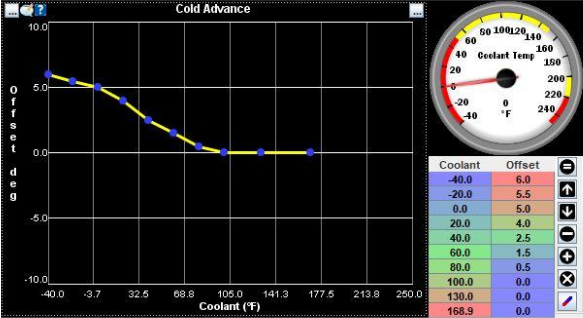
Traditional distributors have no clue how warm or cold the engine is. We usually set the ignition timing on a fully warmed-up engine and accept that it’s going to be compromised during cold starts and warmups. The colder engine chills the combustion chamber and can slow down the overall heat release to the pistons. But by adding an ECT sensor somewhere in the water jacket, we can now populate another table to add some timing when the engine is cold and once again improve both efficiency and cold driving behavior.
The Smart Addition
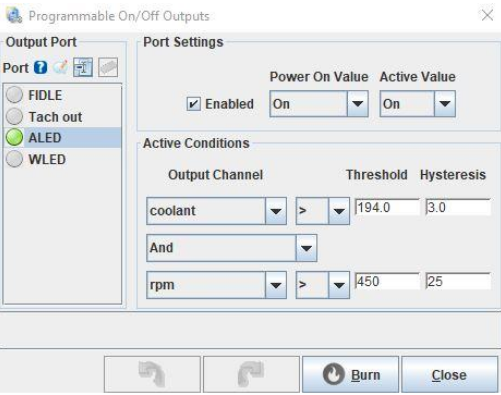
If we’re going to put a coolant temp sensor in, we might as well use it for fan controls too. The MicroSquirt ECU has programmable On/Off Outputs that can be configured to operate based on this measured coolant temp. We just need to run a wire from that pin to the cooling fan relay to get automatic control there too. Switching from a mechanical fan driven by the engine to an electrical unit can free up another 10hp (or more in some cases) at WOT while allowing full fan flow when stuck in traffic at idle. Another win-win solution.
Did I mention that a MegaSquirt can also trigger Nitrous Oxide system solenoids too? Just add a throttle position sensor and you can replace those unreliable WOT switches and add protection for coolant temp triggering and spark retard while the nitrous is flowing. This is a huge improvement over the basic activation setup from most kits.
Don’t Miss This Big Improvement
Another key input to spark control on modern engines is inlet air temperature. When I teach my live classes I like to ask the simple question “Isn’t it easier to burn things when they’re already warmed up?” I get a lot of head nodding from that one as students suddenly realize why the IAT sensor has such a big impact on spark advance.
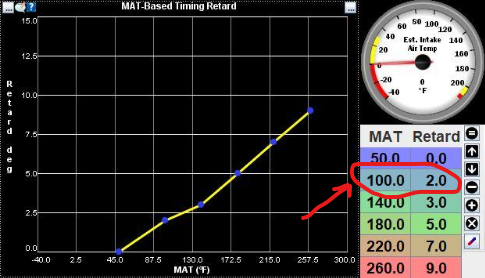
The extreme case of WOT timing drives this home where we know that hot temps can lead to spark knock and potential engine damage. Damaging knock aside, there’s still an efficiency and MBT timing influence of intake temperature and spark that should be accounted for at part throttle too. The OEMs rightly pull timing at high temperatures, and the MegaSquirt ECU can do the same thing using the MAT-Based Timing Retard function. Likewise, cold inlet air will tolerate (and even want) a few extra degrees of timing before reaching normal operating temperatures.
Tuning Trick

Since the MS ECUs don’t do a negative retard, I like to set this whole table up with a few degrees of retard being taken out even at a “normal” manifold air temperature of about 100° F. Then, I can just add that same 2° into the base spark table knowing that it’s being pulled out at normal operating temperature. Then, when we really do get colder inlet air, the ECU can respond by adding a few degrees of timing. In reality, it’s just not taking the “normal” 2° of retard out, but the result is mathematically the same and gives us a vehicle that makes more torque with cold air. If we want more final timing delivered under normal conditions, we can always just add to the numbers in the base ignition table.
Is the Juice Worth the Squeeze?
The opening question in this discussion centered around where we might find the biggest improvement. Is it really worth the effort to replace a working distributor with more complexity? If you see air temp changes of 50°F or more, there are certainly benefits to be had by allowing more adjustment. We also unlock some hidden horsepower at the top of the rev range as we step away from having our total advance dictated by knock limits at the lower peak torque speed.
By adding electronic spark control to the carbureted engine, we were able to take advantage of many of the key performance and drivability benefits in a complete EFI system. Better yet, we did it on a fraction of the budget. And… if we ever do decide to replace that carburetor, choke, accel pump, and air bleeds with some fuel injectors, we already have a lot of the work done. Win-Win-Win. Don’t be afraid to jump into electronic controls on your classic vehicle. The results are definitely worth it.