December 2009
Jeff Linfert from Atlantic Auto Works/Boles Motorsports in Melbourne, FL submitted a writeup on how to modify GM DIS coils packs to stop using the internal ignitors allowing you to fire the coils directly from your MegaSquirt ECU (via BIP373’s or possibly an external ignitor). He’s chosen to go this route because these coils are so readily available in any yard you might go to, and while the coils are good the built in ignitors can be a bit flaky. Here’s how to de-flakify them and get your fire burning.
Modifying a GM DIS ignition module for direct coil control
Everybody knows that you can find GM DIS coil packs everywhere, but the ignition modules can be a little flaky. The coils themselves are great: easy to find, hotter coils are readily available from MSD, ACCEL and others, and you don’t need funky plug wires (Ford EDIS).
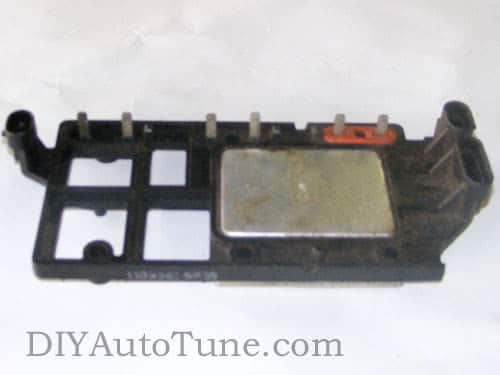
I have a simple way to modify the ignition module so Megasquirt can directly control the coils. The example I’m using is a 6 cylinder module from a 3.1L engine but it can be done with 4 cylinder modules and even 8 cylinder Northstar modules.
Ok, below is a photo of a 6 cylinder ICM
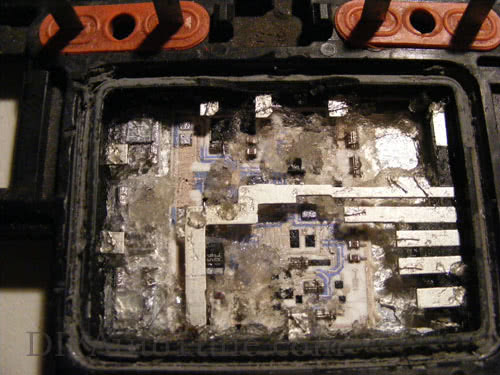
Note the silver metal cover. The first step is to remove it. I use a razor to cut the adhesive around it and the pry it off with a small screwdriver. The ICM should now look like this:

There is clear potting goo covering the electronics, remove as much as you can, also cut all of the fine wires out.
The 2 pin connector on the left of the ICM in the first picture is where you apply power. It will feed all three coils through the vertical spade connectors (1 of each pair will be hot, usually the outside ones, check with a multimeter)
On the right side of the ICM there are 2 connectors, one has 3 pins, the other 6. Ignore the 3 pin connector.
Using your multimeter again check for continuity between the pins in the 6 pin connector and the metal tabs that were covered with potting goo. The first 4 pins from top to bottom correspond to the 4 tabs on the right of the picture above (bottom of page 2). Next you need to find out which tabs connect to the 3 vertical spade connectors that DON’T get battery power. On this module they are the 2 on the left side of the cavity and the top left tab.
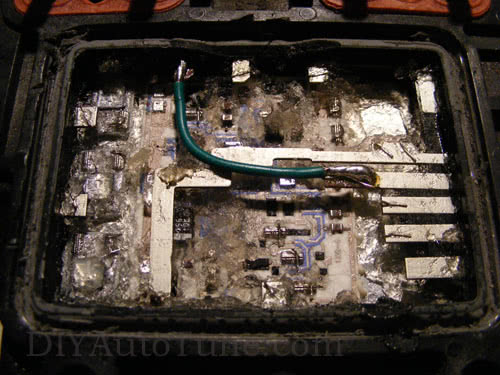
So now you just solder a jumper wire from 1 tab on the right to a tab that connects with a spade connector.
Then solder a second jumper:
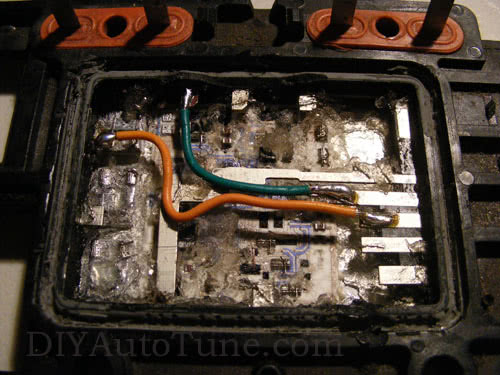
And finally a third:

Once this is done I put some silicone RTV over the solder joints and replace the cover.
Then you can install the coils, bolt everything to the mounting bracket and mount it in the car. The wires that used to trigger the ignitors will now trigger the coils directly, allow you to put the ignitors in the ECU or to use an external ignitor box.
The best sources for these coils at the junkyard are 2.2L Cavaliers, Sunfires, or S-10 pickups for 4 cylinder models 2000 to 2003 models work best and are easiest to access. Be sure to get the connectors as well. Any 3.1L or 3.4L equipped GM vehicle from 94 to 2002 works for 6 cylinder versions and Northstar Cadillacs for 8 cylinder versions.