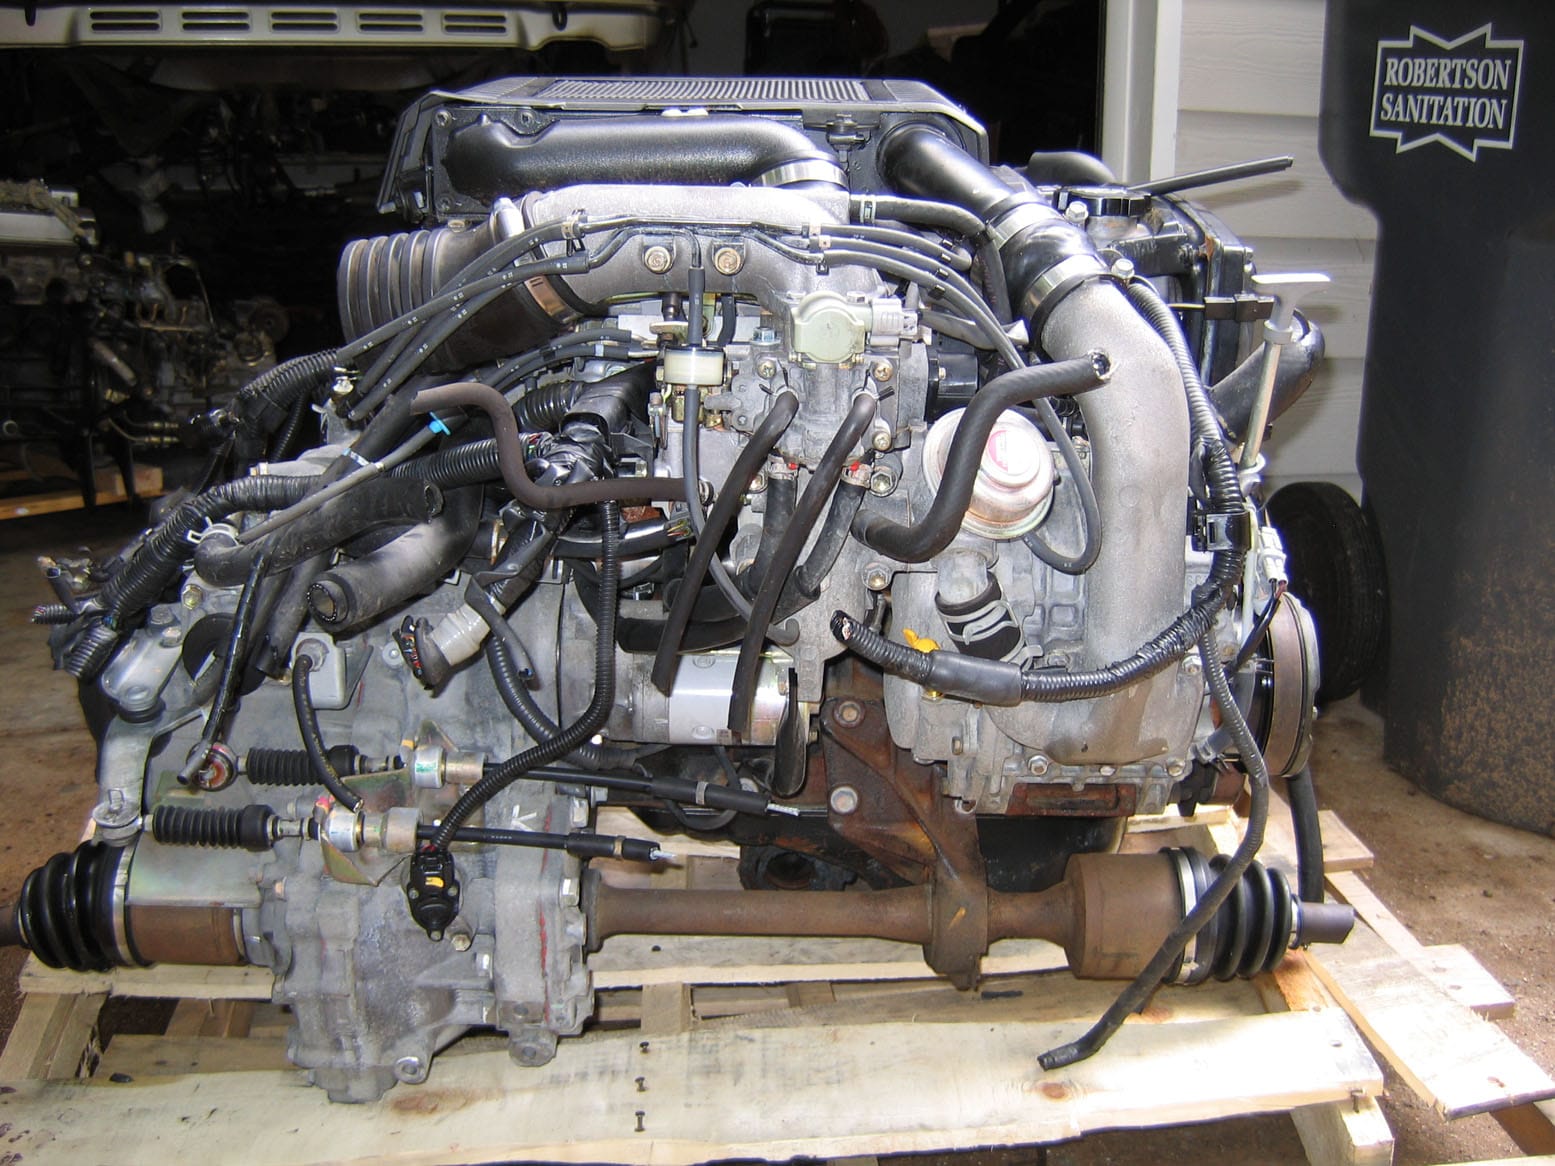
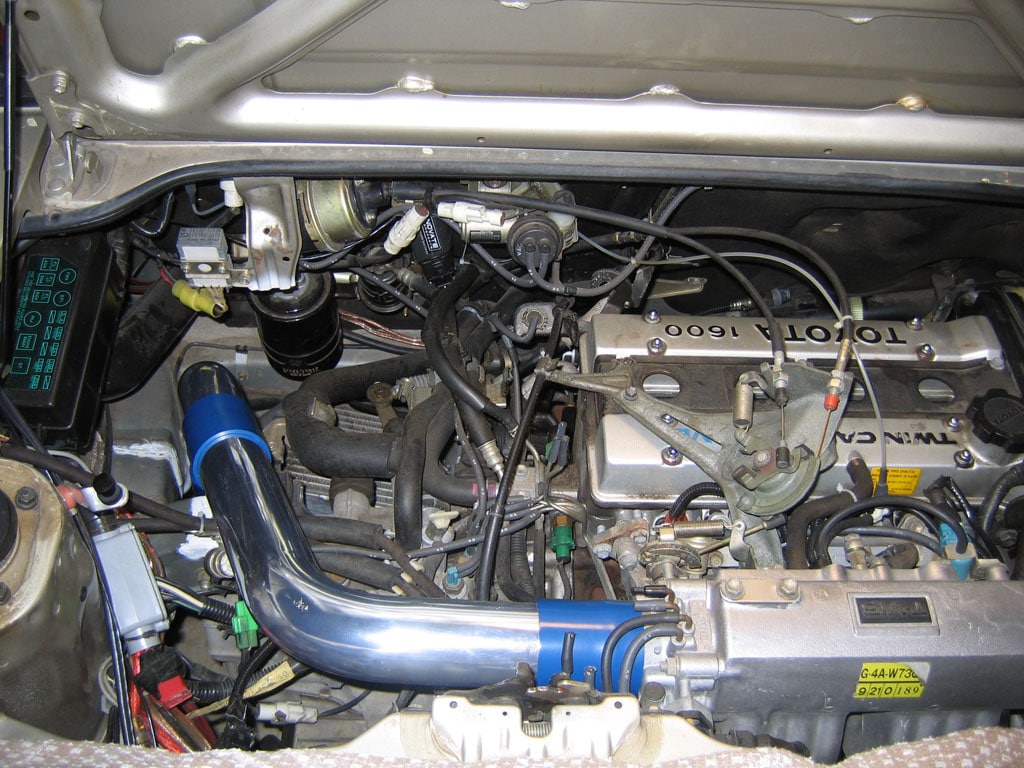
Complete with AE101 4AGTE, T25 turbo
Running:
- MSPNP Gen 2 plug and play ECU
- Innovate LC-1 / XD-16 combo (Standalone Gauge Kit)
- Note – the XD-16 has been replaced by the MTX-L, which puts the gauge and controller in a single package.
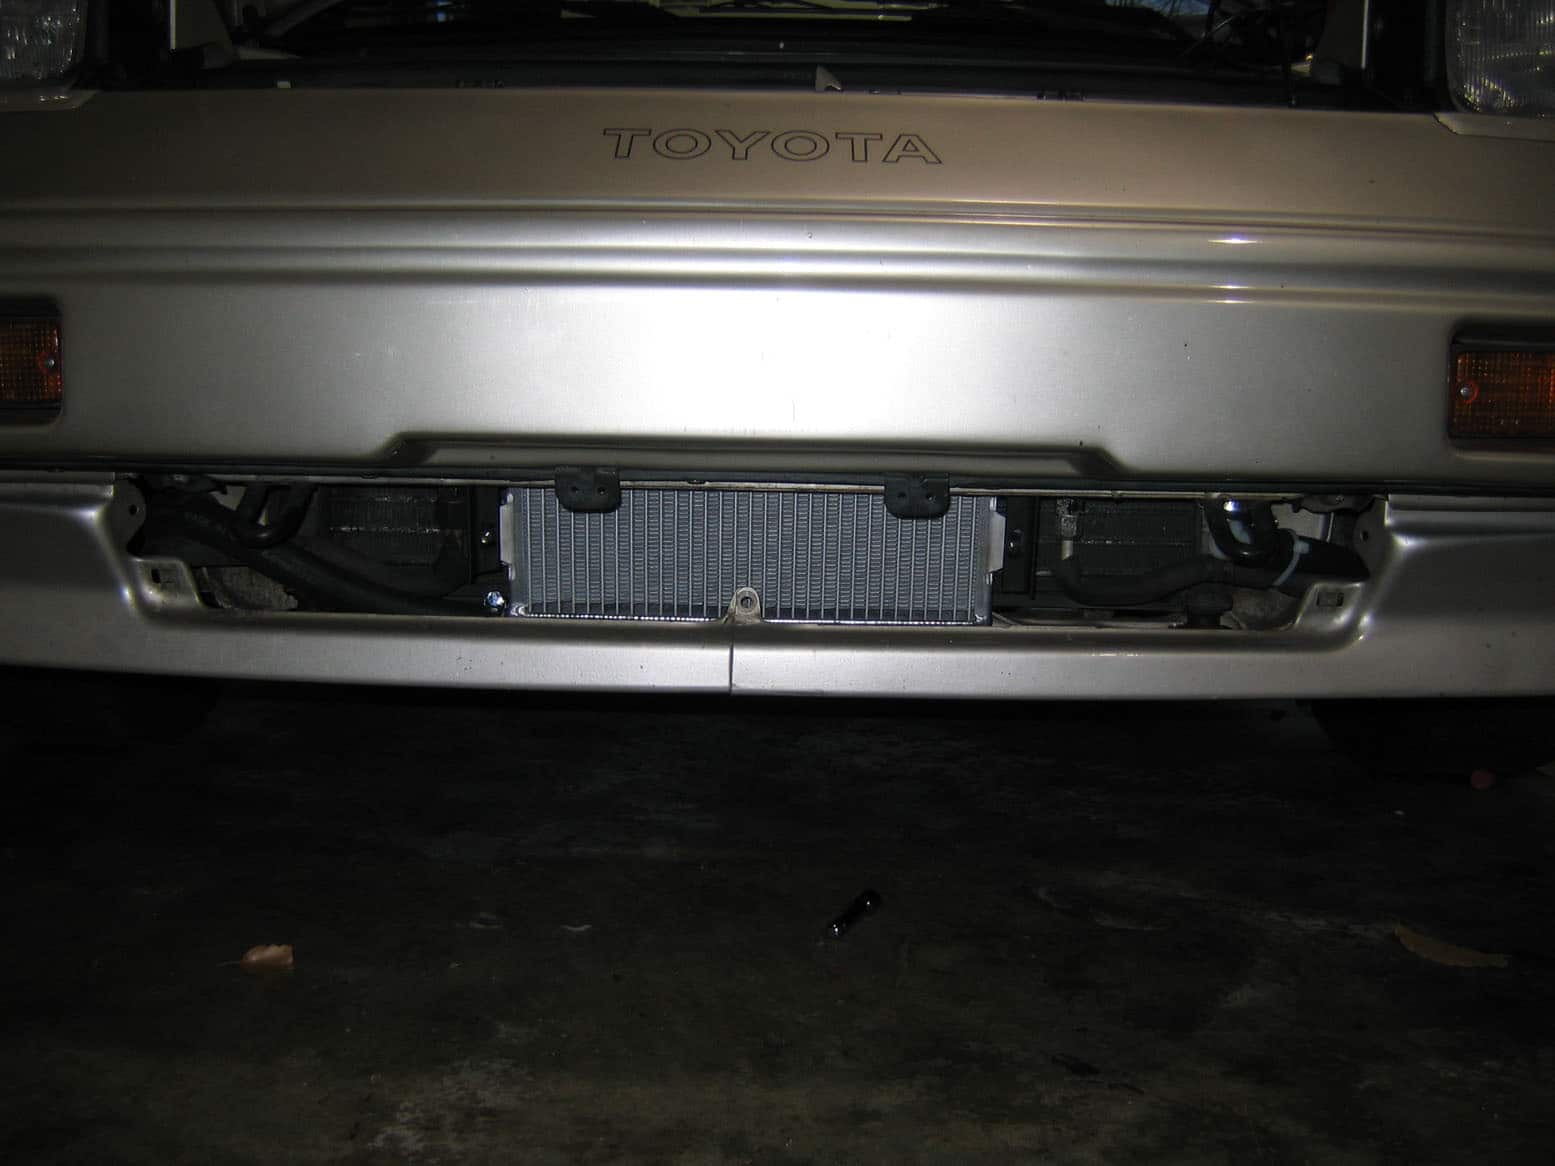
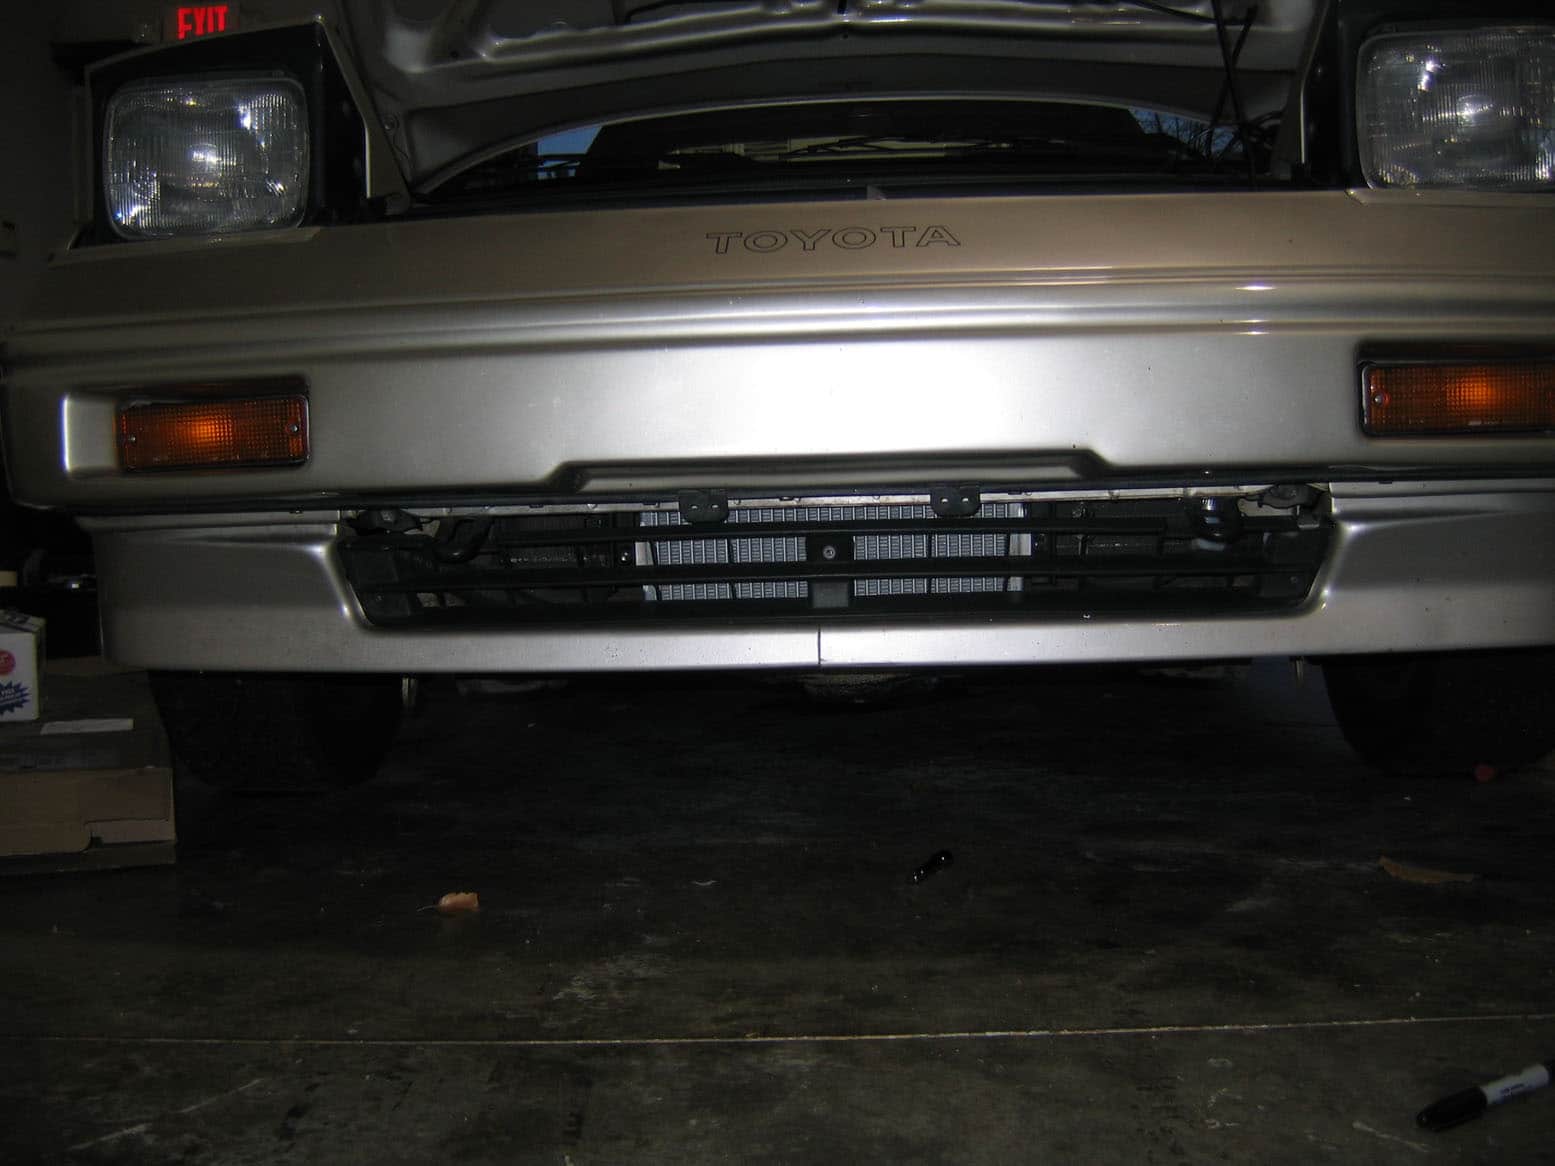
Updated 02/10/2007 – Update with W2A Intercooler Install
Bought ‘nearly new’ in August 2003 with only 34,700 original miles this car is sortof my baby… well, that was before I had a baby, and now we’ve got three! So anyways… It’s now got about 60,000 miles on it now and is still in excellent condition, and still looks pretty much just like the above pic taken when I first got it. Just with some snazzy DIYAutoTune.com decals on the quarter windows…
Engine Mods/Upgrades:
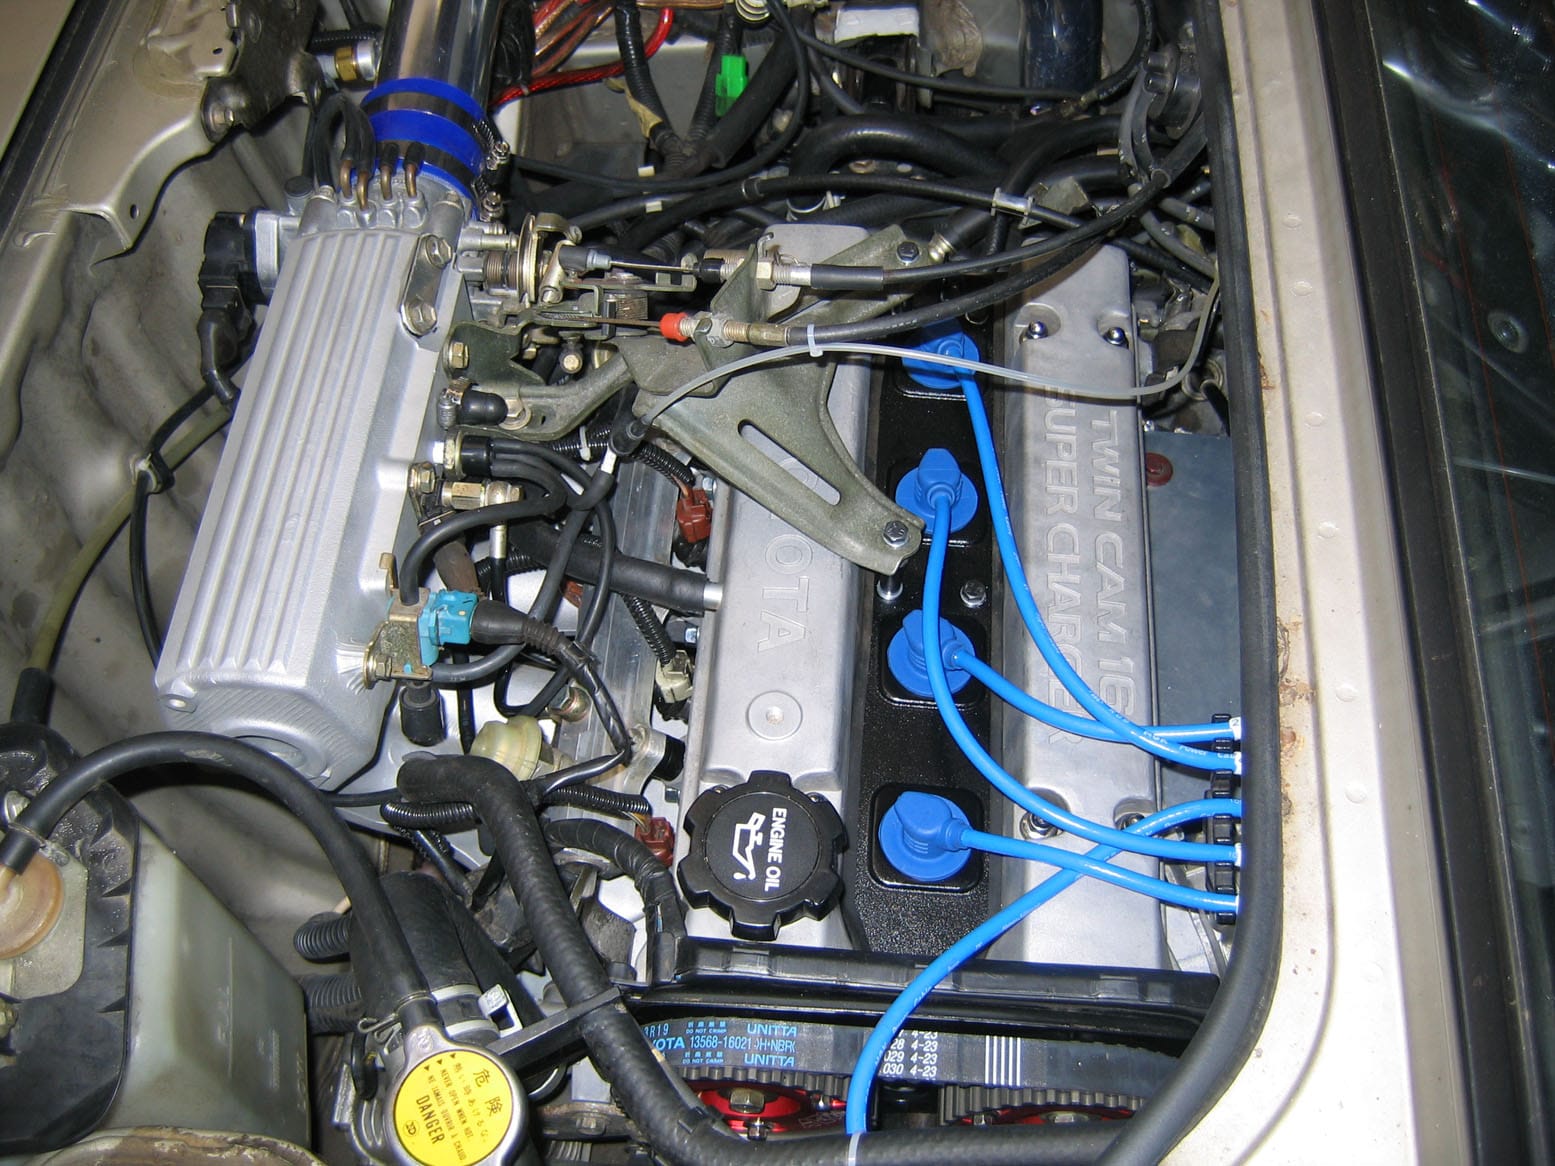
- AE101 4AGZE completely rebuilt including
- 8.9:1 Forged/Ceramic Coated Pistons (Stock JDM bits) with oil squirters underneath
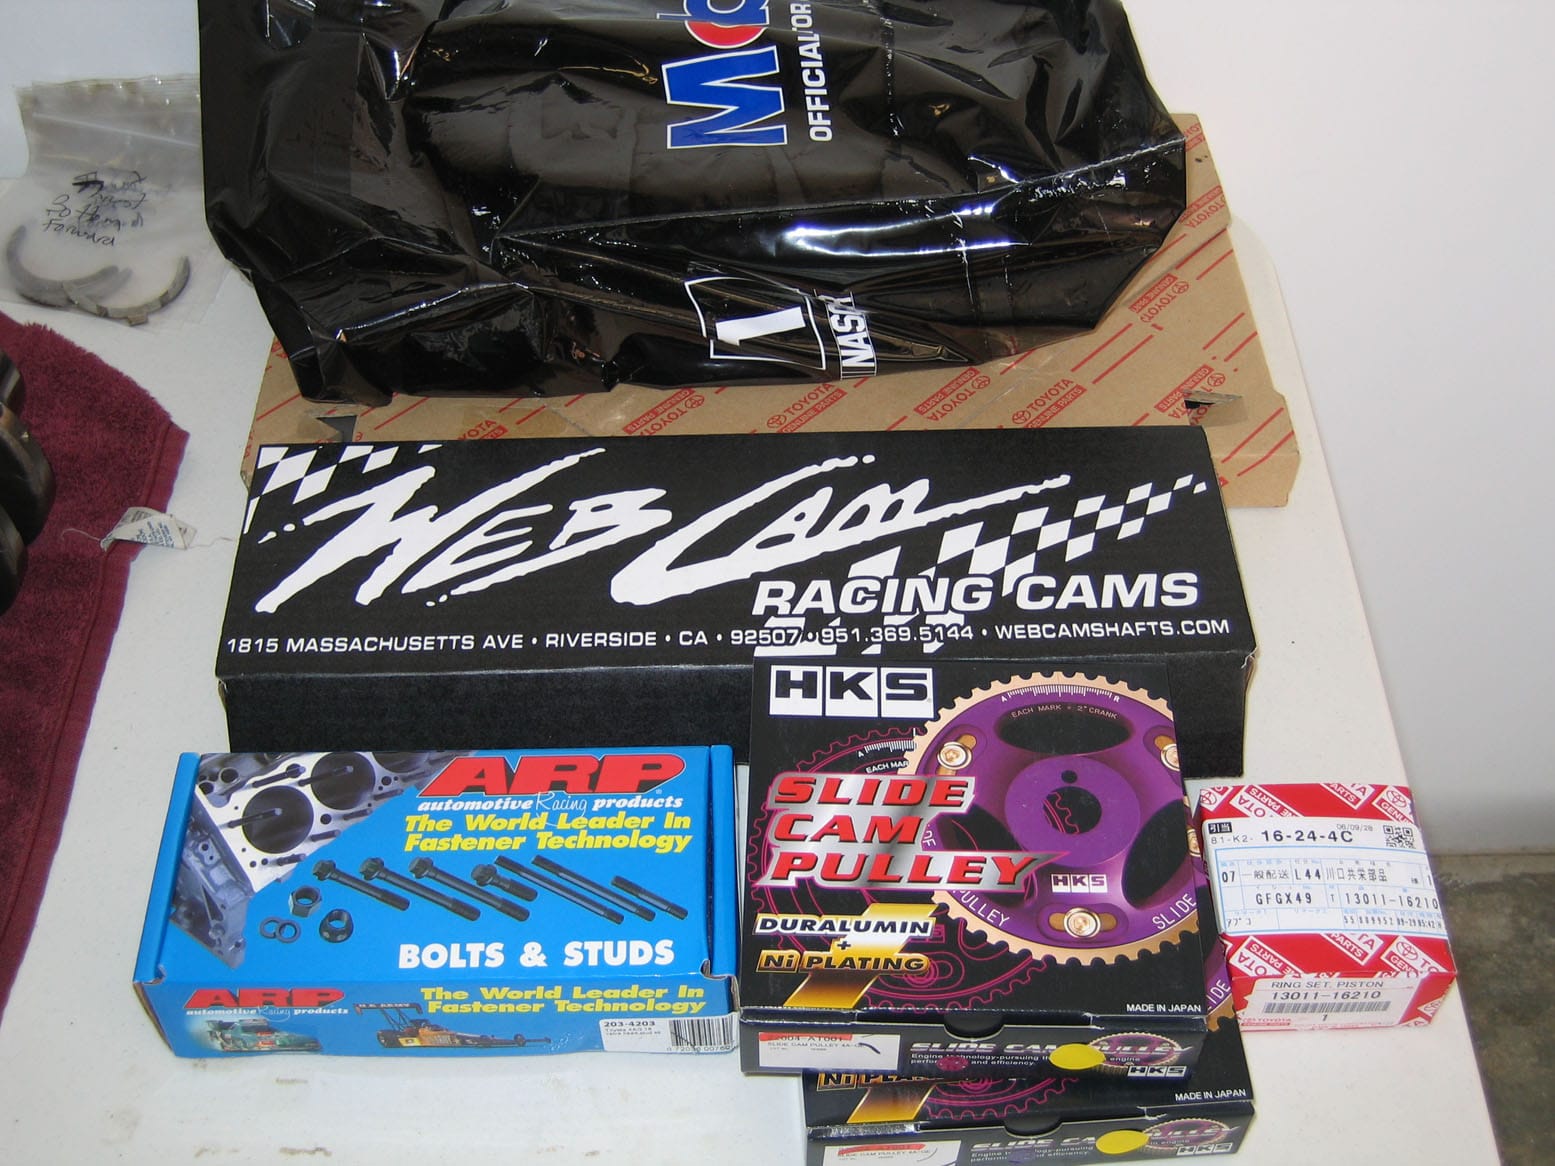
- Web Cams #294
- HKS Valve Springs
- AEM Cam Gears
- ARP Head Studs
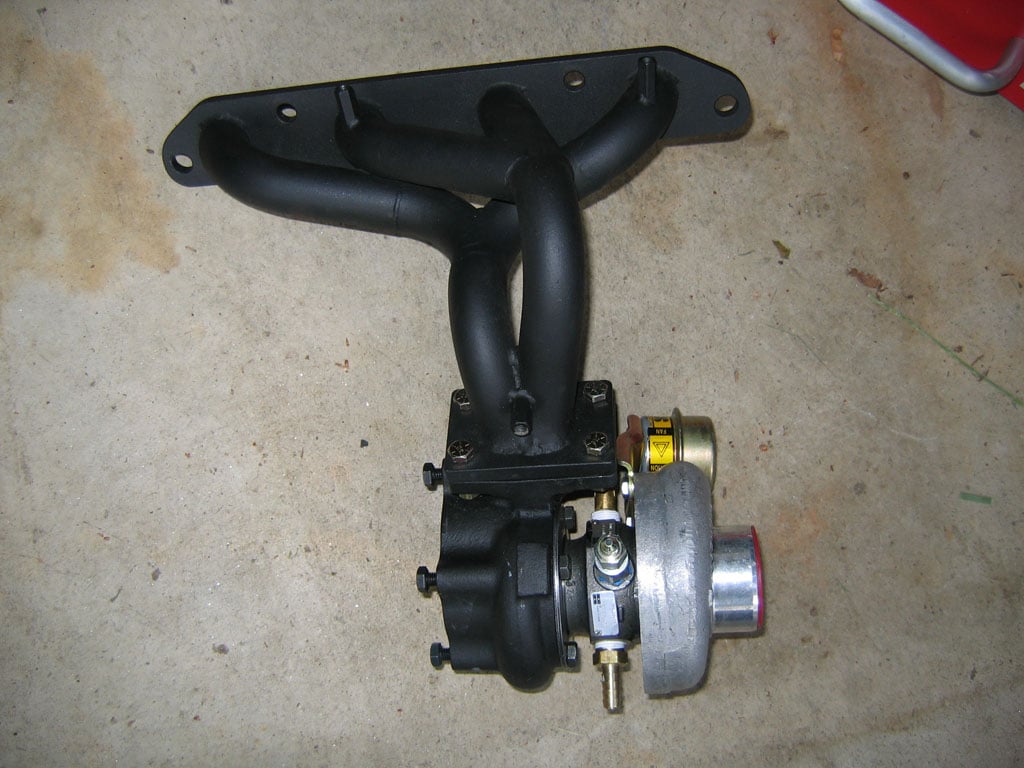
- T25 Turbo
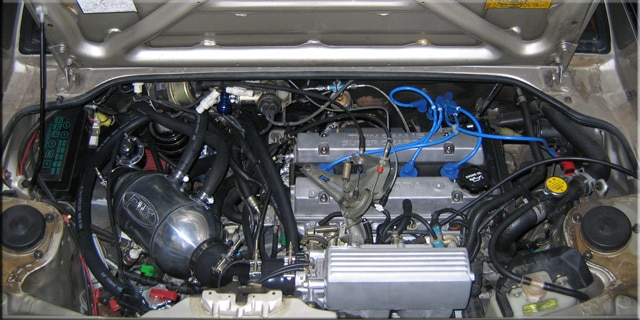
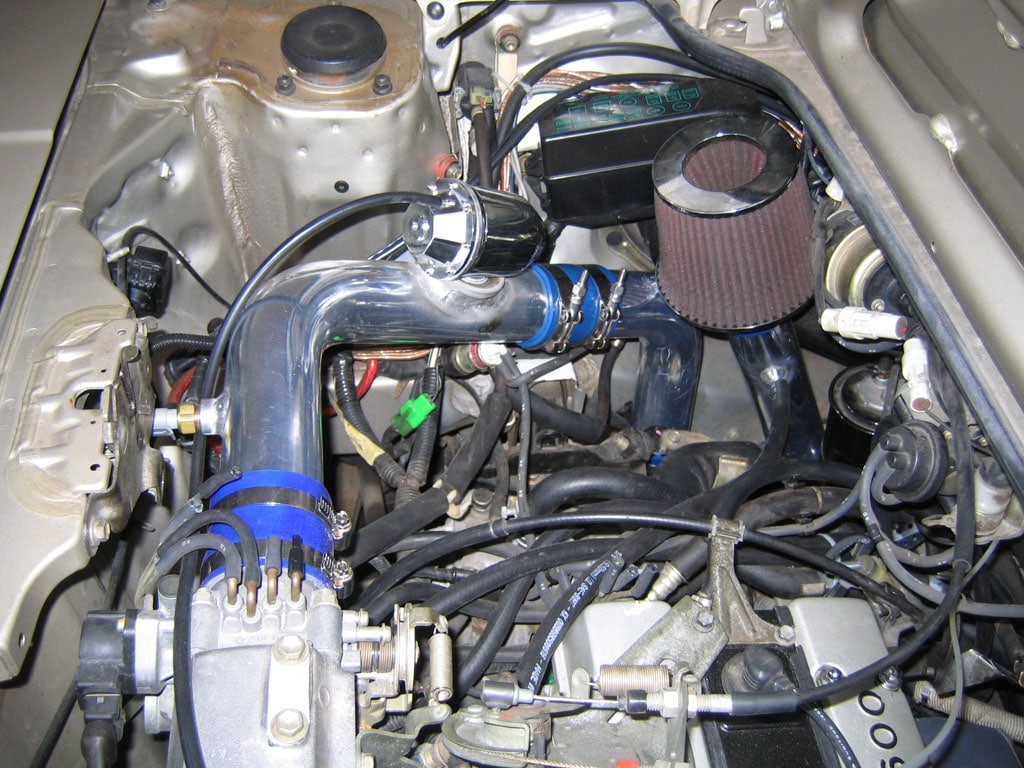
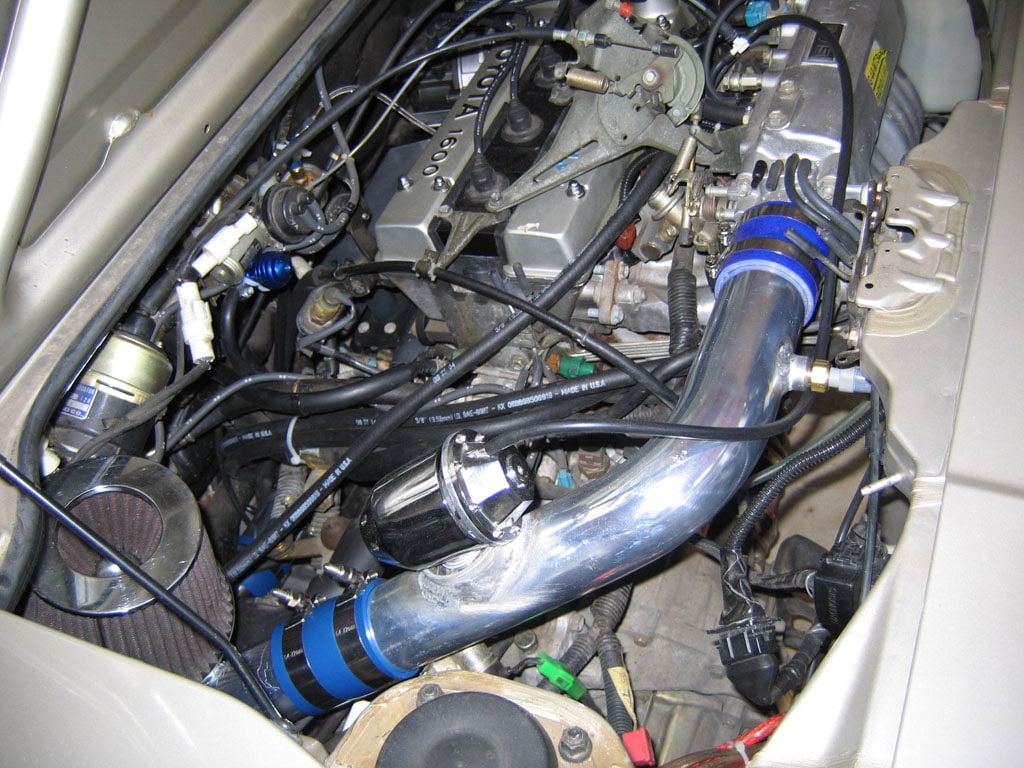
- PWR 6″x6″ Barrel W2A Intercooler
Engine Management System / Fuel System
- MegaSquirt-II PCBv3.0 firmware version 2.687
- Innovate Motorsports Standalone Gauge Kit (LC-1 wideband o2 plus XD-16 digital gauge)
- Walbro 190lph Fuel Pump
- 42lb Injectors from a 7MGTE Supra
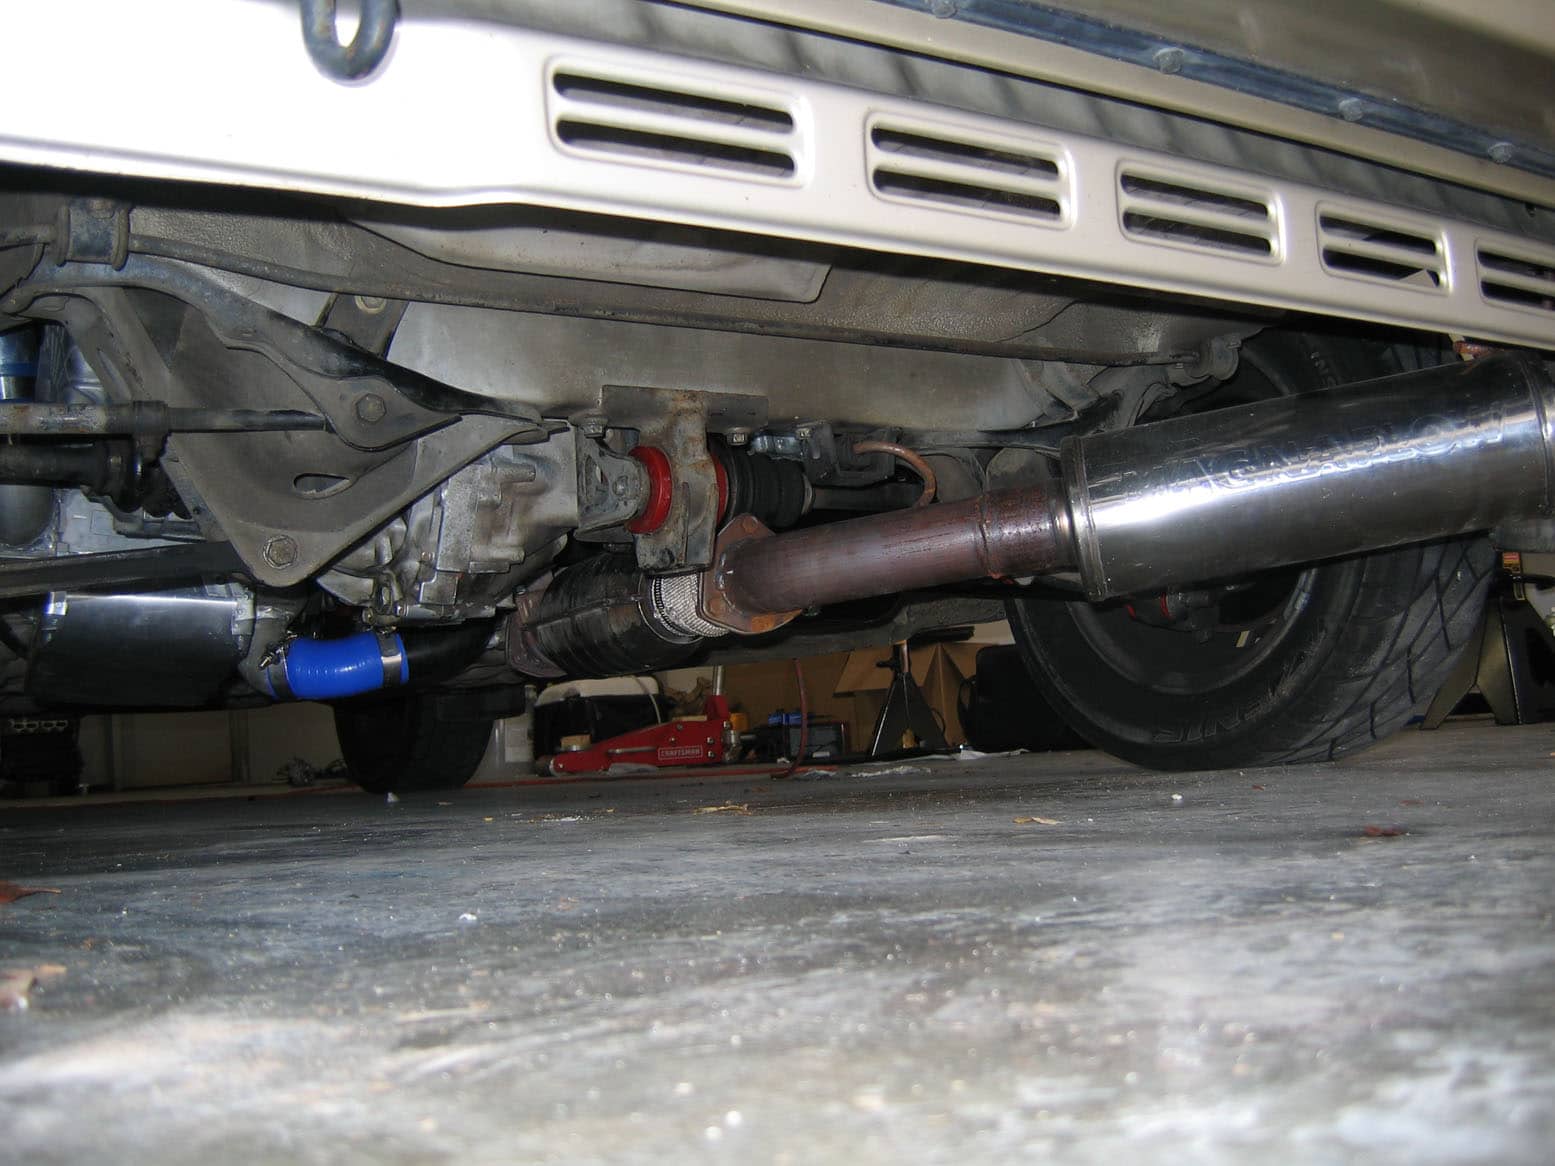
Drivetrain
- Stock C52 5-speed tranny
- SPEC Stage 3 Clutch (6-puck sprung)
- Poly engine mounts
Suspension
- Koni Sports (yellows)
- Ground Control Coilovers / Eibach 250/400 springs
- Prothane Poly Suspension Bushings
Brakes
- ’88 brake caliper brackets and rotors installed front and rear (larger rotors)
- Braided Steel Brake lines
- Axxis Ultimate Pads all around
Misc Mods/Upgrades:
- Battery relocation to the front trunk, also switched to a Hawker Odyssey PC680MJT (very lightweight)
- Battery tray removed from engine bay to make room for intercooler piping.
- Falken Azeni 215’s
What’s Next….
- GT28RS ‘Disco Potato’ Turbo (soon)
- New wheels/tires (sitting in the shop now)
- AE101 tranny w/LSD (after blowing my C50 up, or getting tired of the wheelspin)
Water-to-Air Intercooler Install
2-10-2007
This system has actually been in the car for over a month now, I’ve just not been driving it a bunch as I’ve been super busy and been using other cars for some R&D so my ‘2 has been getting neglected a bit. At any rate I figured it was time to through a few pictures up at least.
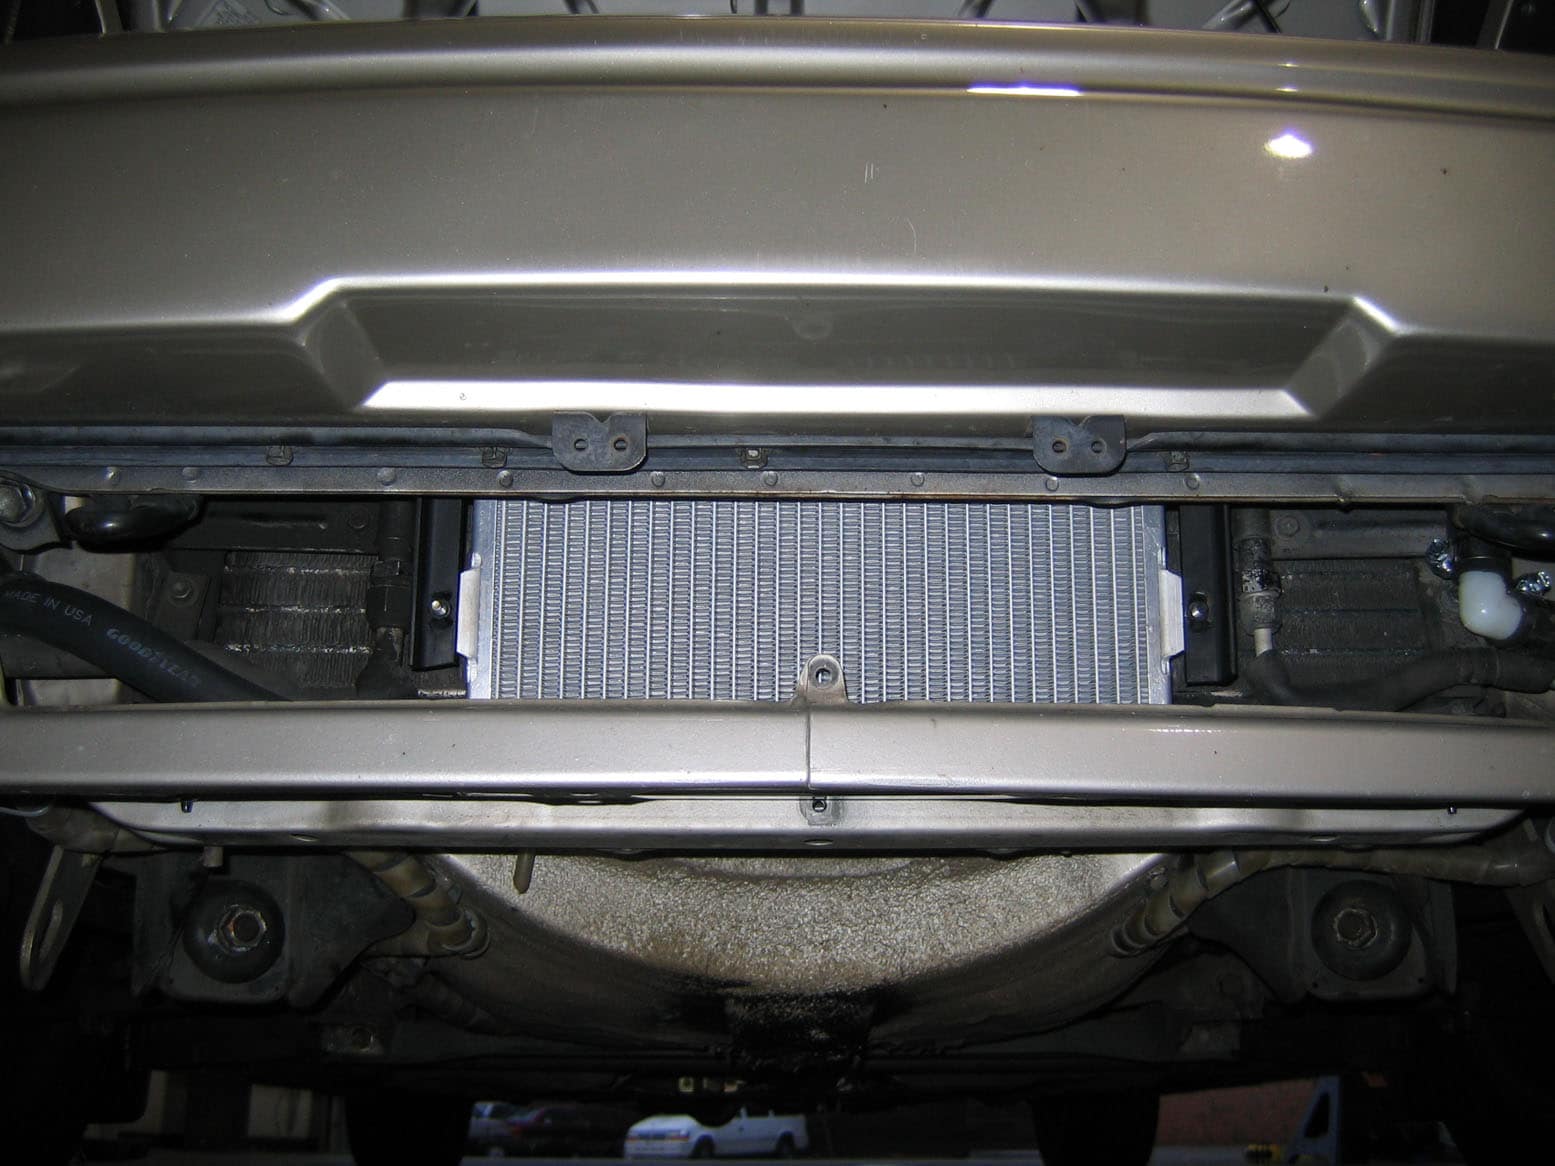
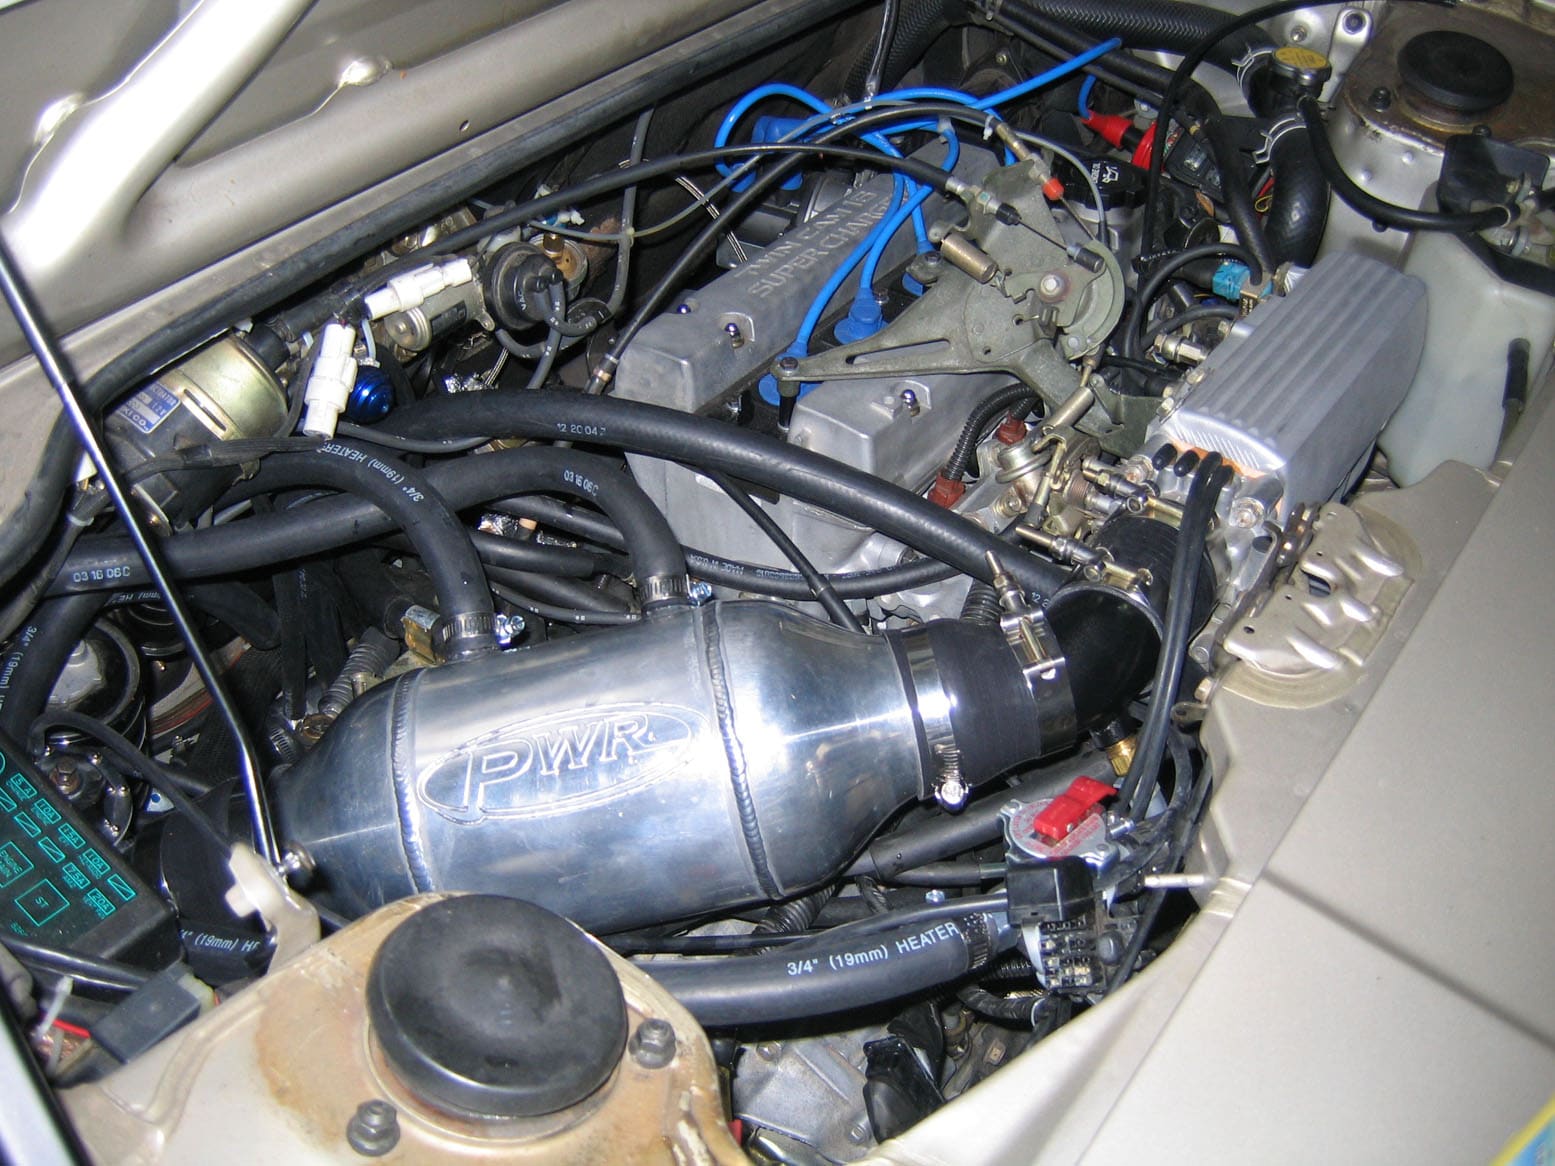

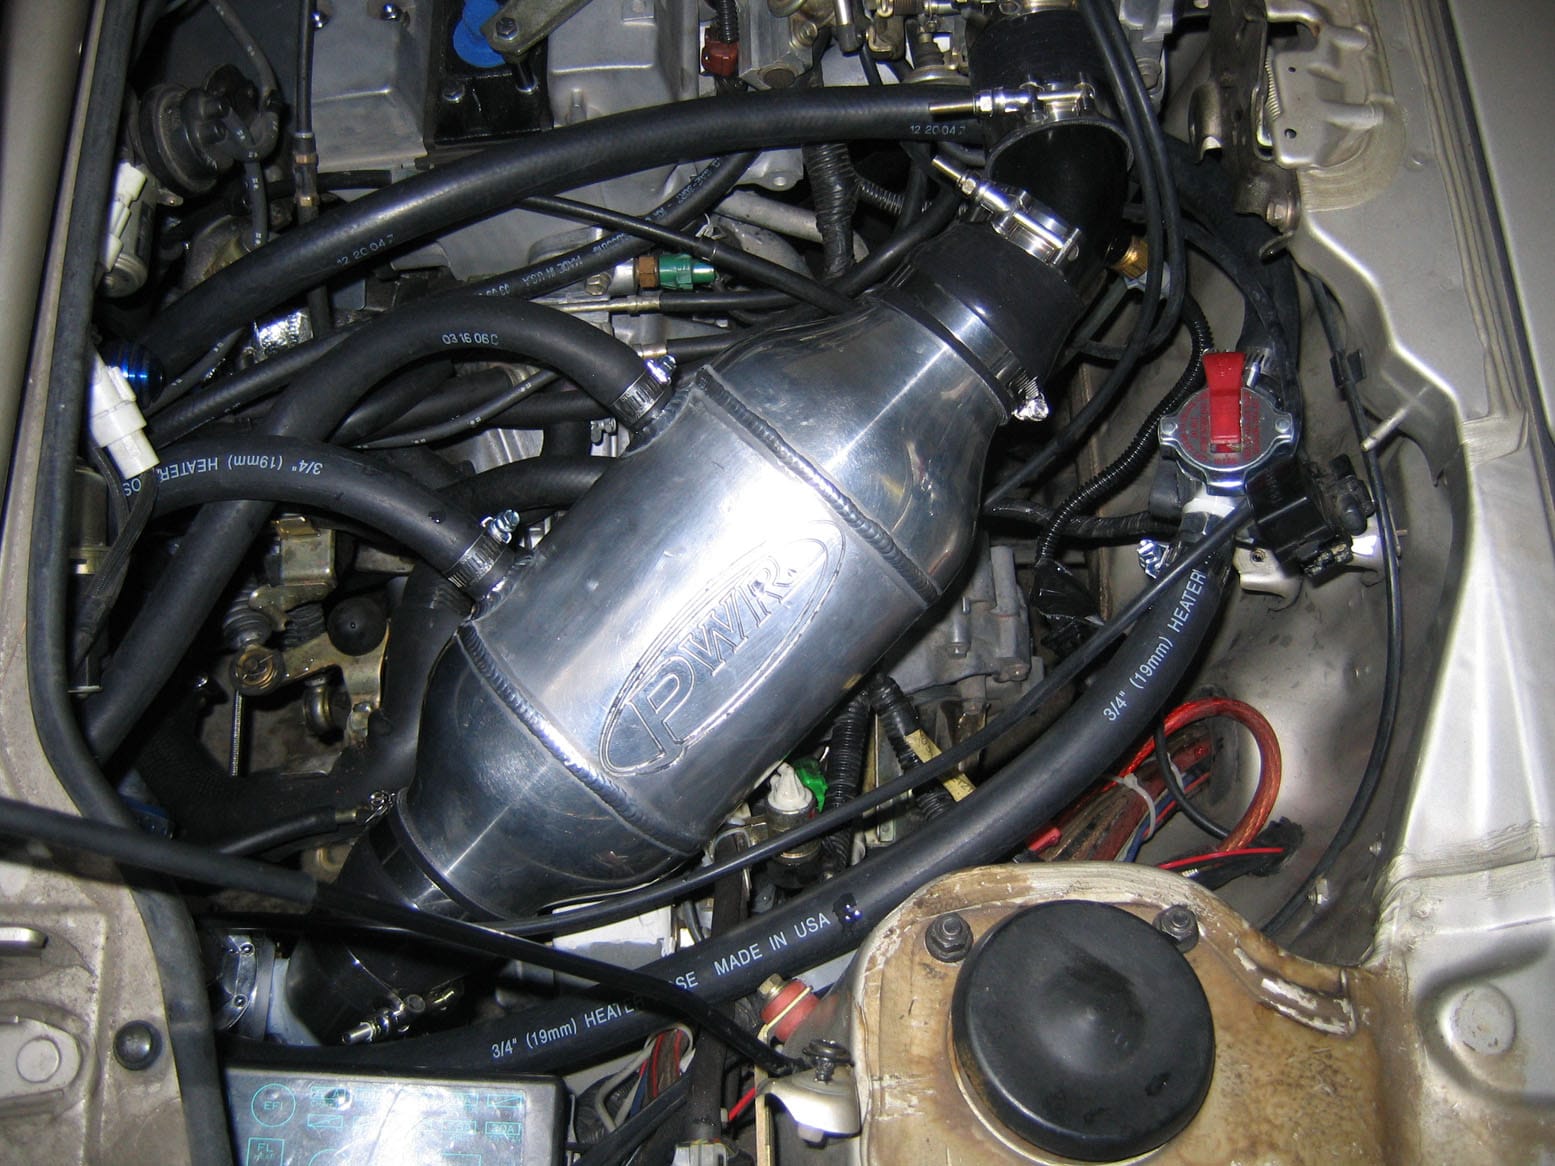
Performance wise this thing rocks– my Intake Air Temps stay MUCH closer to ambient, they still climb when I hit boost but not nearly as much and they fall back near ambient very quickly when I get off of boost. I don’t have mush for numbers right now as I really haven’t taken it out and dogged it out enough to give you good hard numbers yet that I’d rely on, but I’ll do that before too long. I just don’t want to go to jail and to drive this thing hard enough to put this to the test that would be a real risk as you need several back to back boosted runs and that means low speed to 100mph+ acceleration runs back to back for several minutes straight… I need a trackday.
I just had a lift installed in the shop last week ;). I’ll be seeing if the GT28RS will fit with the C50 tranny (and starter on the exhaust side) soon. If not I’ll be making plans to swap in the E58 sooner than I was thinking just so I can get the disco potato in there, and the LSD will be nice too ;).
Major ‘Metamorphosis’ in progress complete!
11-24-2006
Long story short I recently upgraded my EMS to a MegaSquirt-II PCBv3 unit and I’ve got it roughly dialed in. Right now timing is VERY conservative and fueling is pretty much right on in most areas thanks to the LC-1/XD-16 combo. I’ll get the timing spot on when I get it to the dyno here soon…
Pre-start leakdown test numbers:
1- 13-17%
2- 20%
3- 15-20%
4- 13-17%
I didn’t quite do a full-on ‘Mototune’ breakin on the motor, but pretty darn close. It didn’t take too long and I worked up to hitting 5500-6000 rpms with 50-70% throttle. Lots of decel vacuum, lots of accel, almost no cruise. I changed the oil at 20 miles, and again at 200, and by that point I was pretty much driving it like I stole it, not quite redlining it, but tapping 7200 here and there. At this point, with 460+ miles on it and it running strong, I’ve hit the rev limiter at 8000 a couple times (due to loss of traction) and have intentionally rev’d it out to 7600+ a few times. Running strong.
460 mile breakin leakdown test numbers (from today with motor hot):
1- 8.5%
2- 10%
3- 11%
4- 12%
That’s just darn pretty. I’m tearing up.
I just played around with boost some and I think it’s time for a bigger turbo– time to do some research and make up my mind. I’ve got it peaking out at 9.2psi at 5300rpms and then slowly tapering off to about 6psi at 7600rpms. It screams but I’m pretty sure this motor is making peak torque closer to 6 grand and my boost is already dropping there. I thought it would do more but I’m pretty sure I know why it’s not, A) the cams are going to leak a bit of boost with their longer duration compared to stock cams, and B) I shortened the wastegate shaft when I turbo’d the old motor to keep boost safe and low at first so on spring pressure alone it stays at about 4-5.5psi. I think the exhaust pressure is climbing enough at high rpms to push the wastegate back open and let the turbo slow down. Everything I’ve heard about T25’s on this motor is they should do 12psi all the way to redline so it’s got to be something like that. I’ve got the boost controller pretty much wide open at this point. AFR is plenty fat and ignition timing is well retarded until I get it on the dyno. I stepped it back even more to make darn sure I was safe.
Sure I could just replace the wastegate, or remodify the shaft to lengthen it… but a new turbo sounds like alot more fun 😉
I think I have a decent idea of where to put my heat exchanger (for the W2A) finally. Looks like that new scooped hood I have is going to work out nicely with it, the drivers side scoop (not over the engine so it’s where cooler air will be flowing) is the perfect size for the heat exchanger. I may experiment with mounting it flush with the bottom of the hood and sealing it with weatherstripping like some OEM’s do. The hood will close and make the seal. The negative air pressure outside the rear of the car (and the fan on the exchanger) with bring lots of air through it. It’s not as good as if it would fit up front in the fresh air path but there is almost zero room up there…. compromises… I think it’s a pretty good solution though– I’ll have to toy with it some more soon.
11-7-2006
The pics are finally here…. (all clickable for larger views)


If anyone’s interested here’s the datalog of my 20 mile break-in drive from yesterday. You can see I wasn’t easy on it, but wasn’t totally brutal either. I’ve put another 20 or so miles on it now and will get out there later today for more. It’s raining right now and I’m playing catch-up in the office as I’ve been neglecting a few things lately to get this finished ;).
11-6-2006 It runs!
The AE101 4AGTE is up and running! It’s been a long time coming but this thing is purring nicely, I’ve only put 32 miles on it so far but I can tell that it’s wanting to pull! The first 15 minutes were just sitting still revving between 2500-4000 rpms, followed by 20 miles of semi-hard breakin driving. Not full-on Mototune hard, but 50-70% throttle position runs up to about 5000 or so RPM followed by engine braking, over and over again. I did let it get up to 6000 rpms a few times in the process as it just jumps up there pretty fast, and that’s not going to hurt anything. I had pulled the boost controller off to run wastegate pressure which is 4-6psi and reviewing the datalogs I stayed around 4psi most of the time with a couple brief spikes to 5psi. This thing was pulling nearly as hard as my bluetop did with 8.5psi with that measly 4 lbs of boost, and that was with me never getting over 6000rpms where it was really wanting to take off.
Oh yeah, I had also pulled 5 degrees of timing from my map everywhere above atmo pressure as I need to dyno tune it before going nuts, so there is surely more power there as well.
So after 20 miles of breakin I changed the oil and drove around a bit more, I’ll put a couple hundred more miles on it gradually running it a little harder, but leaving the boost right where it is for now. Then change the oil again and let it rip. I’ll hold off on boosting it hard until I’ve got 1000 or so miles on it, or maybe a bit more, I may wait until I get the A2W IC on it (working on that soon) and swap over to Mobil1 oil after the breakin is 100% complete.
Pics tomorrow….
11-4-2006
Still no pics, but the only thing missing is oil and clutch fluid. I found a smallport fuel rail locally (thanks Russ and Huy) and bolted it up this afternoon, pressure tested the fuel system and all is fine. Filled the coolant, plugged in the last of the electrical connectors. Bolted in the throttle bracket with my newly Jerry-rigged (as my name is Jerry everything I do is Jerry-rigged) adapter to raise it up off of the SC valvecovers which are different than the bluetop covers ( bolt holts sit lower and back a bit, spacers and slotting needed on the bracket).
My wife was making up some killer dinner so I had to head home before firing it off and I won’t be making it in Sunday but I’ll fire it off for sure Monday. Check back Monday evening for pics/info and maybe some video.
11-03-2006
Figured I’d give a quick update of the last three days progress and what the holdup is. It took all of 20 minutes to hang the motor back on the mounts with the help of a lift and a buddy over at AutoFab Motorsports a couple of doors down from our new shop. Since then I’ve been reinstalling accessories, re-wiring and plumbing everything, etc and it’s all done now with one exception. There just had to be one more roadblock…. the freakin’ fuel rail that I had planned to use is from a largeport (my stock bluetop) and the smallport head has different spacing for the injectors so it uses a different rail… DOH! Anyways I did some research and found a couple of posts indicating that the 4AFE fuel rail had the same spacing as the smallport 4AG so off to pull-a-part I was. I was simply amazed to find out that everything on the internet must not be true (I know, it’s crazy) but the 4AF rail, while the injector spacing actually does appear to be right, the holddown bolt holes are in the wrong spots so it’s worthless. DOH #2! Thankfully Russ came thru again and got in touch with a buddy of his locally who was able to dig one up so I should be able to pick it up tomorrow most likely and crank this thing up.
So I was too lazy to take pictures today, but to sum it up, EVERYTHING is reinstalled except the fuel rail/injectors, the throttle linkage bracket, and I need to fill the fluids.
10-31-2006
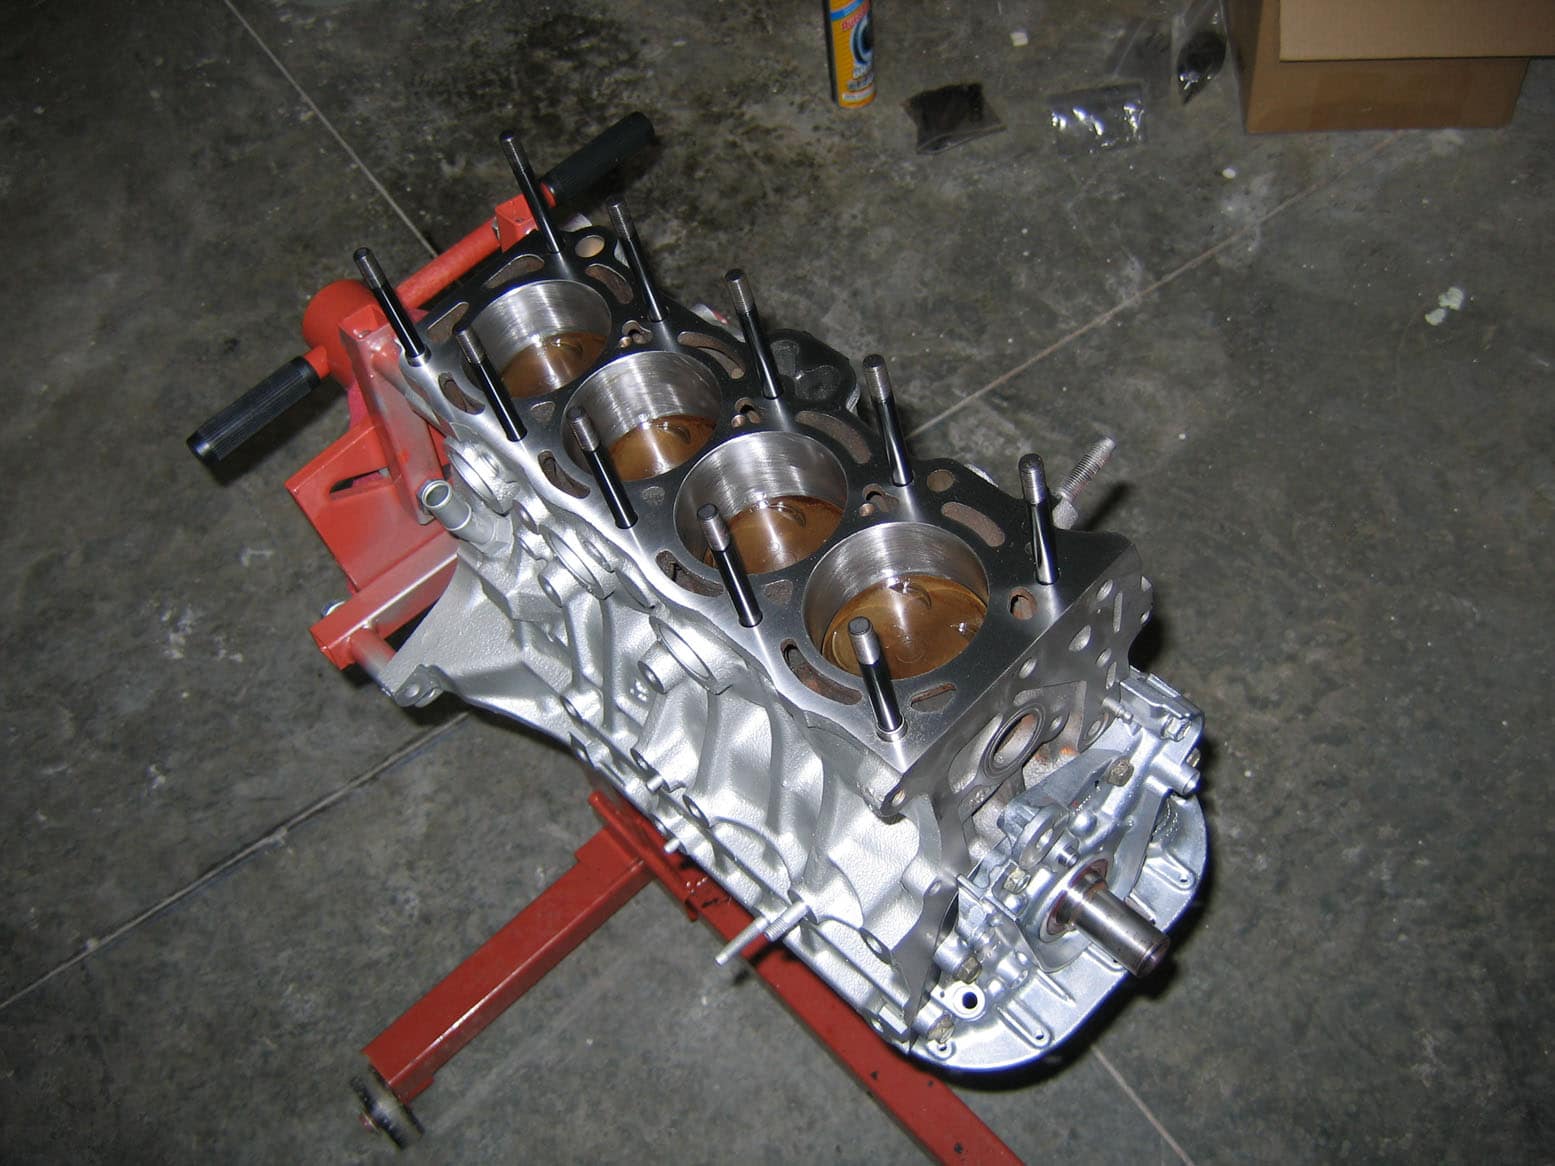
After a couple of minor delays the project still moves forward. The clutch I had originally intended to use is the wrong size. It turns out the 86 (or at least my 86) uses the later 212mm clutch rather than the earlier 200mm setup. I’ve ordered another one from SPEC, their Stage 3 which is a 6-puck sprung clutch that should still be pretty streetable though will engage quickly and hold plenty of torque. The motor is otherwise ready to go in, the valve lash is set, cams are all degreed in, I sandblasted the valve covers and intake to clean them up nicely and moved the throttlebody and other bits over to the intake in preparation for the install. Cleaned up some of the other bits as well (water piping and such) and have everything ready to install. The clutch should be here tomorrow so I’ll get at it tomorrow afternoon/evening. I don’t know how far I’ll get but it will be on the mounts and partially wired/hosed up at least.
Here’s some pics of the final touches being applied:
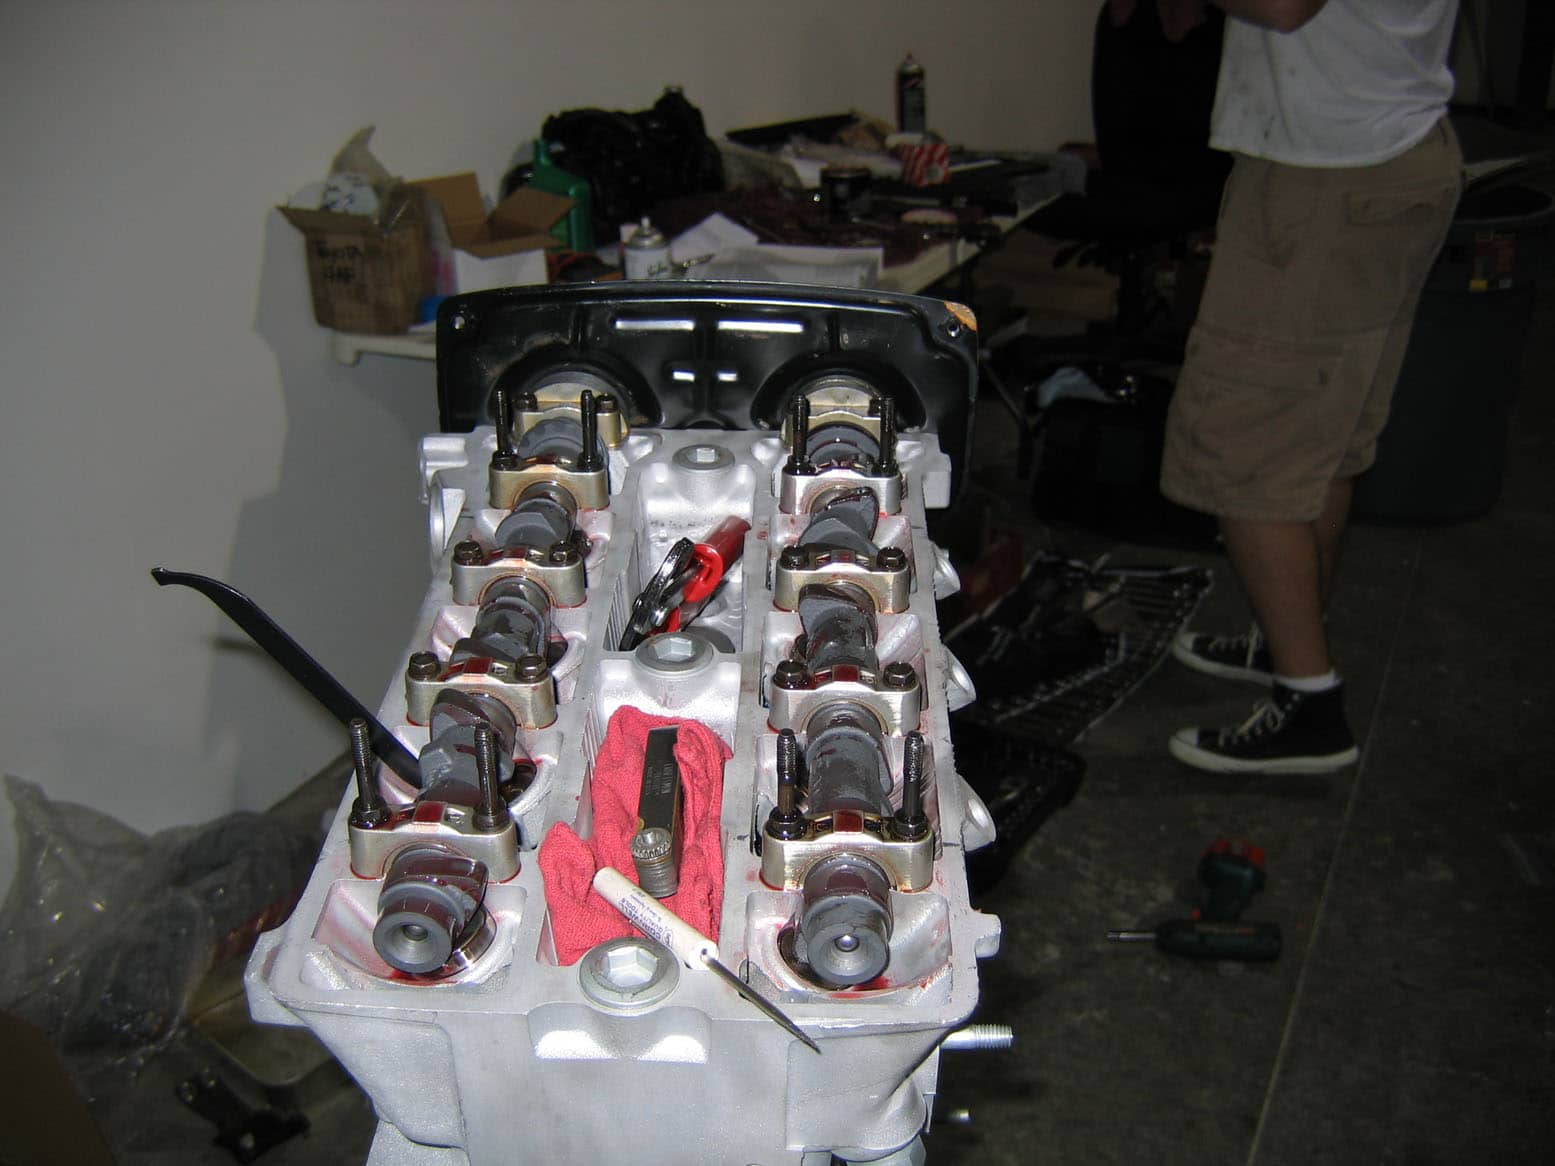
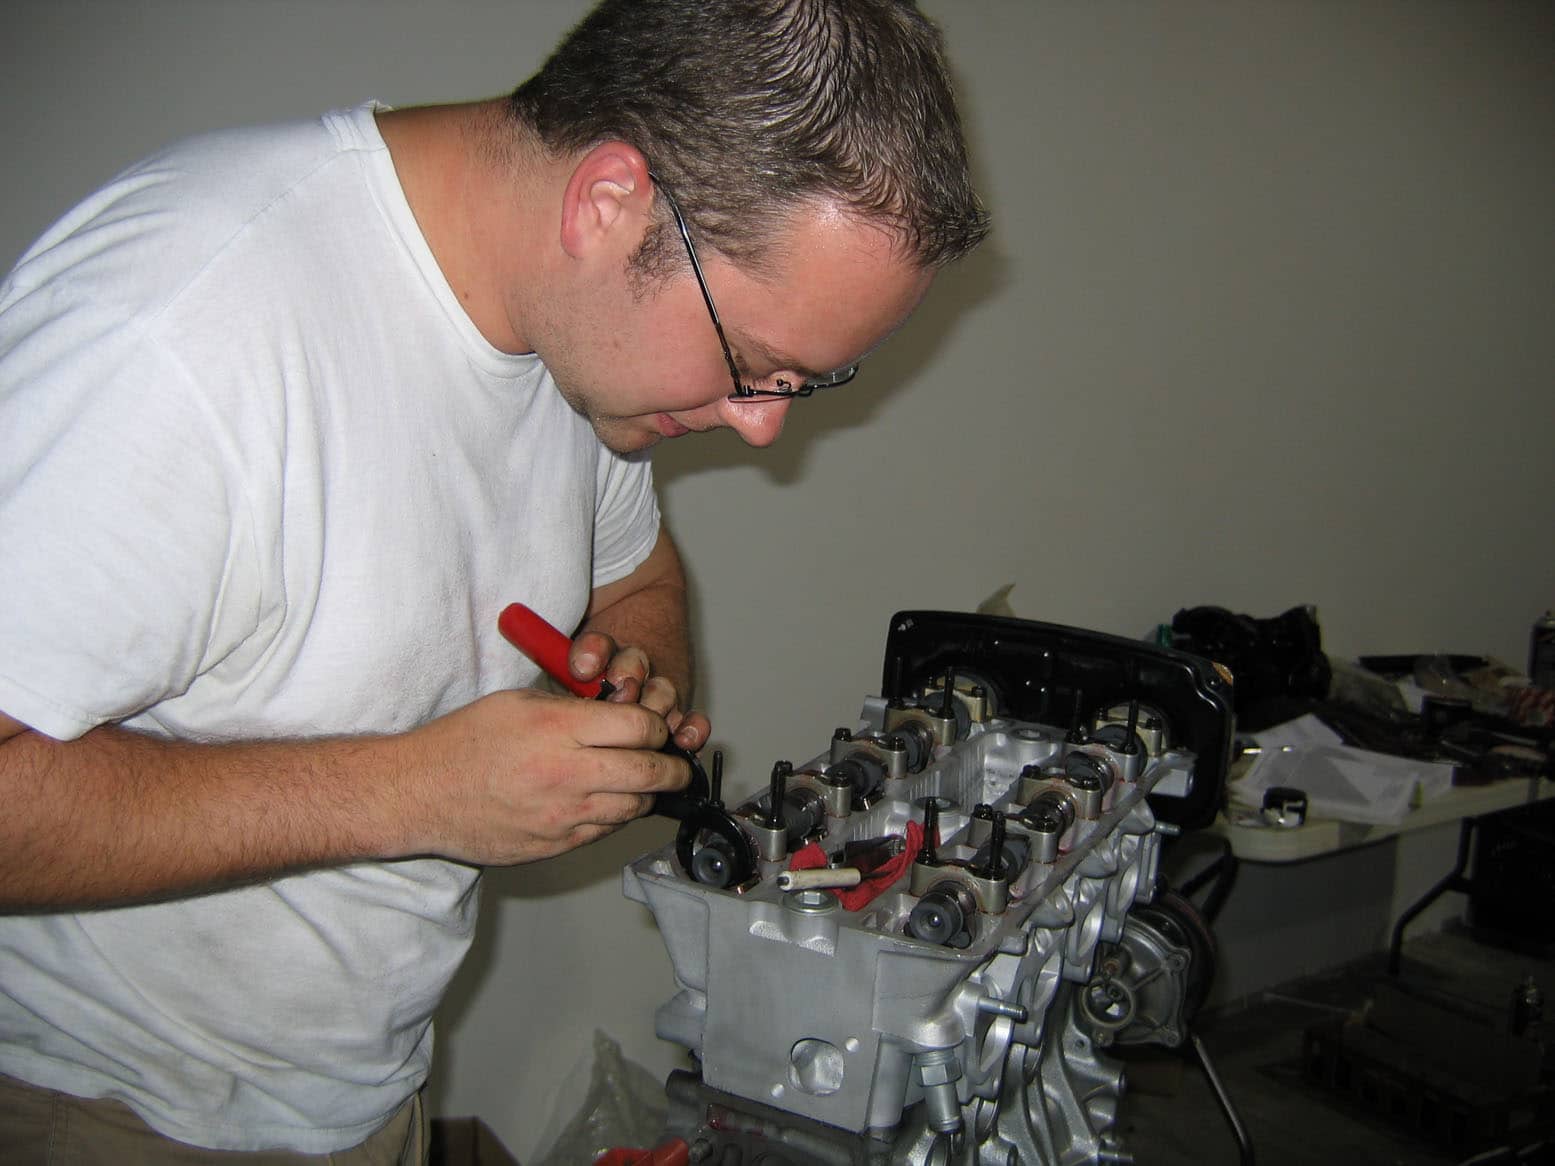
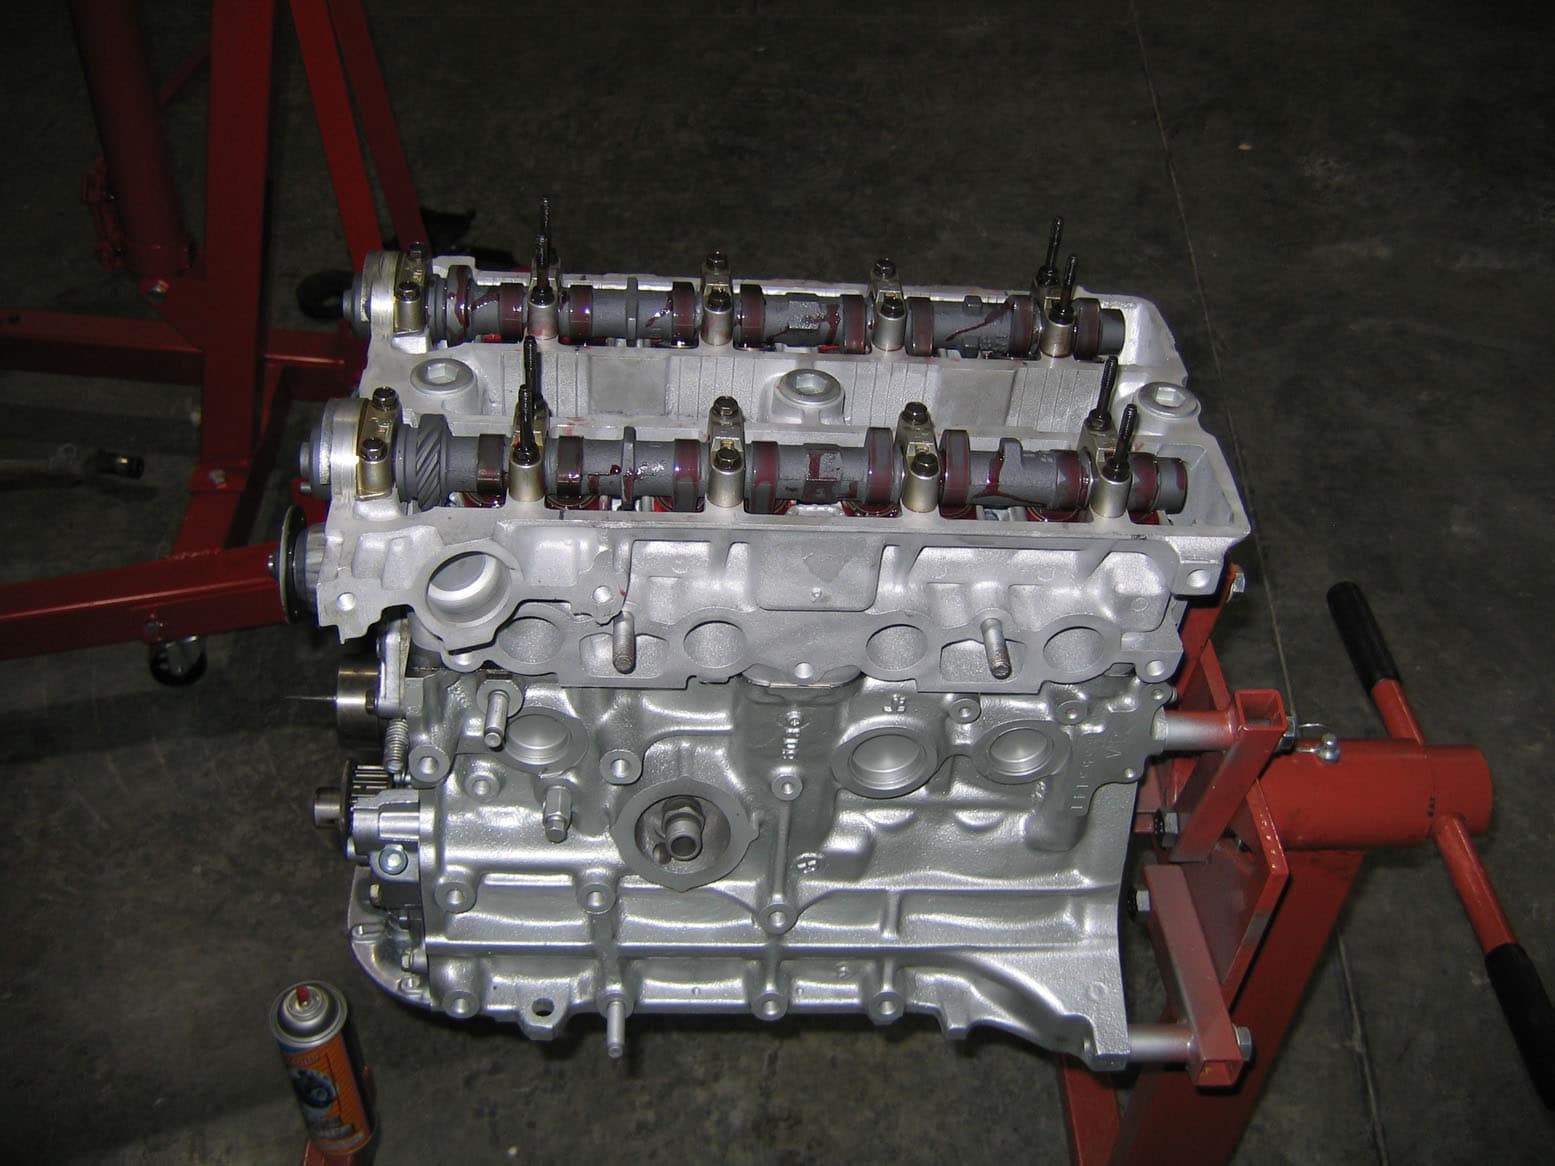
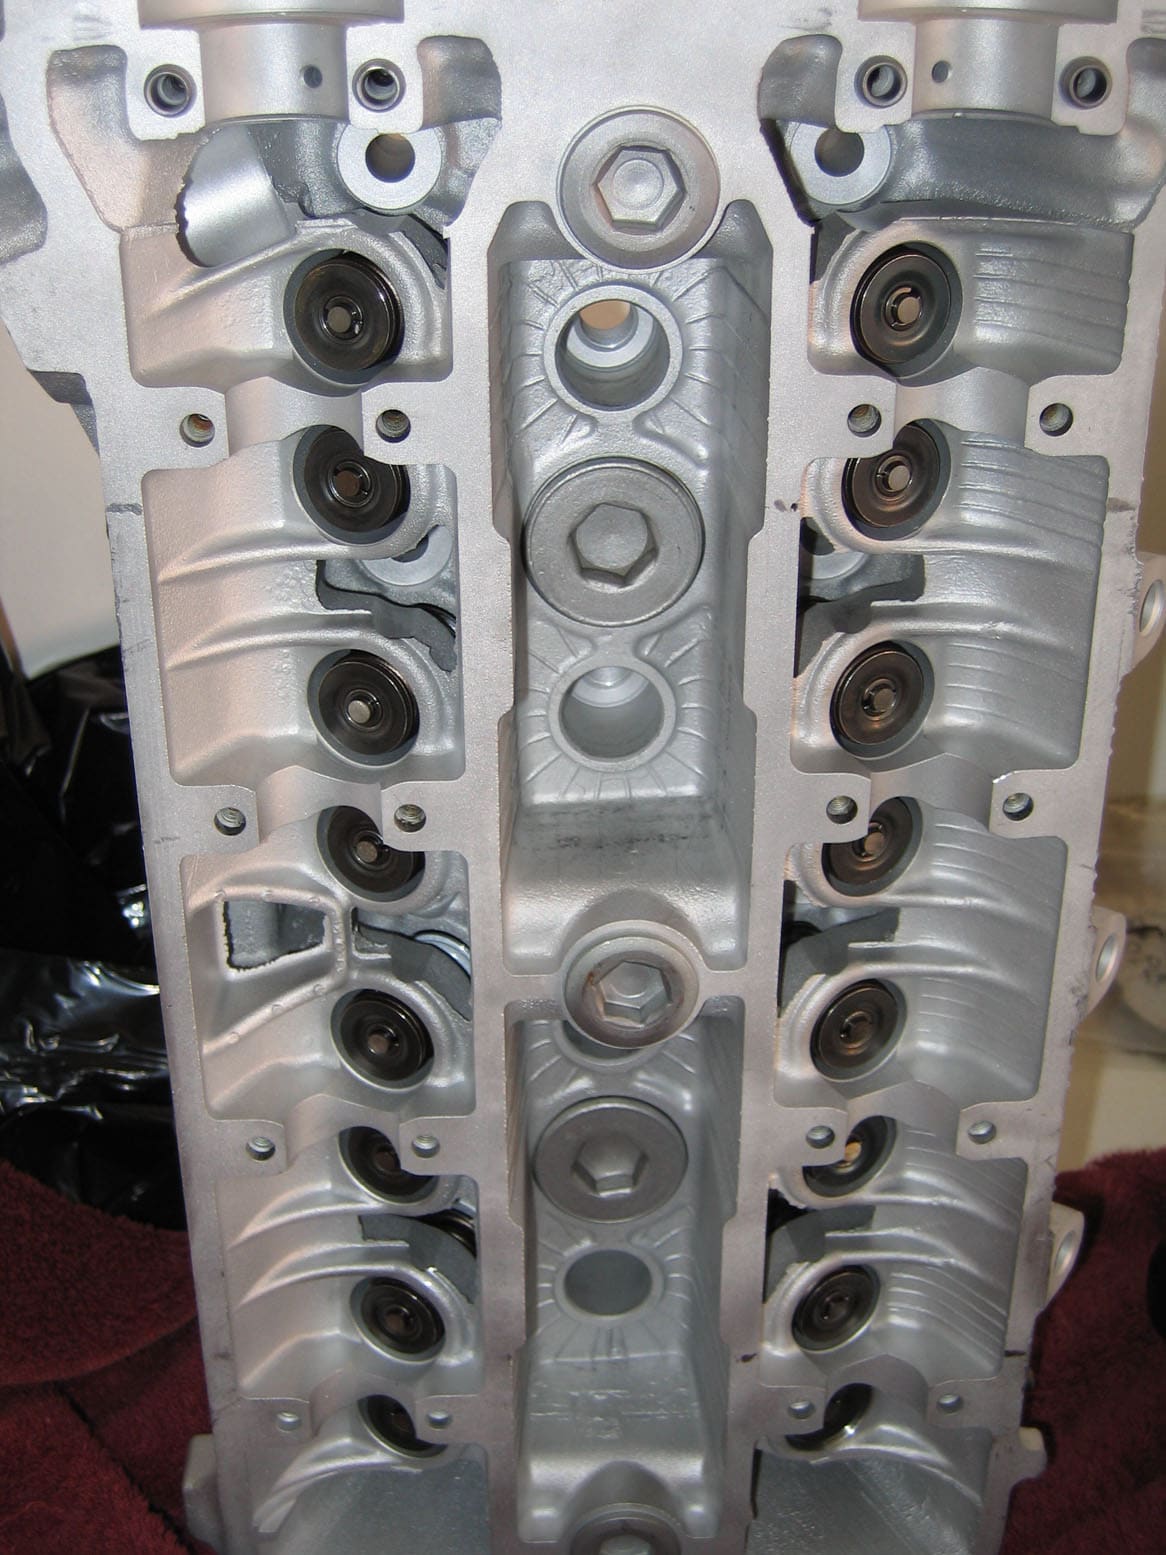
Russ adjusting valve lash with his nifty shimming tool…. (Snap-on still carries these, I just ordered one for 40 something bucks)
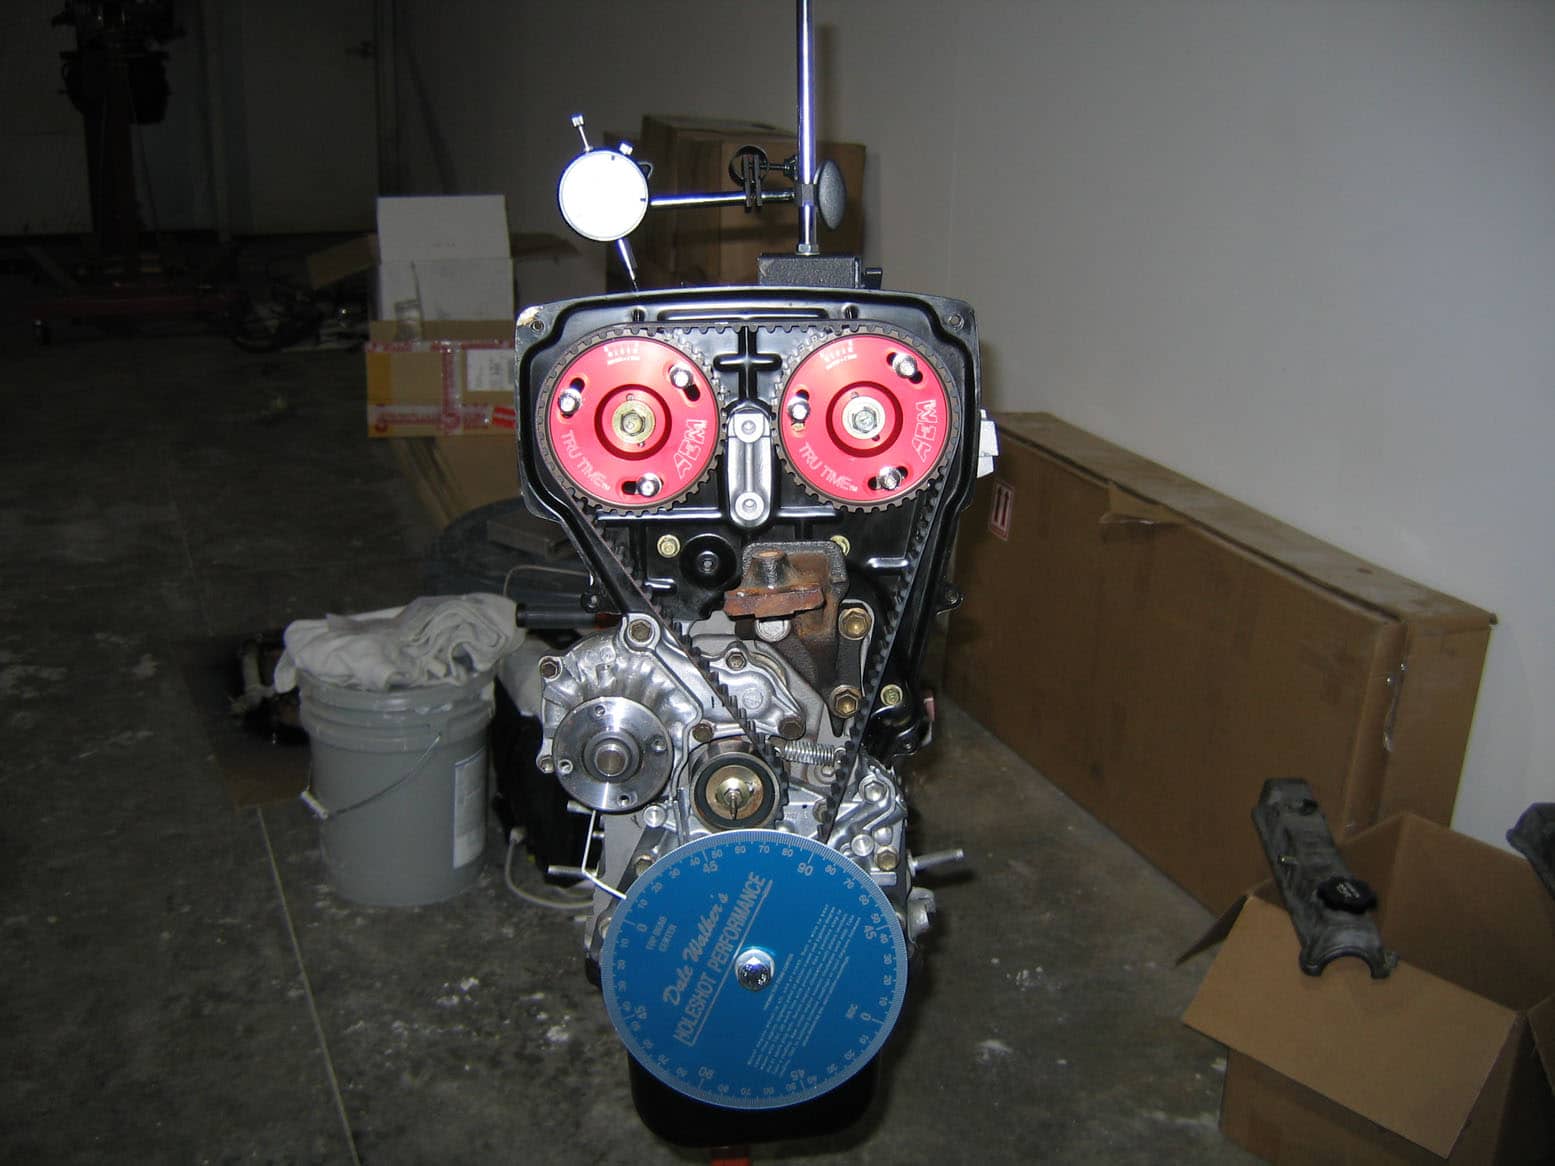
Degreeing the cams… (Once finished– 15 ft-lbs on those cam gears with Lock-Tite RED!)
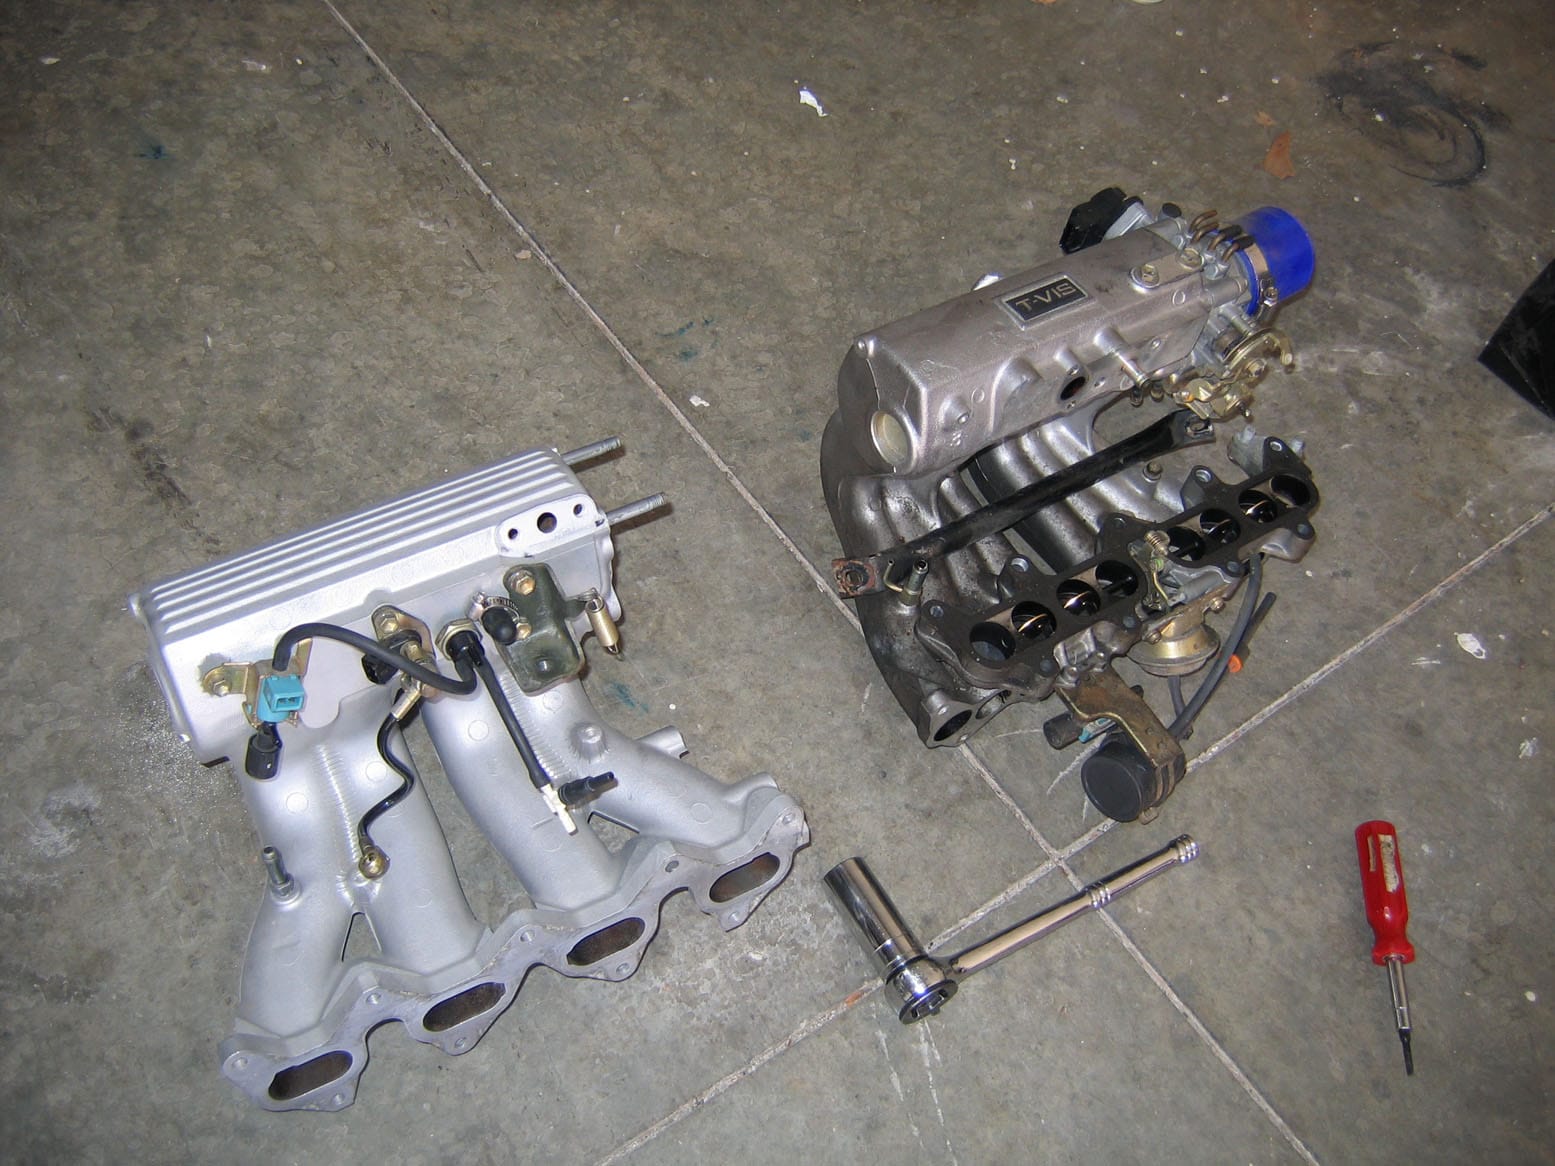
Partway through the process of moving everything over to my cleaned up smallport manifold (this thing started out super nasty, yea for sandblasting!)

And finally… ready to bolt on the clutch, pressure plate, tranny, starter, and then I’ll go ahead and bolt the chassis to this thing. That work should start tomorrow night assuming the clutch comes in on time tomorrow….
10-20-2006
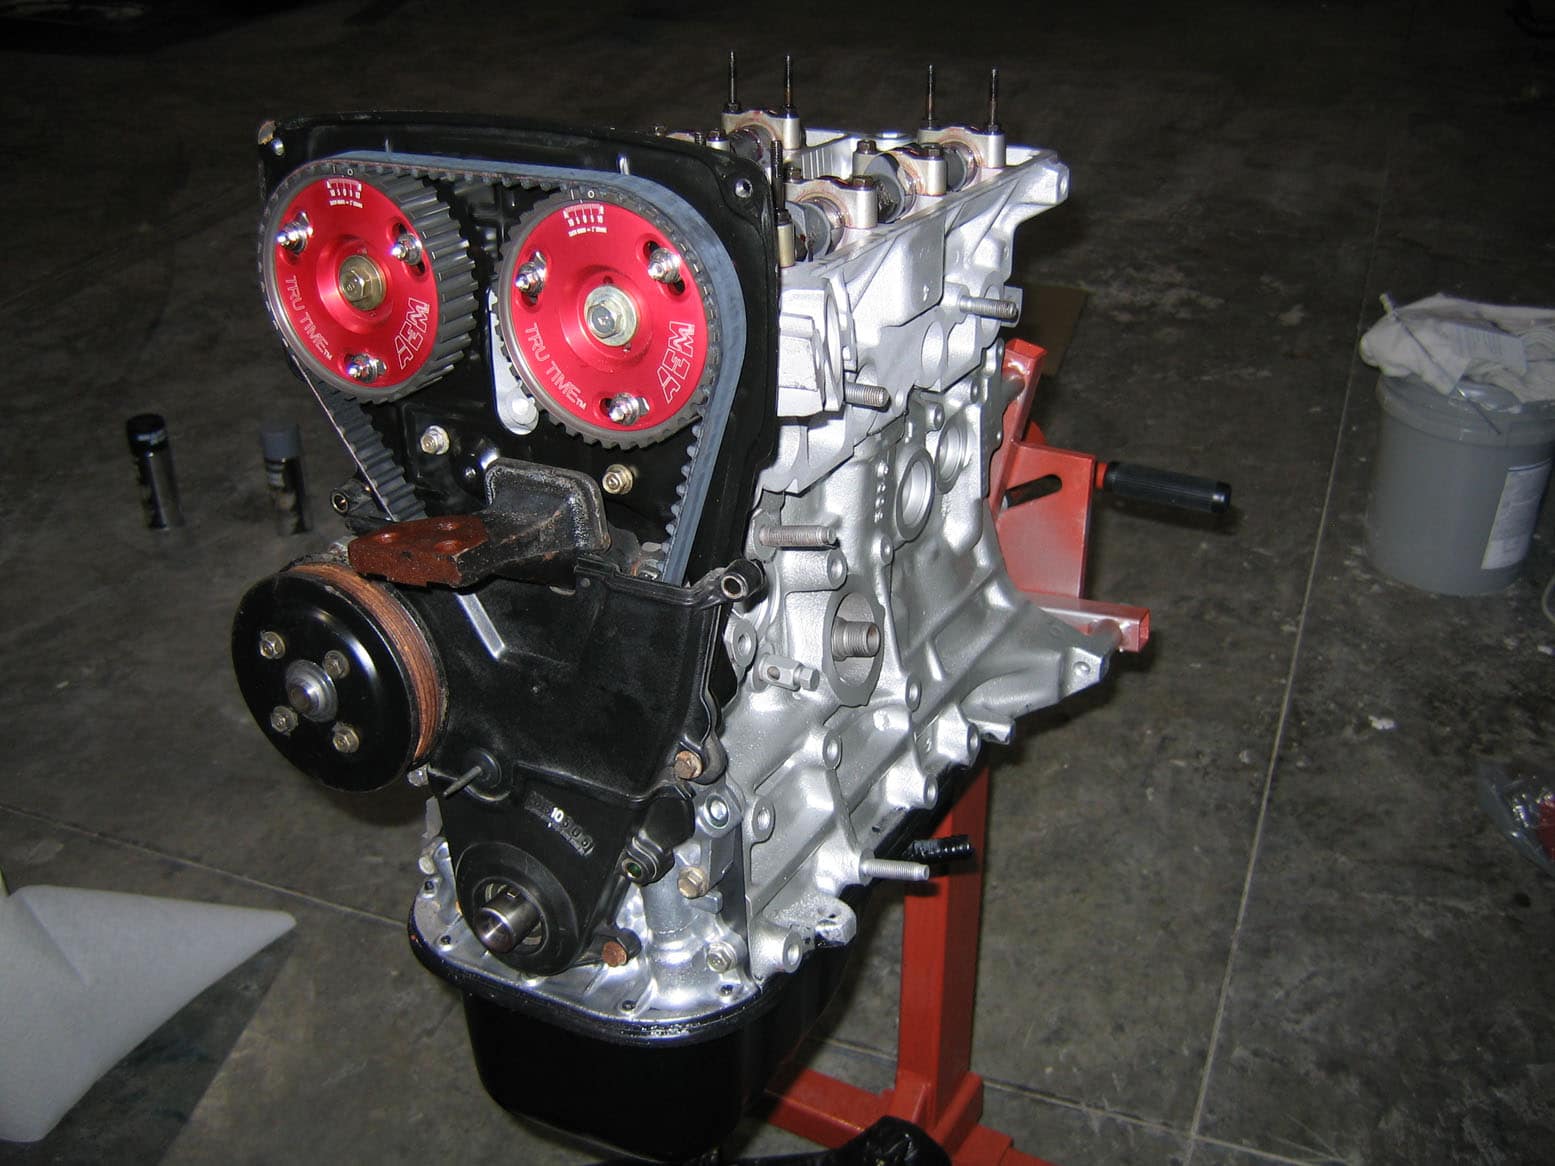
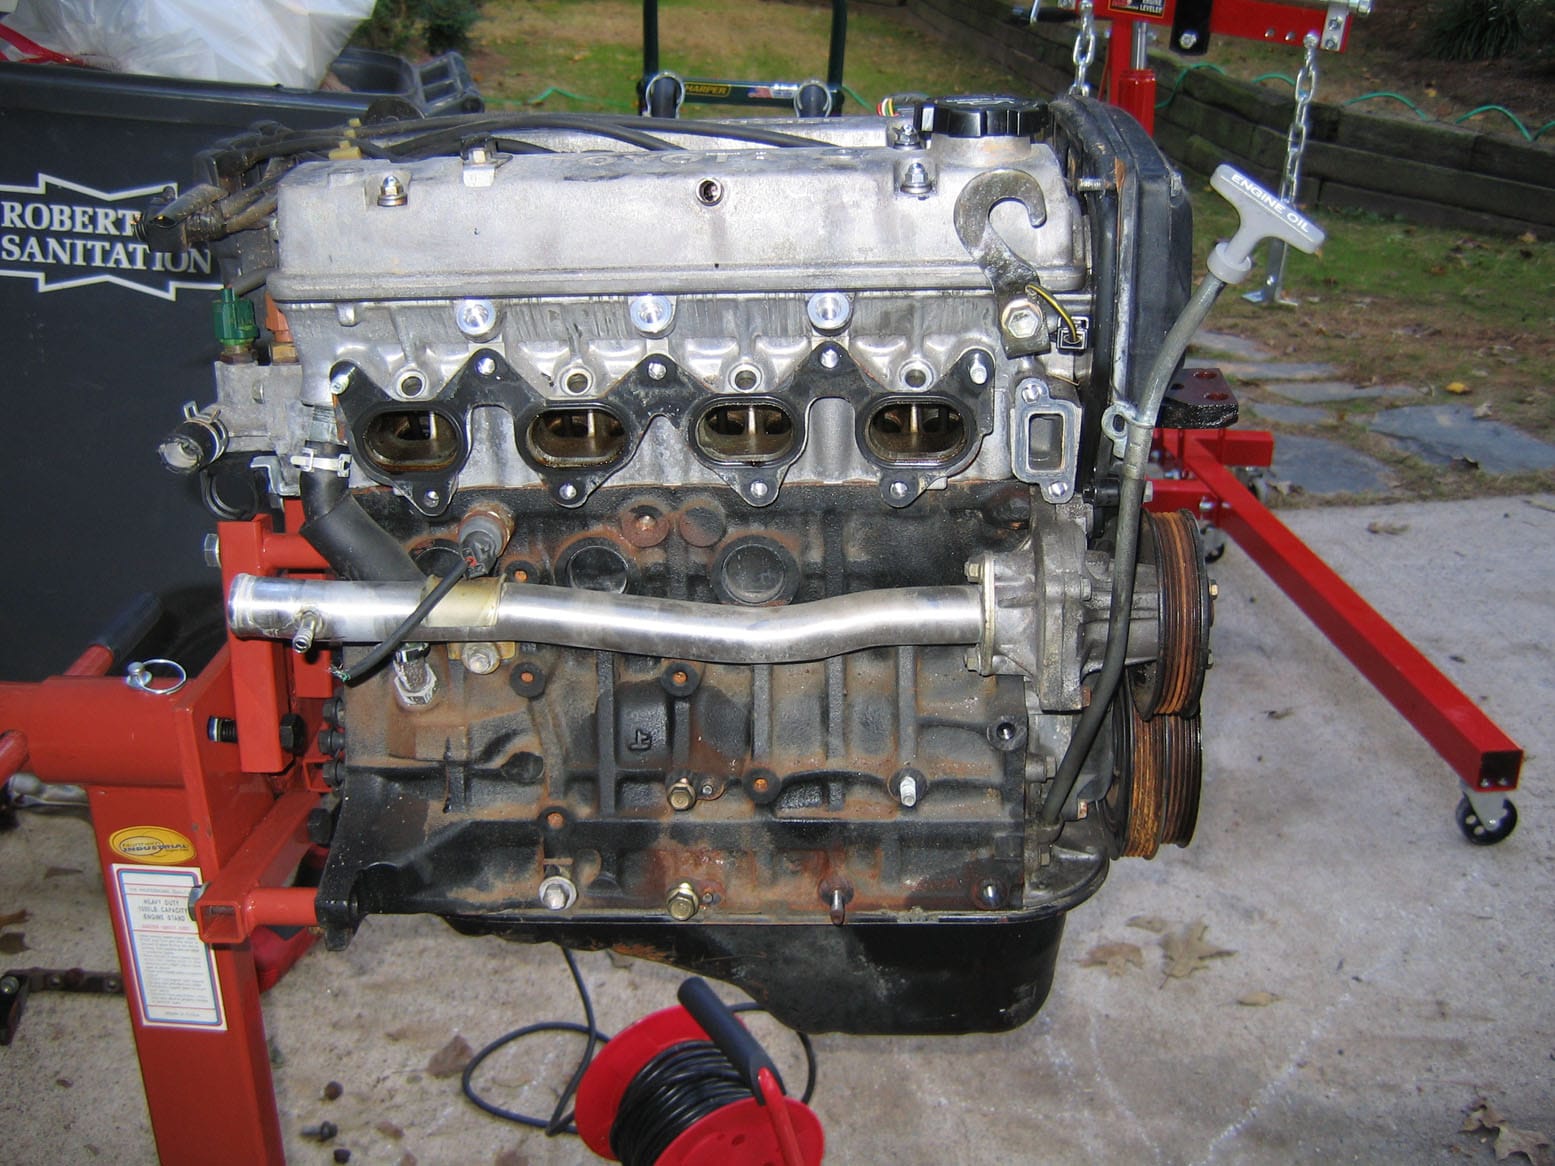
After a couple of late nights the longblock is mostly assembled. (Big thanks to Russ Patrick for the help!) Just a few details remain such as shimming and degreeing the cams, the oil pan/windage tray, and moving the accessories over from the old bluetop.
Here’s pictures of the progress so far:


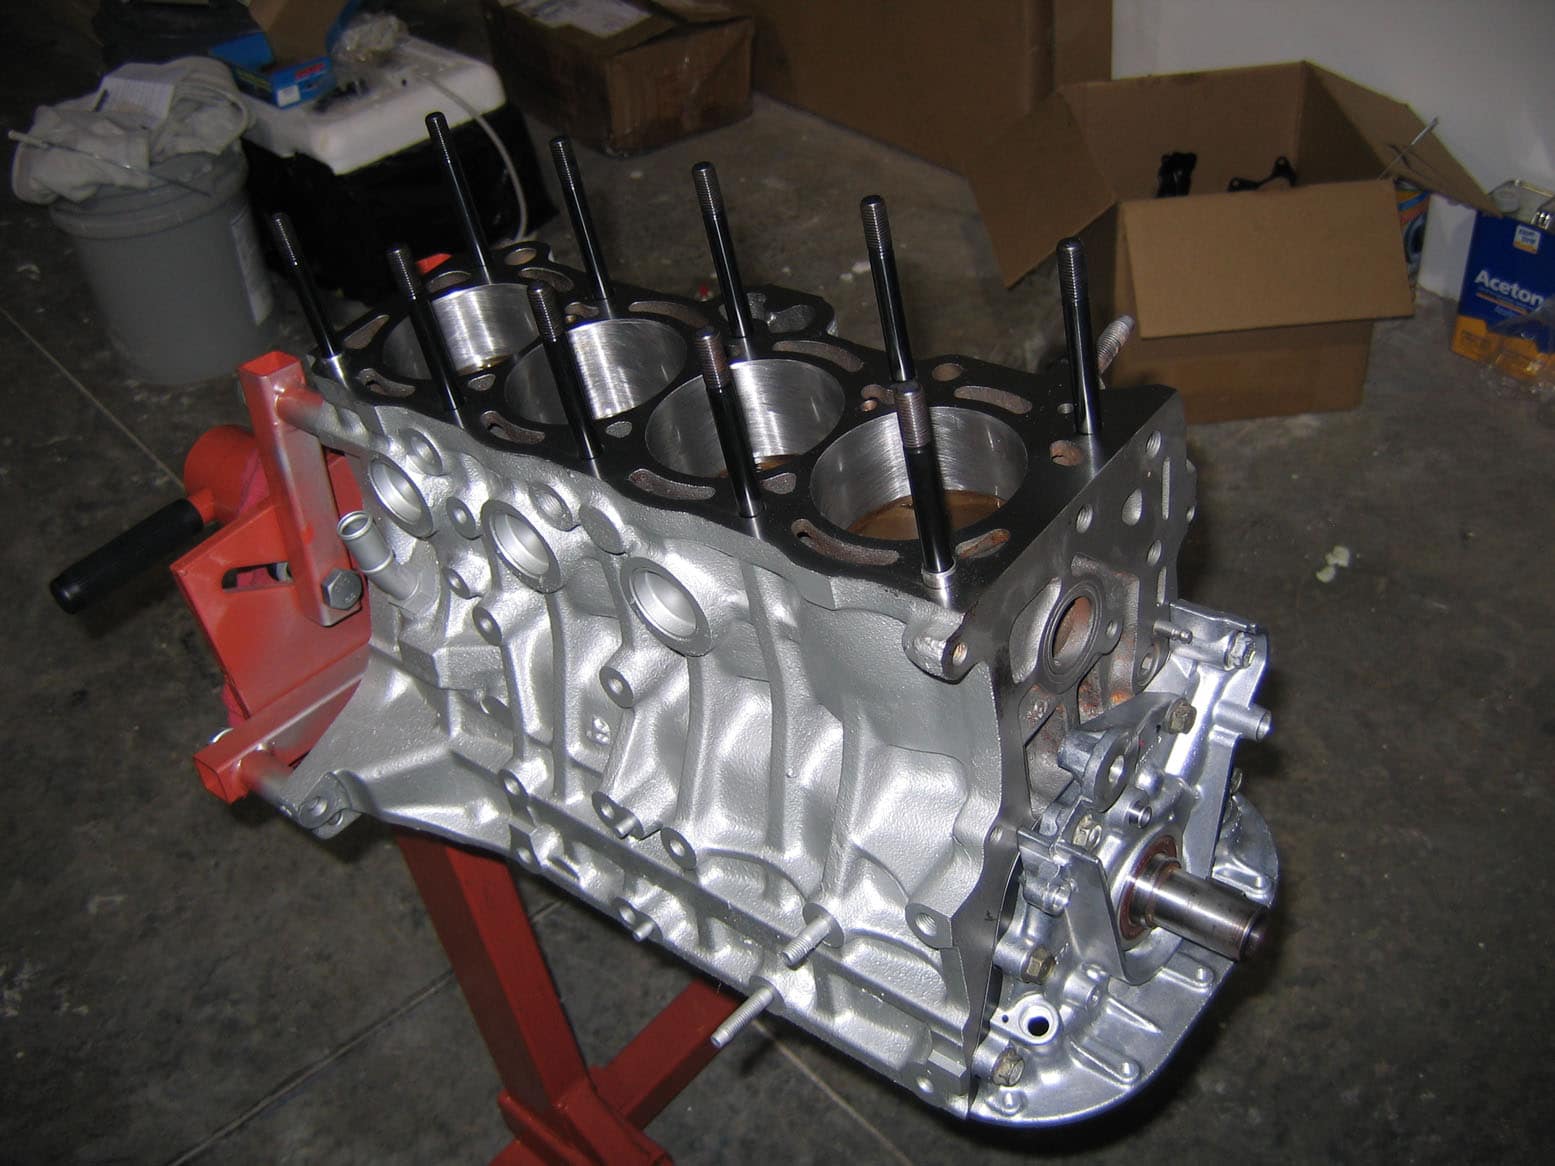
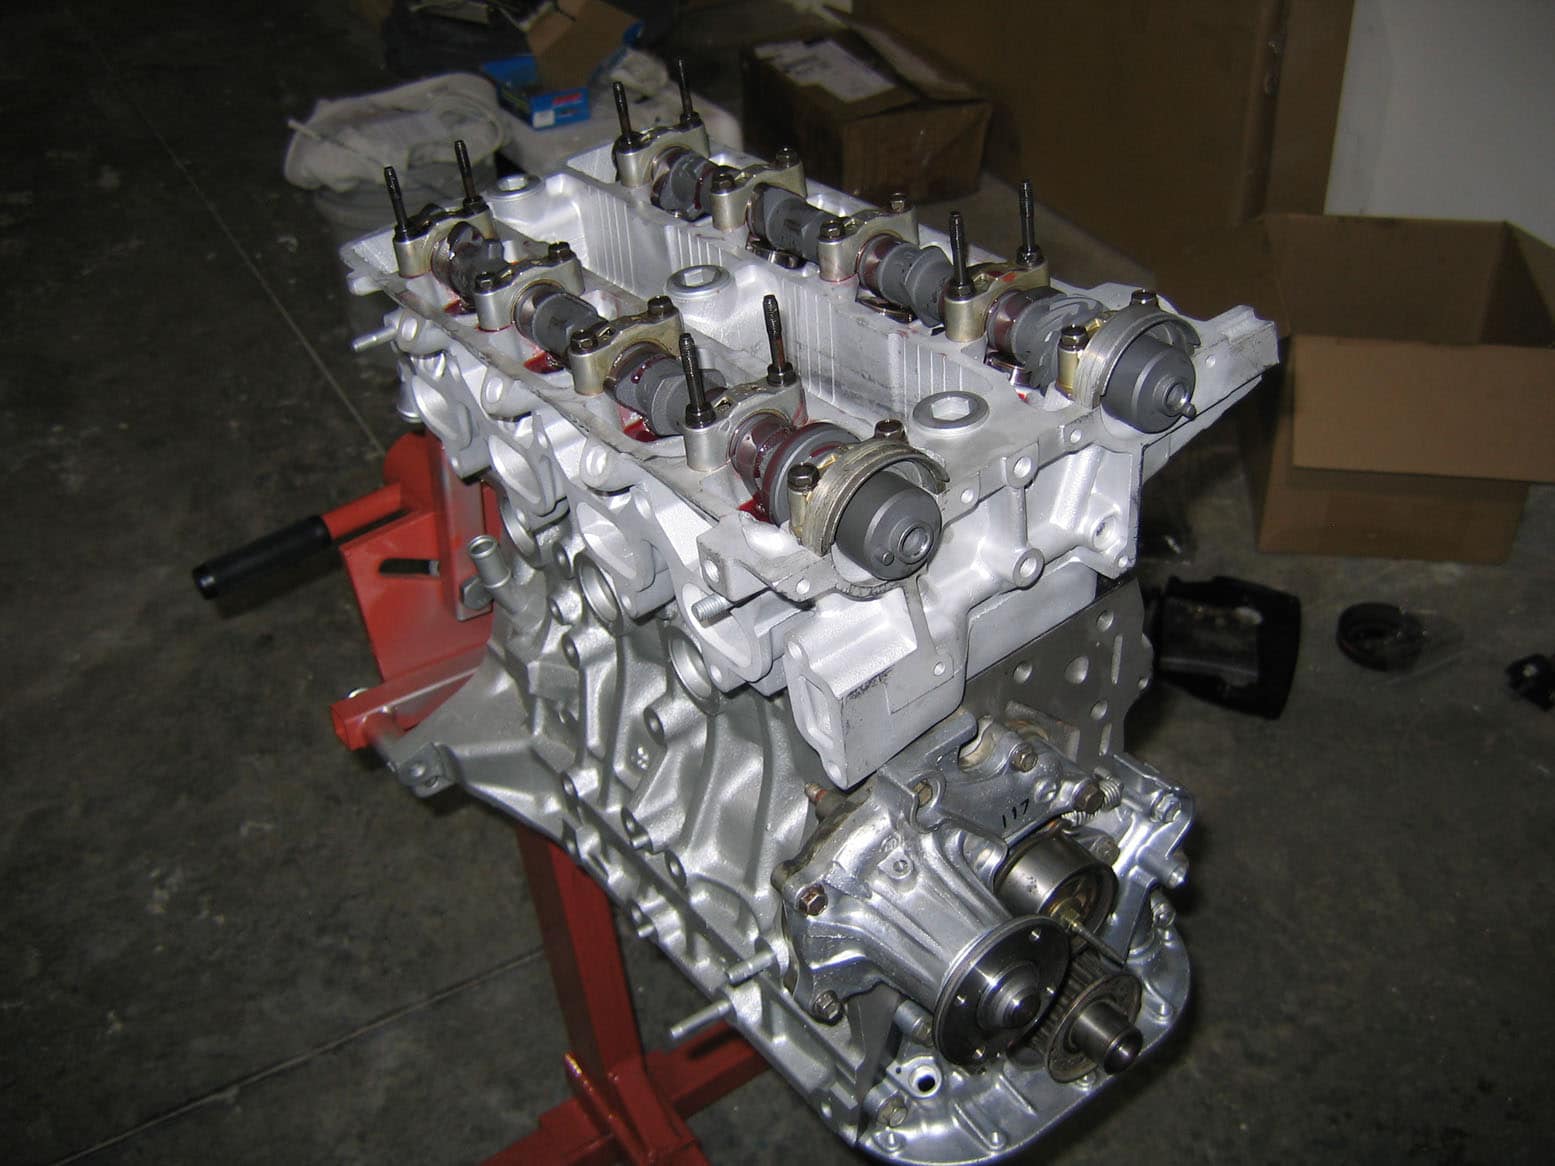
So it won’t be much longer. I’m sure I could find more to type but I’ve got some work to do so I’ll let the pictures do the talking here. Tomorrow night should finish up the assembly and I’ll get more pics up afterwards….
10-12-2006
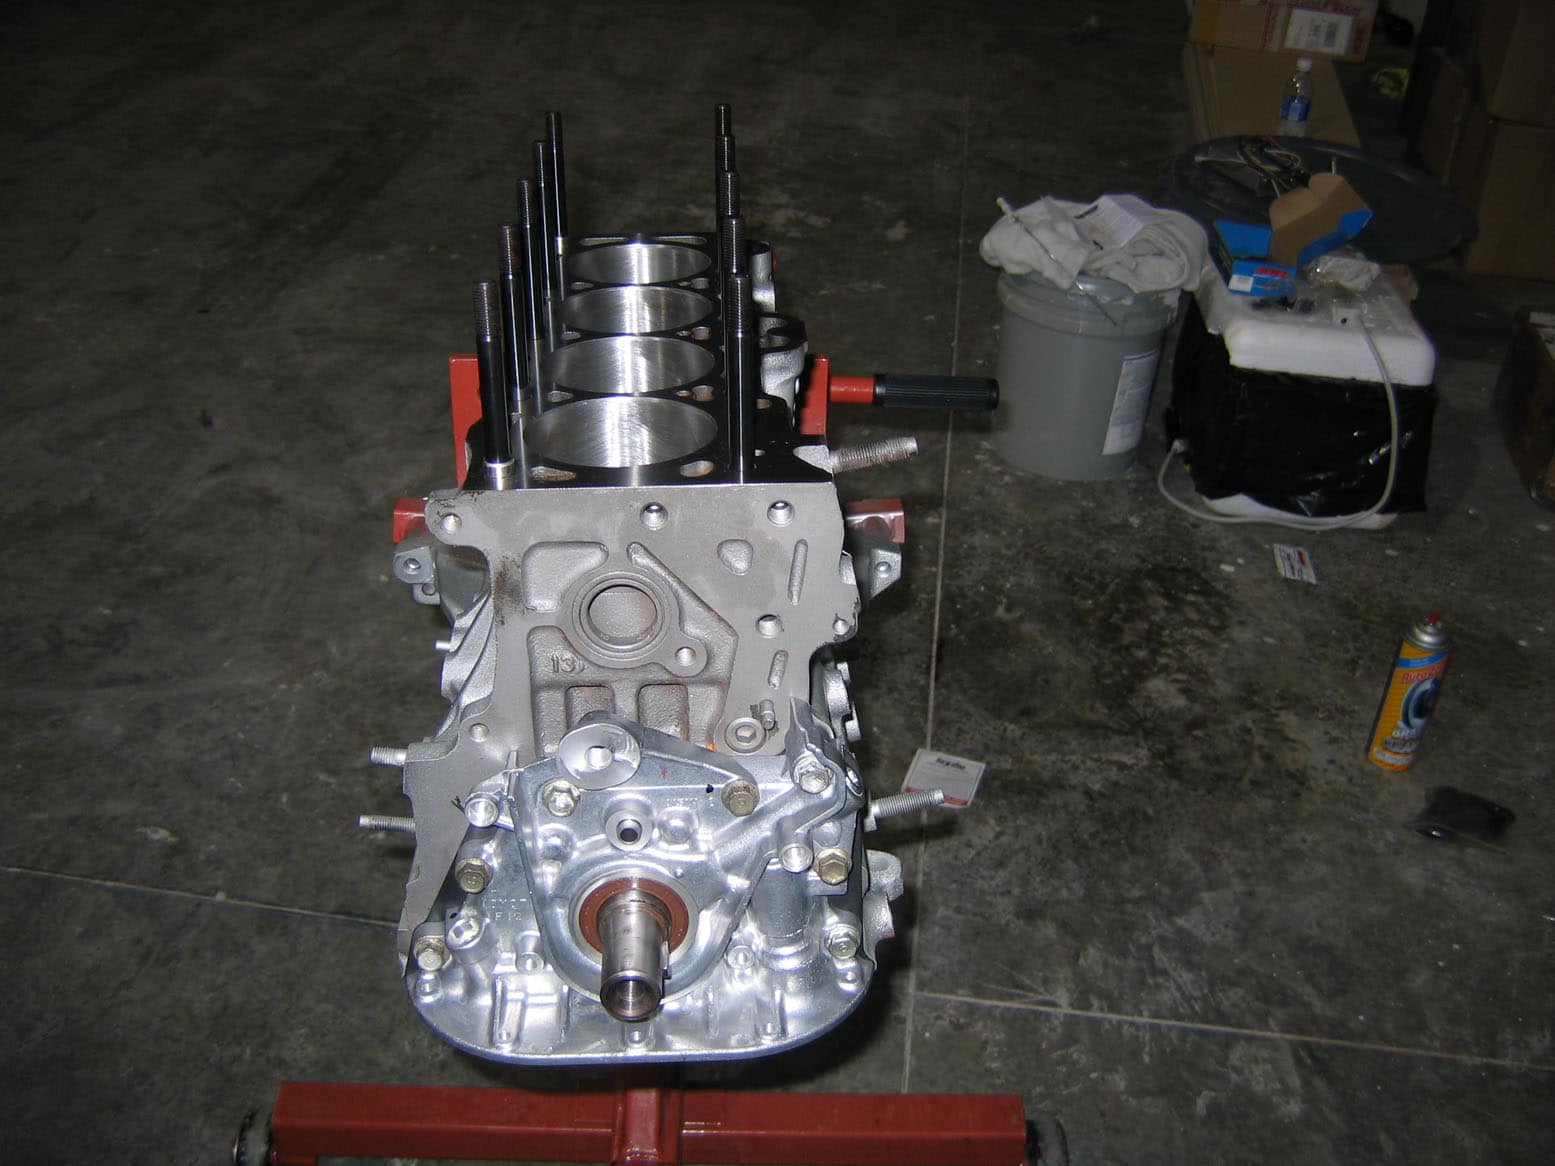
Motor is back from the machine shop…
Pictures say thousands of words, or so they say…. (all of these are clickable for bigger pictures that say several thousand)
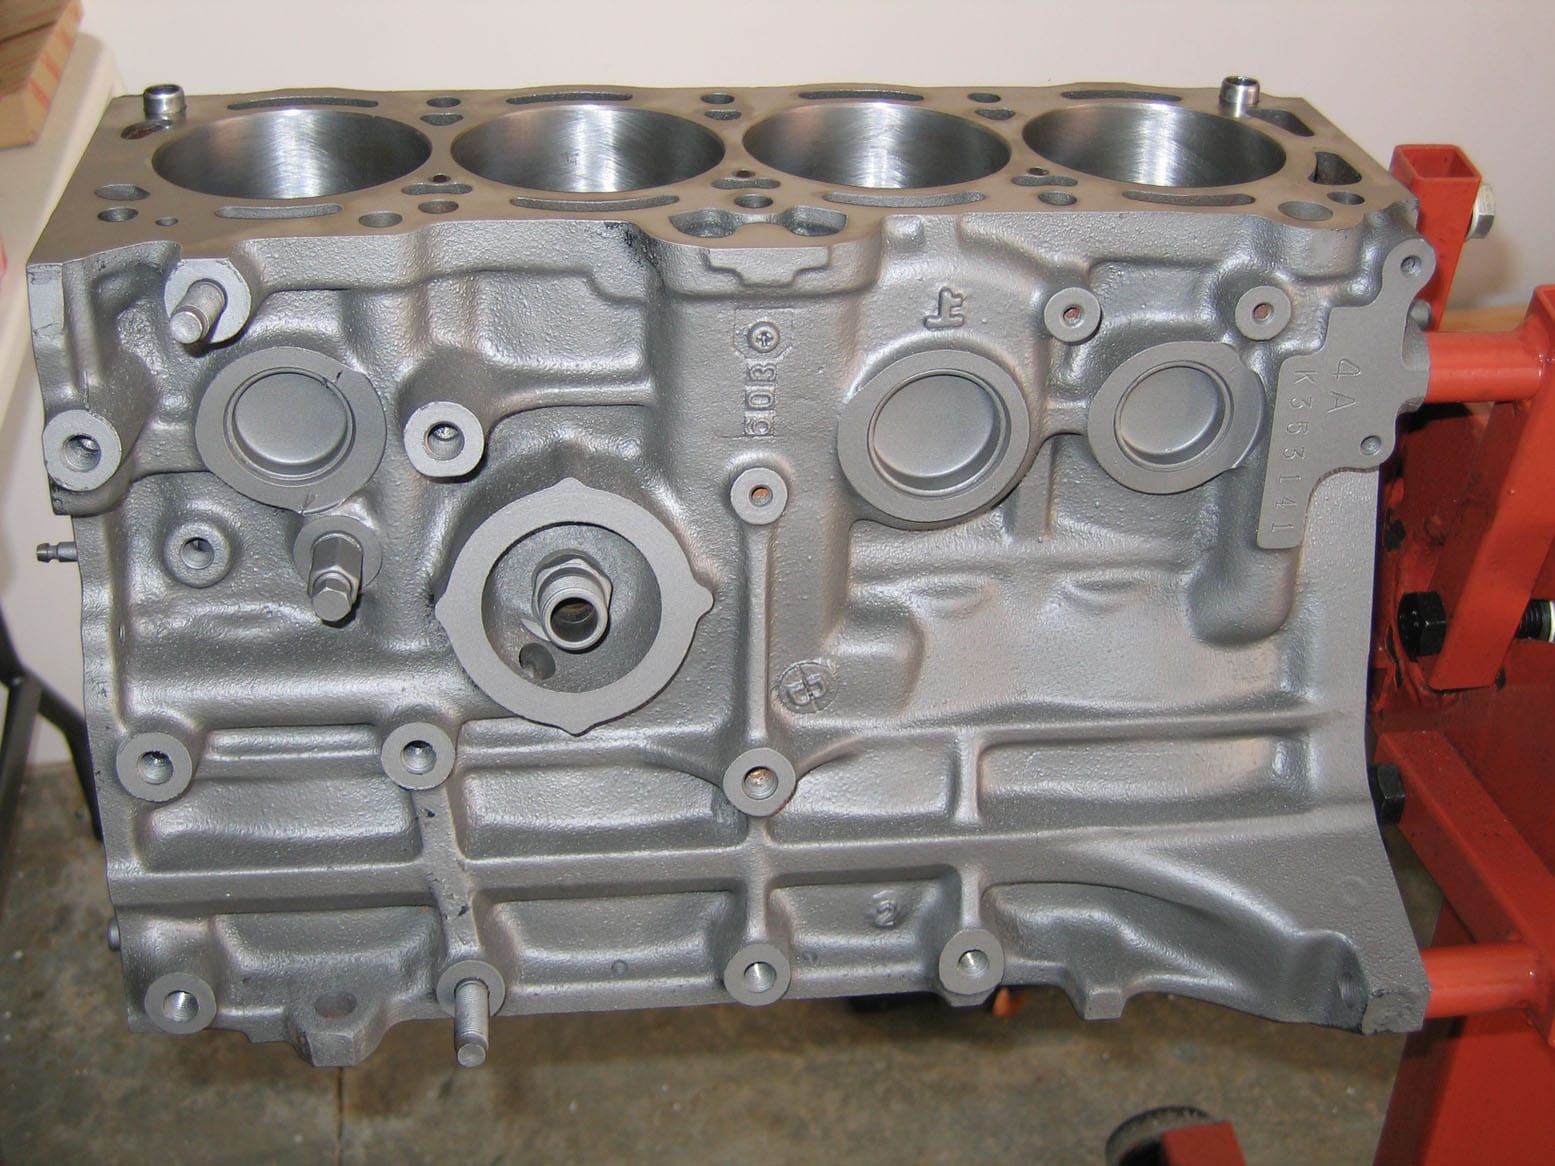
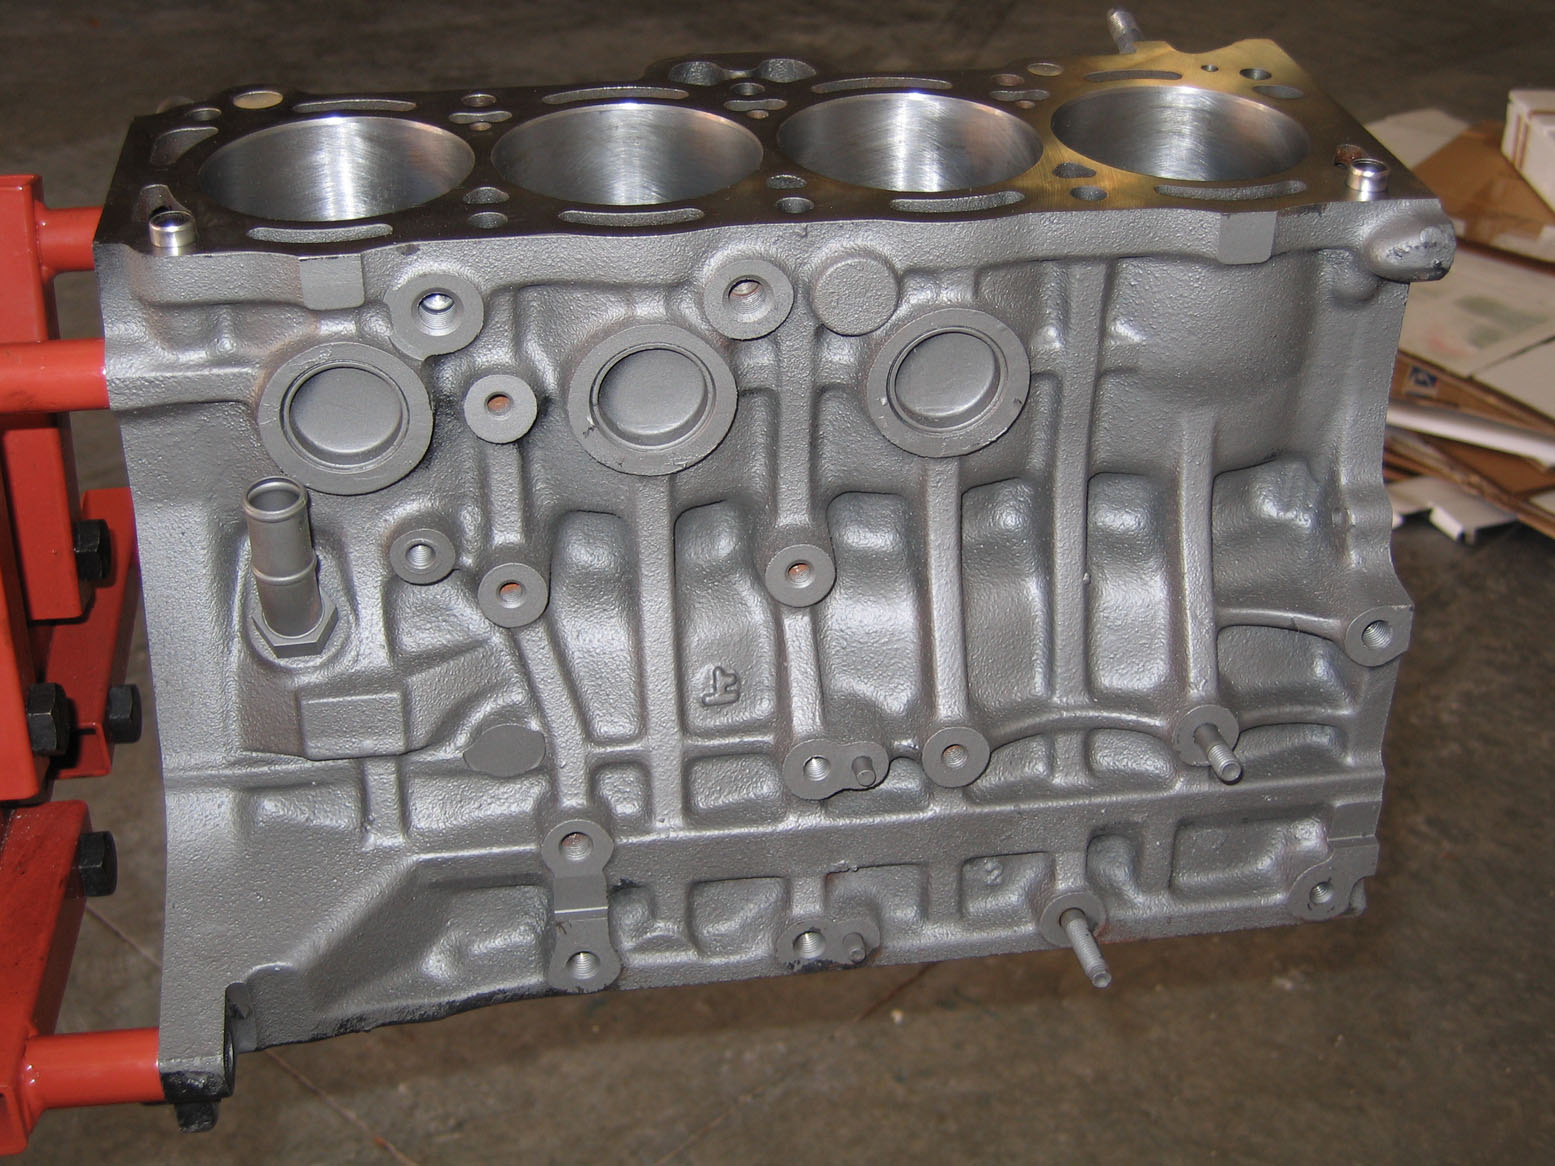
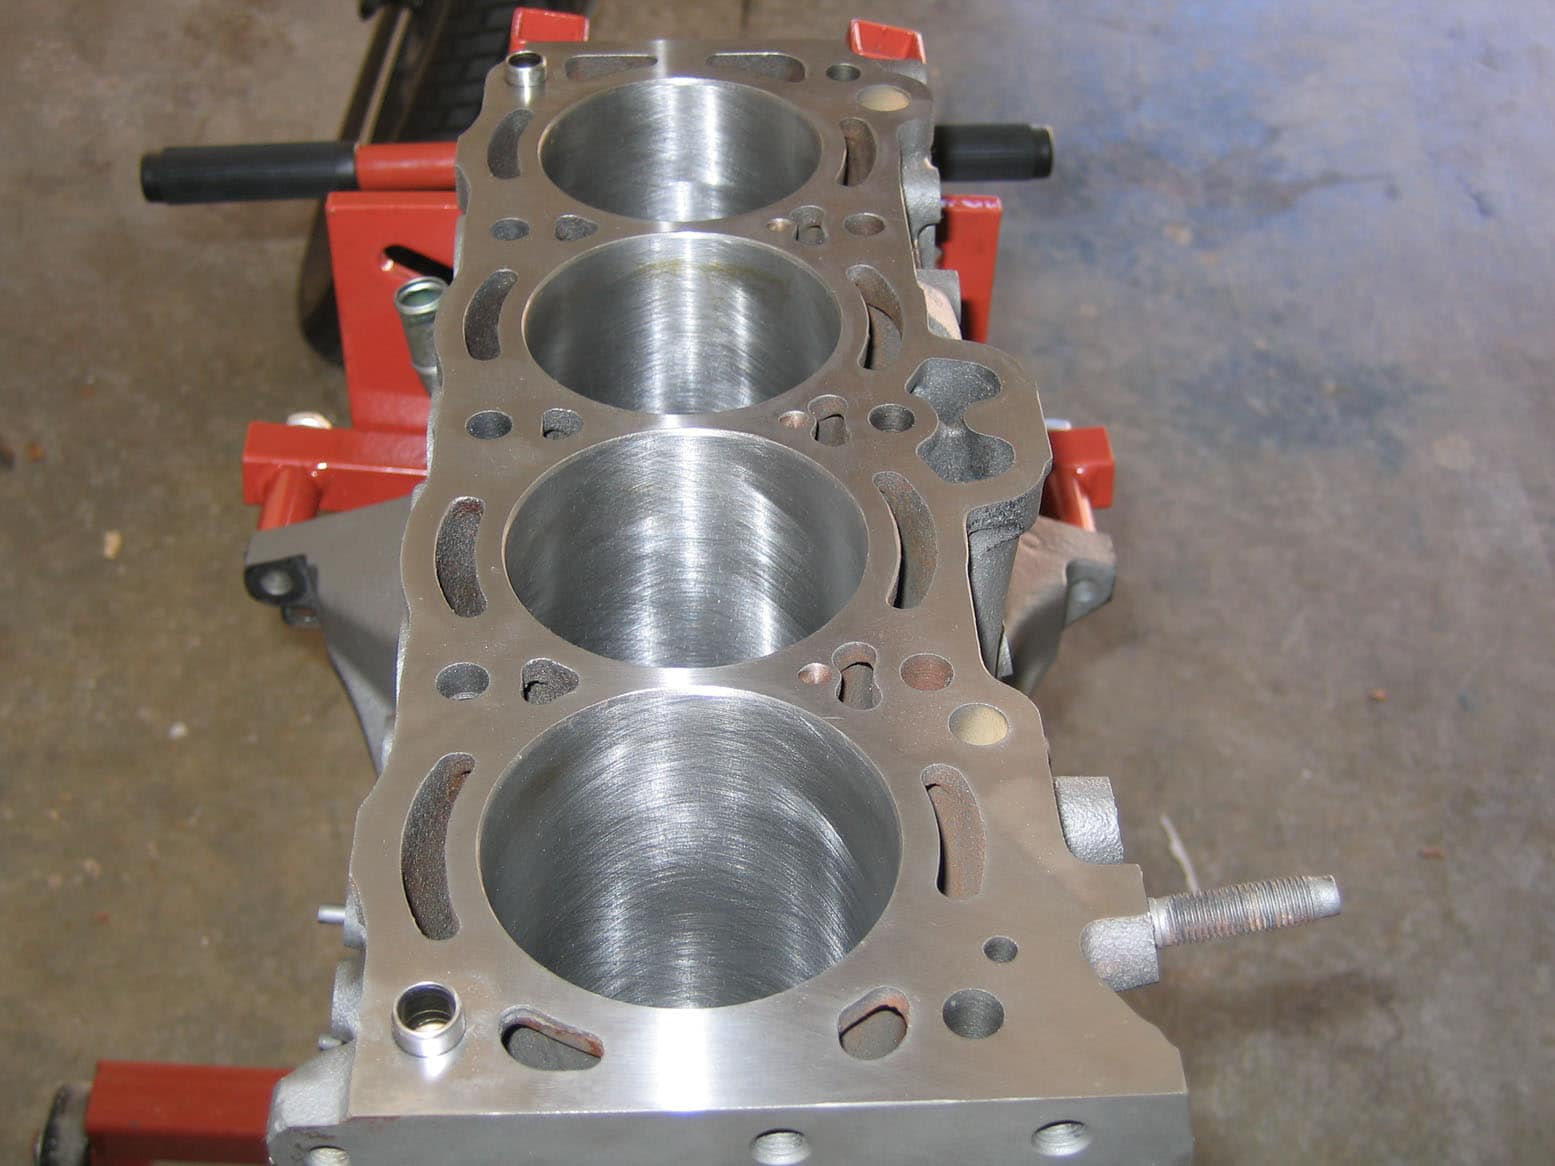
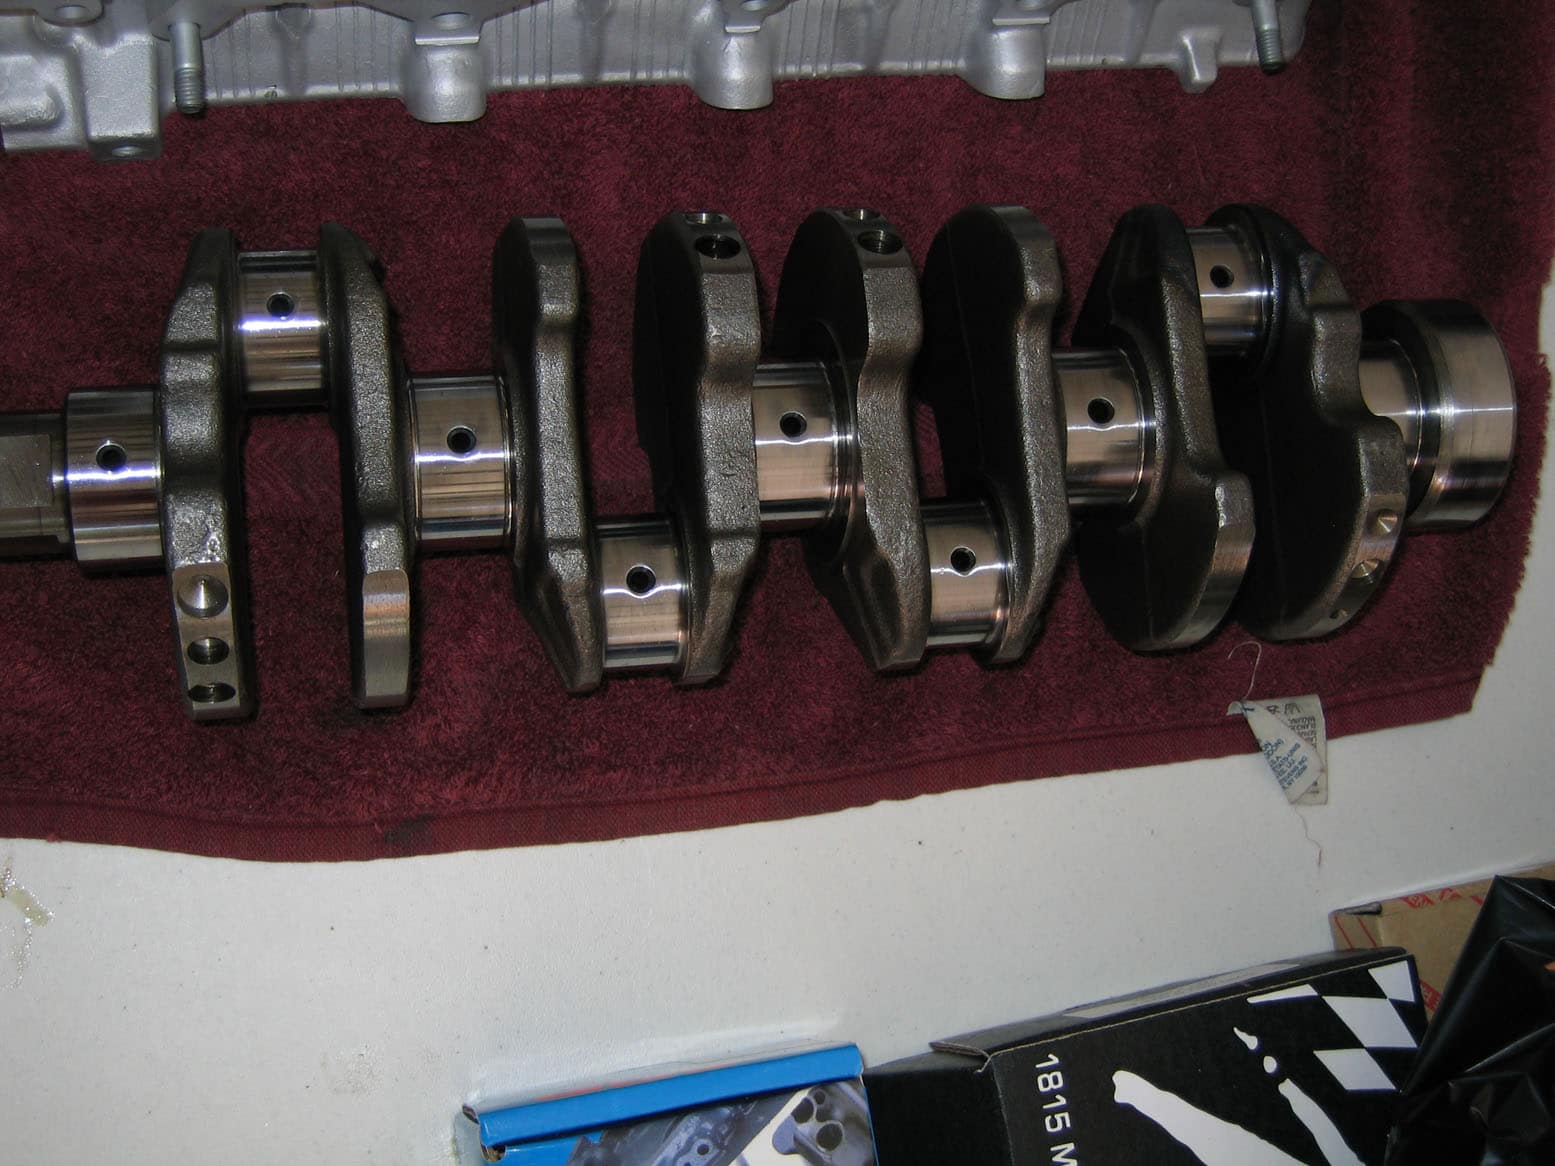

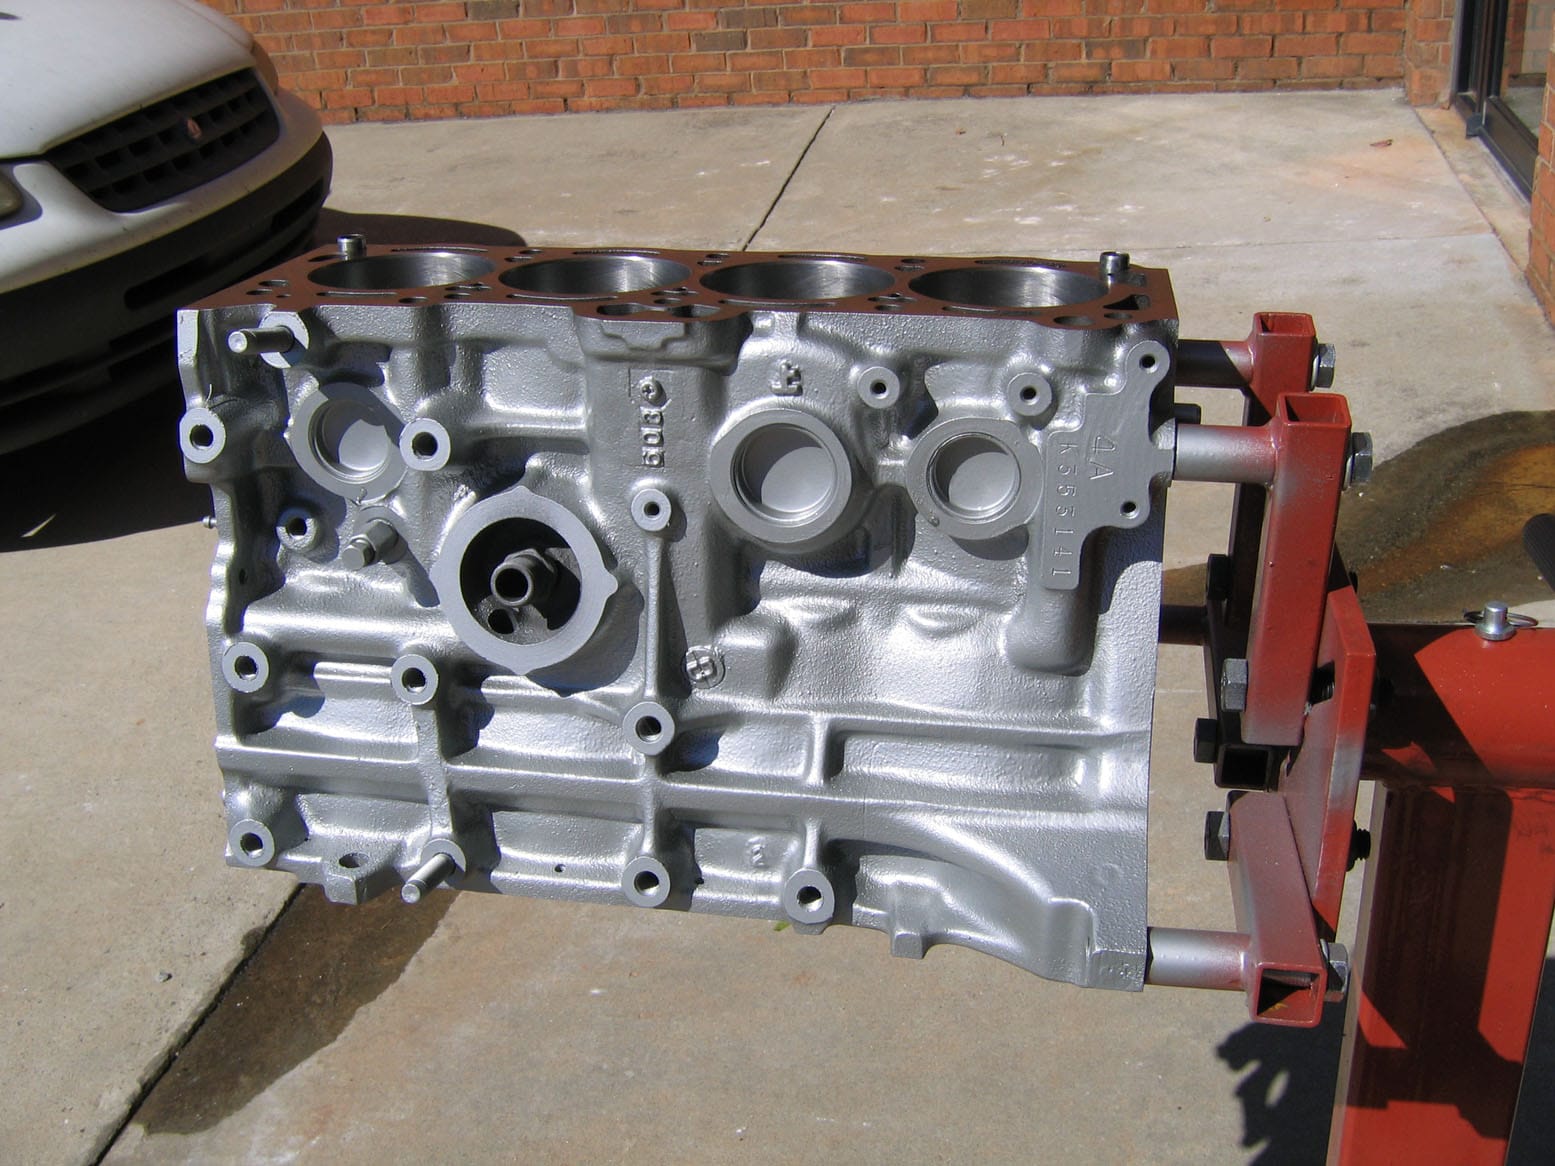
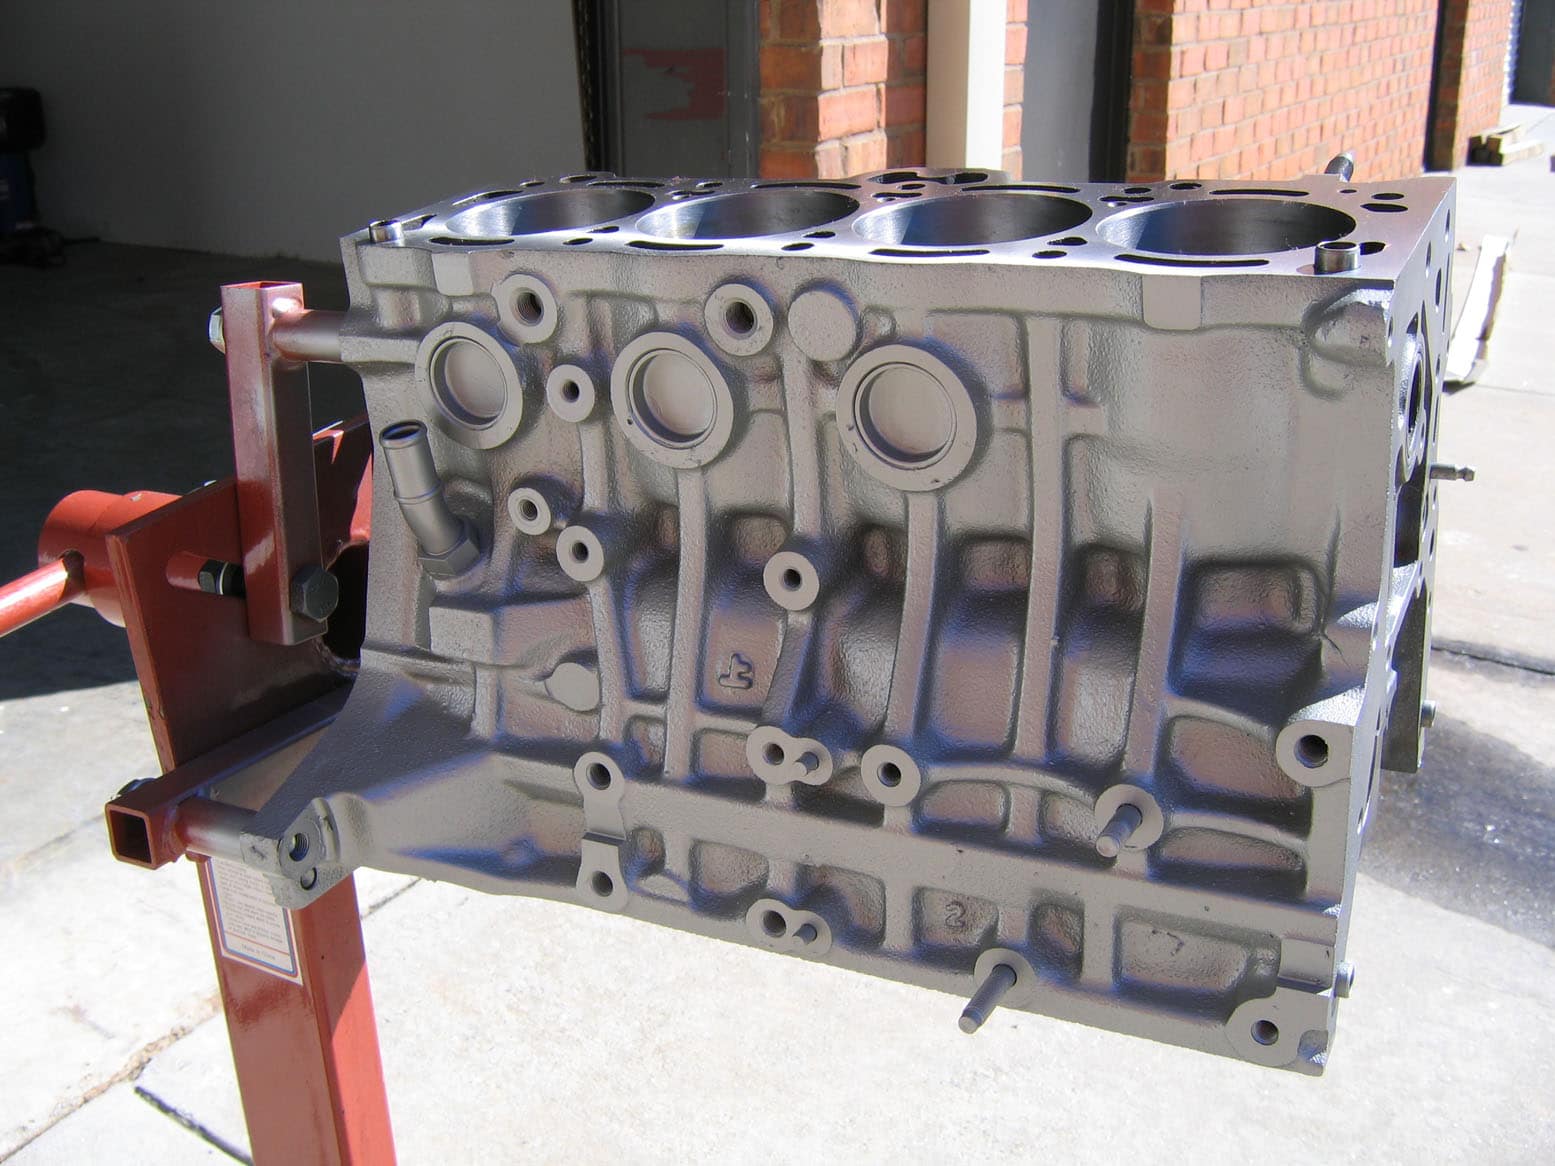
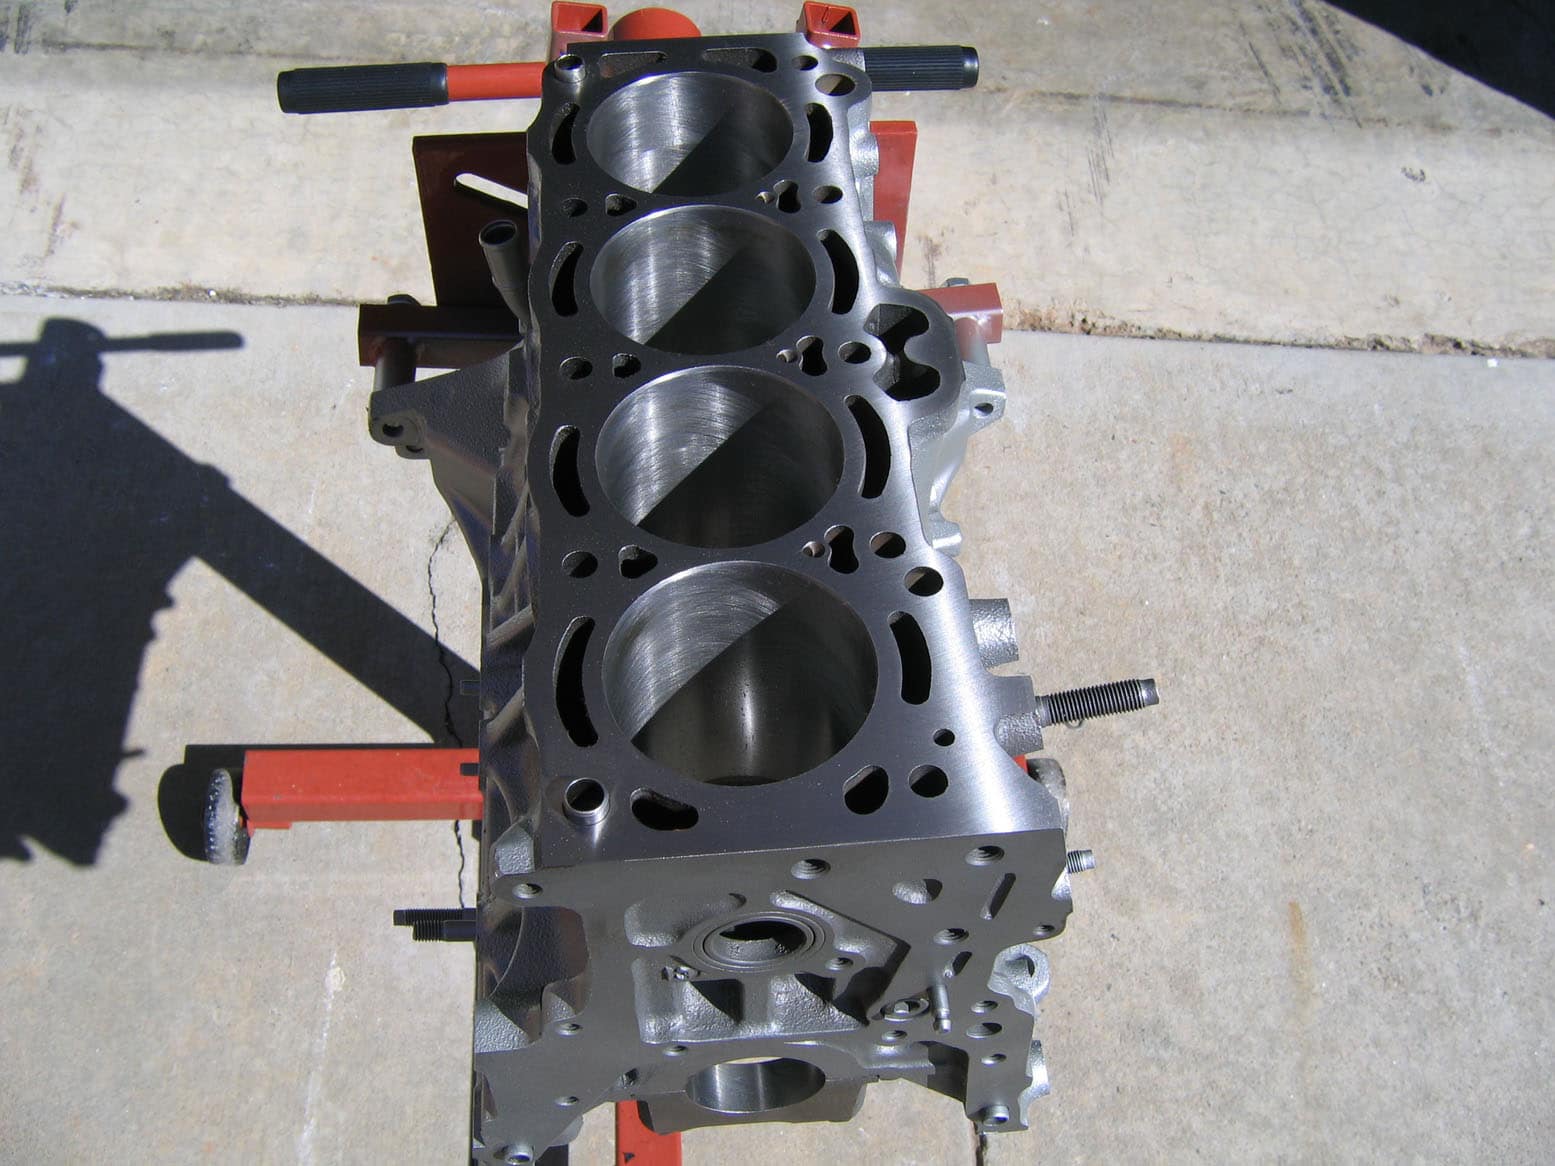
So that’s almost all there is to say… a few pics of the block fresh from the machine shop, primed, a few of the head, crank and the goodies that are about to go into this beast, and then a few of block after a couple of coats of engine enamel. I did go ahead and have the crank polished and I’ll be replacing the bearings after all, the machinist recommended it even though they looked pretty good, we’re already in there so why not… Saturday night Russ (toyota tech buddy) is coming down to the shop and we’ll be assembling everything and then I can drag my car up here and use the shop nextdoor’s lift to drop it back in… (or lift it in actually). It won’t be long now…..
10-7-2006
The Motor….
Before and after stripping off everything I don’t need…. click for bigger images…
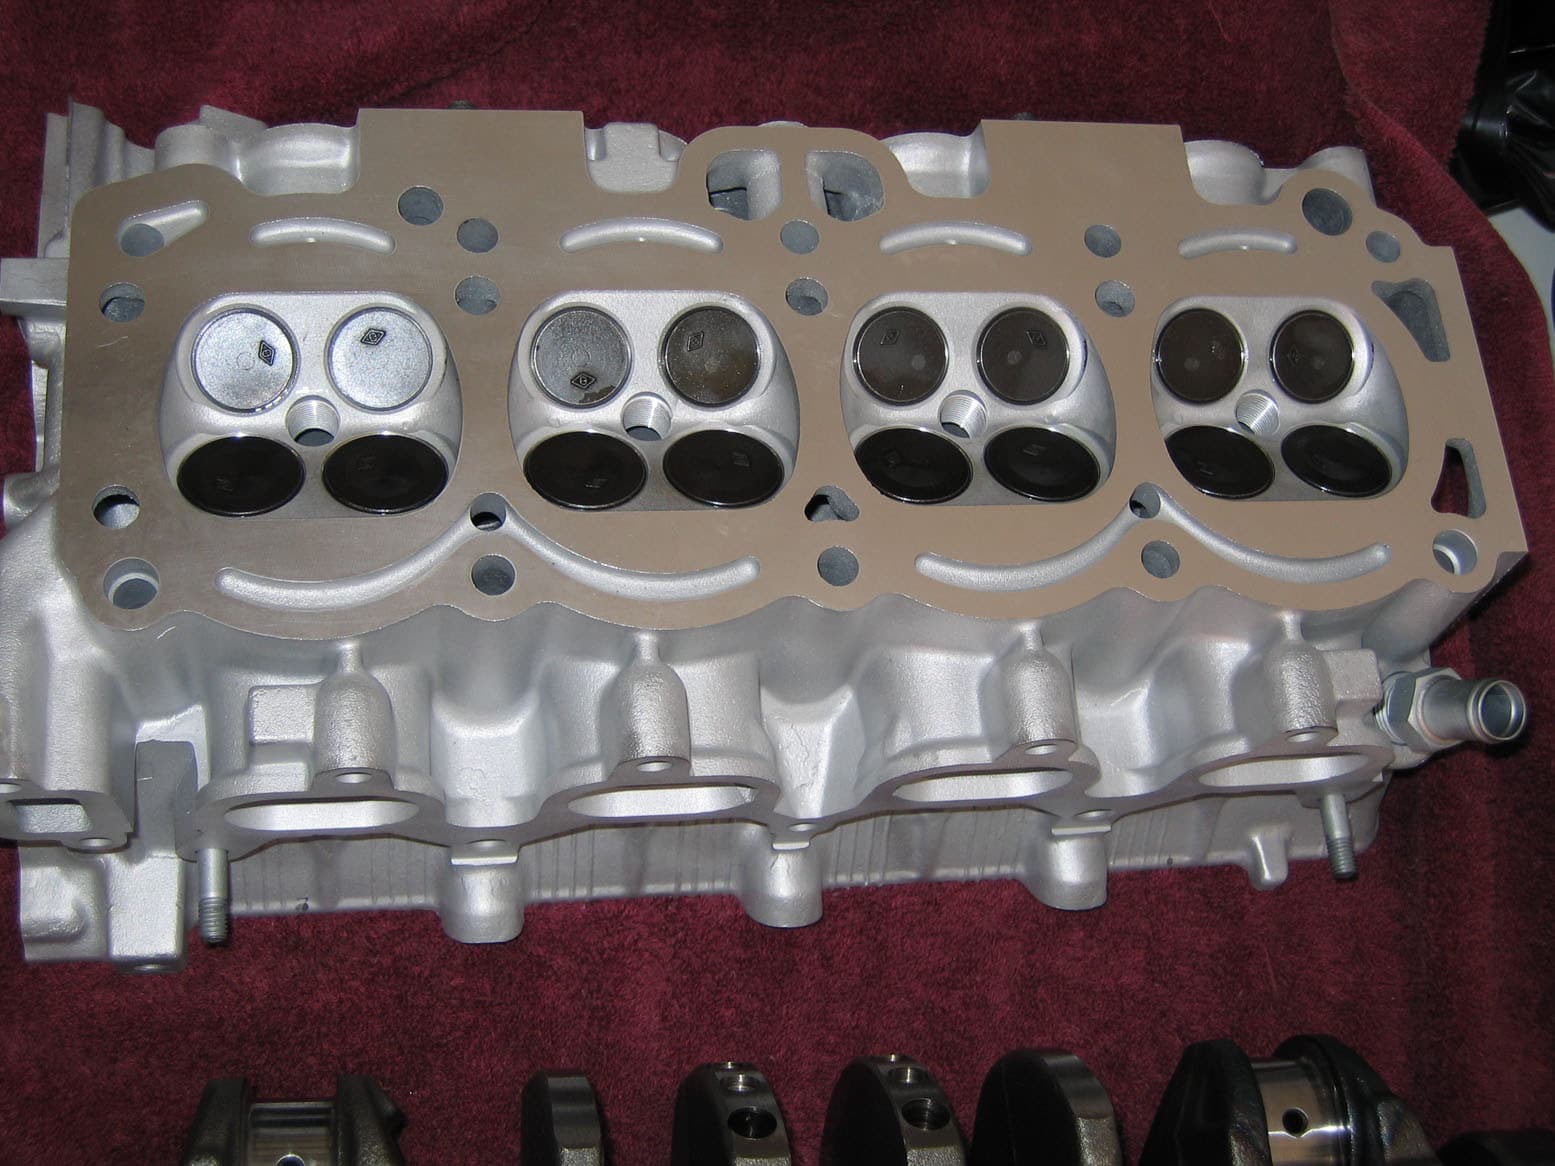
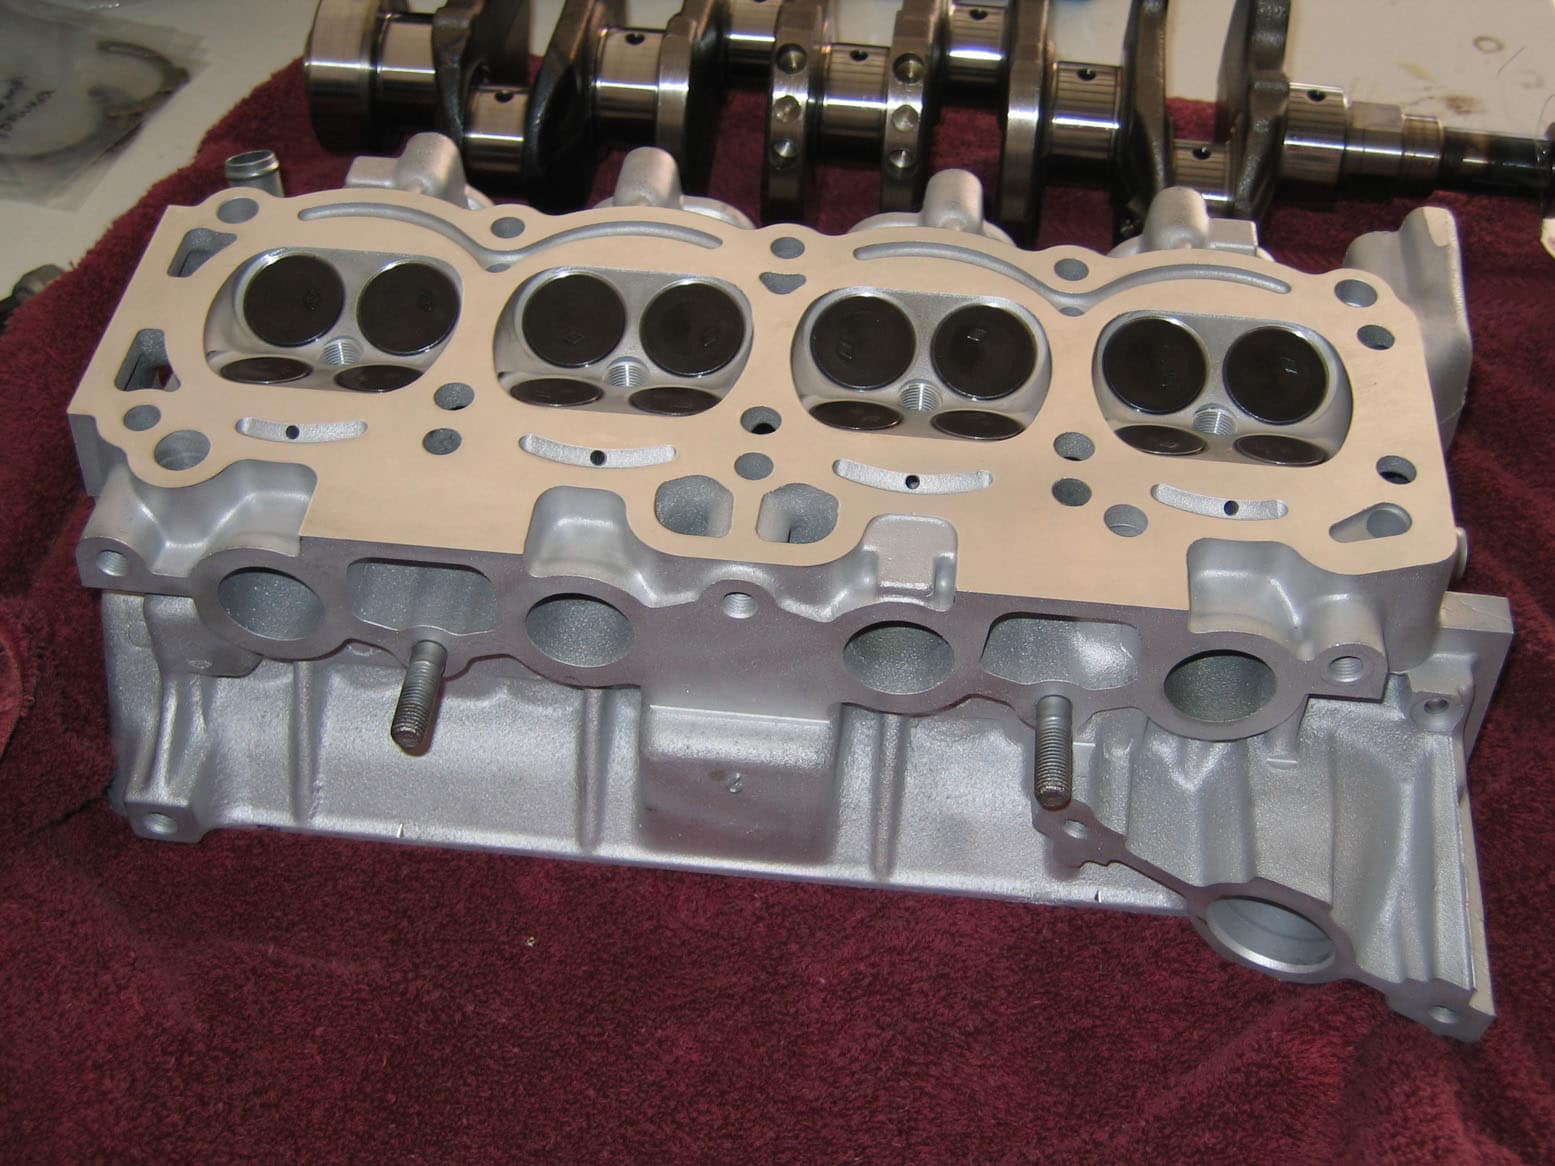
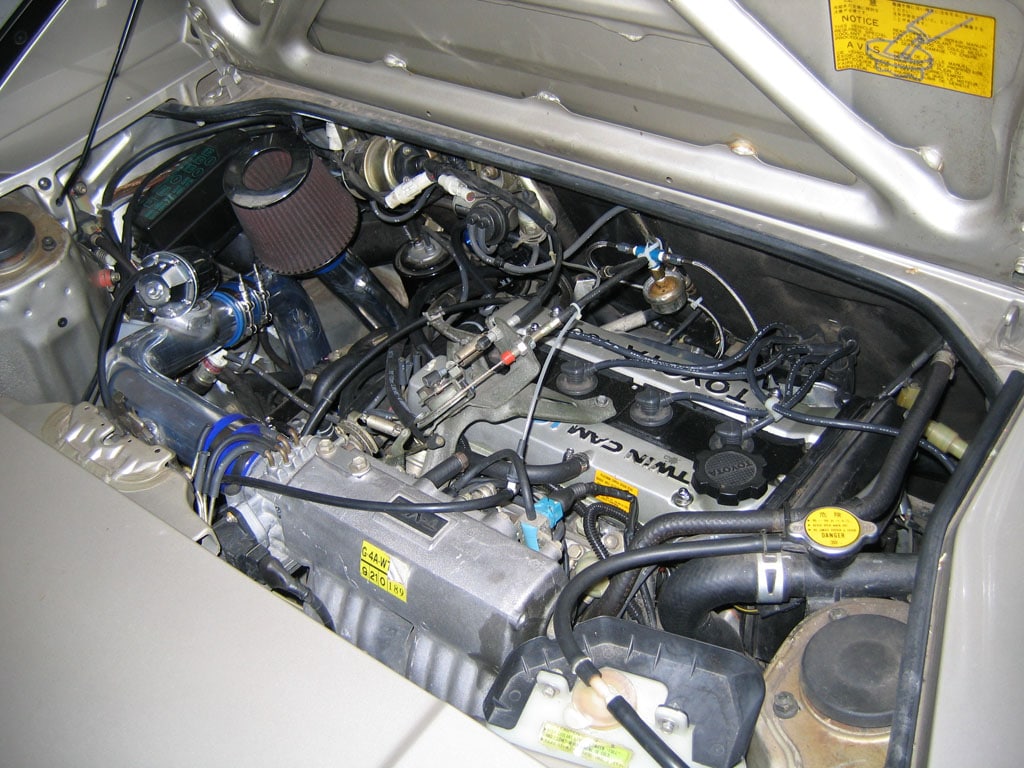
The car is on jackstands, the motor/tranny are out, a new AE101 4AGZE has been purchased and torn down for a rebuild and the block and headed are off at the machine shop as I type this. First off, the AE101 GZE is a BIG upgrade from the bluetop I was running even if I was doing nothing to it. It comes stock with 8.9:1 forged ceramic coated pistons, oil squirters, a reinforced block, crank, rods, etc. It also used the smallport head which is known to flow better than the largeport design that was on the older bluetop motor I was running (my stocker). This motor, stock, on 10psi of supercharged boost made 170 crank hp.
I didn’t go crazy…. but I couldn’t leave it totally stock, could I? The heads are being mildly worked right now, mostly just cleaned up and given a fresh 3-angle valve job, along with HKS valve springs, Web Cams #294 grind cams, and HKS Cam Gears. I’ll be using ARP head studs as well when I bolt it back together.
I’ll let the dyno tell the tale, but with the turbo being more efficient than the SC, and the minor internal mods, I’d expect 200 crank hp at 10psi should be realistic. And this motor should handle at least 18psi properly tuned…. That will require a new turbo though, I’m betting this little T25 runs out of breathe above 13psi or so, at least at higher RPMs.
The air-to-air IC stays for just a bit longer. I’ve got a sweet PWR 6″x6″ barrel water-to-air IC that I’ll be installing soon but I’ll have to pull the front end apart to find a way to fit the heat exchanger up there, it’s going to be super tight with the radiator and AC core up there but I think I can shift those back just a bit and make some room. I’ll keep the boost low until then…. which will motivate me to do this soon!
I’ve also got one of Max Misawa’s ‘Illegal Garage’ Clutches which I’ve heard great things about. It’s the 200mm setup since I’m using my stock C50 tranny until I explode it ;). (Edited: I’ve found that I have the 212mm setup and had to return the 200mm setup to Max, more info above) The clutch should handle everything this motor will put down and stay nice and street-able according to Max, who I trust on this based on all the great feedback he’s been getting. If all goes well I’ll need another one as soon as I do thrash this tranny as I have the AE101 tranny sitting here with the LSD which will need the 212mm clutch, I just need to source the bigger axles and modify the tranny to move the shifter levers to the other side of the case for the mid-engine configuration.
Suspension….
This section is much shorter, but ALOT has happened here! While I’ve had it all apart I’ve installed Koni Sports (yellow adjustables), with Ground Control coilovers, and Eibach linear rate springs, 250 front, 400 rear. As well as a full Prothane poly bushing kit. This should REALLY transform the car as I’m still running on all stock suspension at this point. It’s a super low-mileage car and the rubber wasn’t dried out at all, but it was still 20 year old original rubber, struts, and springs…. I’m pretty stoked about the new stuff 😉
Turbo Conversion Details:
6-21-06 Dyno Tuning and Results, and the plan for the future
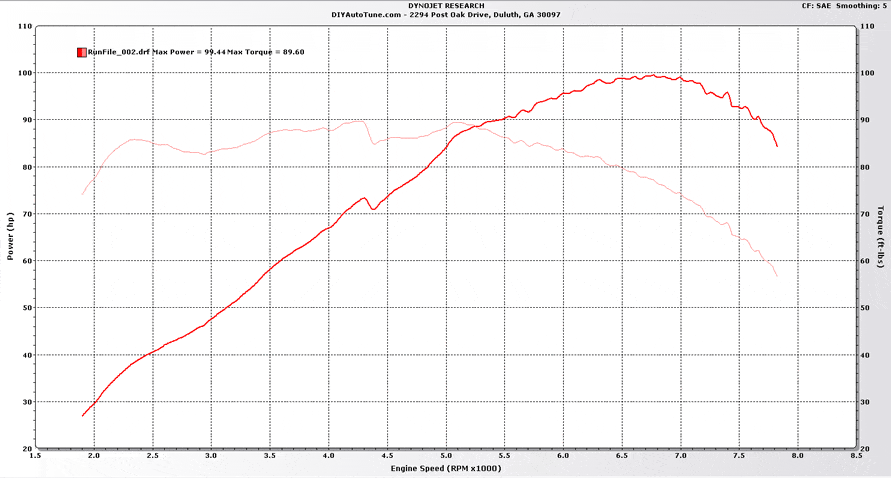
I dyno tuned the car a few weeks ago on a sweet Dyno Dynamics machine here in GA. As it turns out I had the AFR’s dialed in perfect on the street and just needed the dyno to get the ignition spot-on. I’ll post my NA dyno chart first– keep in mind the NA runs were on a Dynojet so the numbers are inflated about 17% over what a Dyno Dynamics machine would read.
Here’s the NA Chart from the DynoJet–
And here’s the 4AGTE chart from the Dyno Dynamics machine–
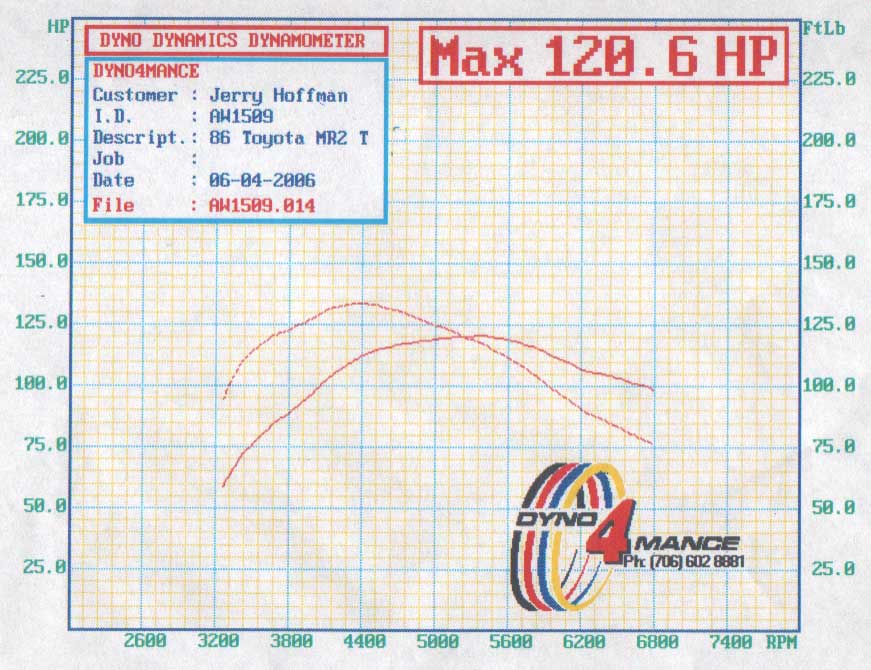
If you just look at the numbers you might be disappointed— a 21hp increase isn’t what I’d expect from a 4AGTE conversion (though the 46 ft/lbs doesn’t look too terrible). The good news is that this is not what I really got either. You REALLY can’t compare the numbers from these two different dynos directly. Talking with both the shop owner, and the tuner that I had helping me out (instructor for EFI University, we did this after a class) the Dyno Dynamics machine reads right at 17% lower than a Dynojet.
Taking that into consideration that would have made my ‘calculated for comparison’ NA peak right at 82.5 whp, and my NA torque peak right at 74.4 ft/lbs. With my 4AGTE runs reading 120.6 whp and 134 ft/lbs of torque you can see that the gains were significant. 38.1 whp and 59.6 ft/lbs. Thats a 46% hp increase and almost a 56% torque increase with just a hair over 7psi of boost, 7.2psi to be exact.
That’s the ‘peak numbers’ story– but you can see solid gains all across the powerband, and the car is MUCH torquier than before, setting you back in the seat nicely very soon after you get into the peddle. I autocrossed it week before last and it felt great on course. The only complaint I have is the torque peak drops off so sharply. It’s still putting out more at redline than it did NA but I want to flatten that torque curve out which will allow my whp to climb a good bit higher and let the car pull strongly to redline, where now it pulls strongly through the midrange but then feels a little bit flat in the upper RPMs.
5-29-2006 First Crank and Drive Video
Both videos are the same, just different sizes
4AGTE First Drive — 320×240 – 9.5 MB
4AGTE First Drive — 640×480 – 20.5 MB
Only other news is I’ve got the AFR’s out of the 11’s now into the very low 12’s at partial throttle under boost and WOT and the car is much more responsive for sure. I’m still ‘playing it safe’ with the timing.
5-27-2006 She lives!
Plenty of work has been going on whenever I could find the time, though few updates to this page… but the good news is the MR2 is now up and running with the T25 pushing 6-7psi of boost! Dialing the fuel in with the MegaSquirt and LC-1 wideband was easy and it’s running right at 12:1 AFR under boost. I’ve stayed pretty conservative on the timing for now as I don’t have the exhaust built out yet so it’s crazy loud with the open downpipe and there’s no way I could hear if there was any knock right now– I’ve got the exhaust parts coming in Tuesday and I’ll have that built out this week more than likely and be able to further dial the timing in shortly thereafter on the dyno. It feels good now but I know there’s more power to gain in the tune– Here’s some pics of the last month of progress. I’ve got a video of the first time I cranked it up that I need to pull off the camera and I’ll post that as well.


4-27-2006
I’ve made a little more progress over the last two weekends, things are still going a bit slow as free time is tight but it’s starting to come together, and I actually snapped a few pics so I can prove it 😉
First off my poly engine mount inserts came in so I installed them– they were super easy to install and should enhance throttle response and enhance the ‘human-car connection’ a bit. I got them from a MR2OC forum member that went by Kirkosaurus, he’s used to make them for the MKI, II and III MR2’s. Not sure he’s still around doing that though.
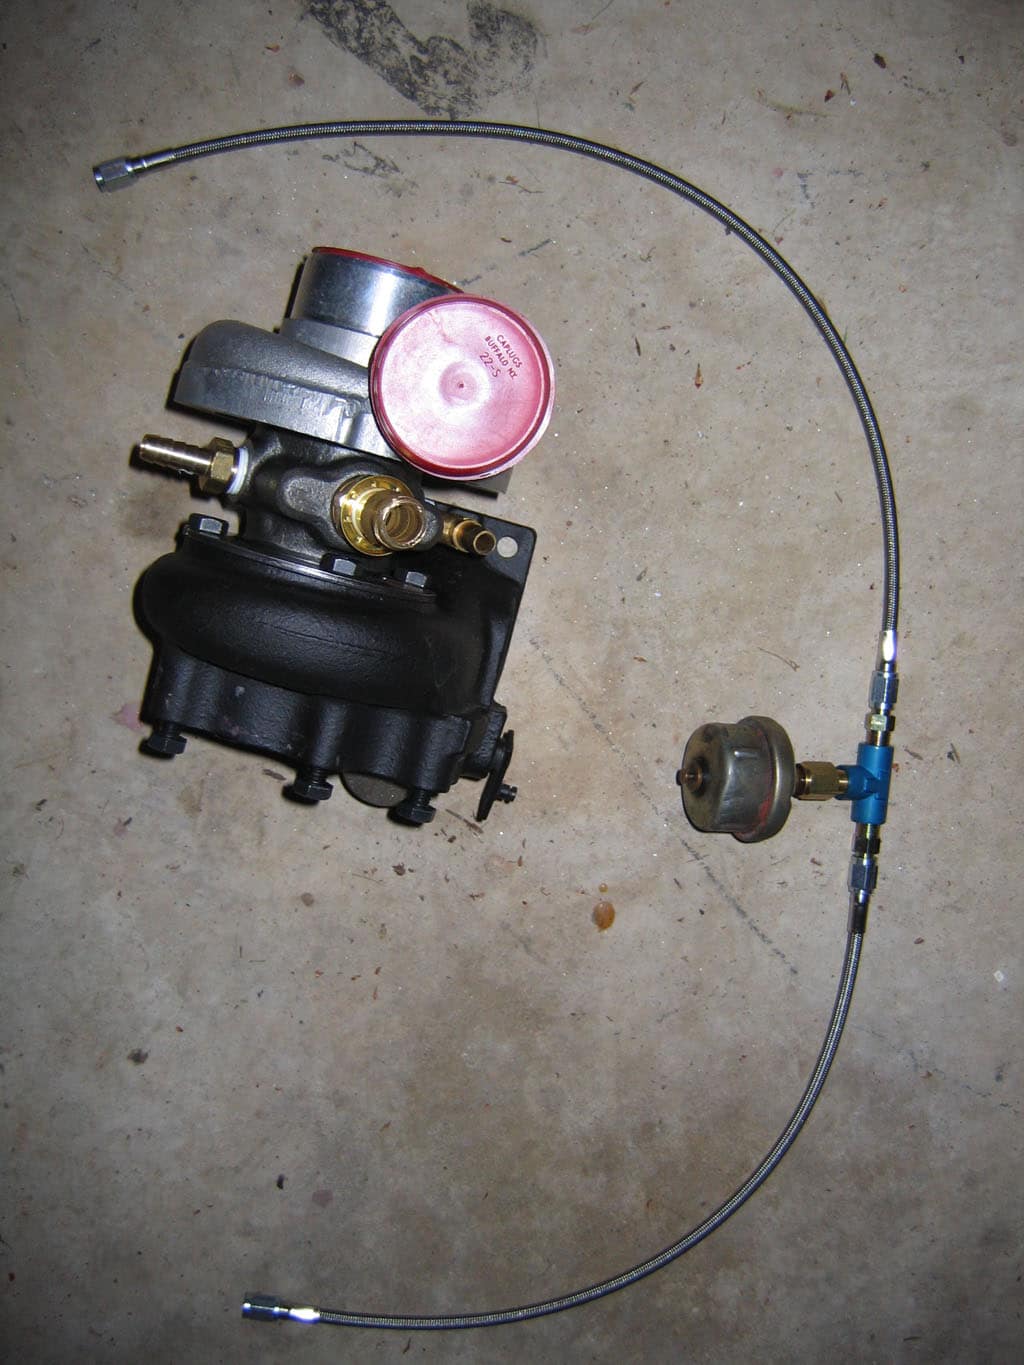
I also had new holes drilled and tapped for the wastegate actuator mount, though I’m having to modify how the actuator is mounted to the bracket a bit to make it fit.
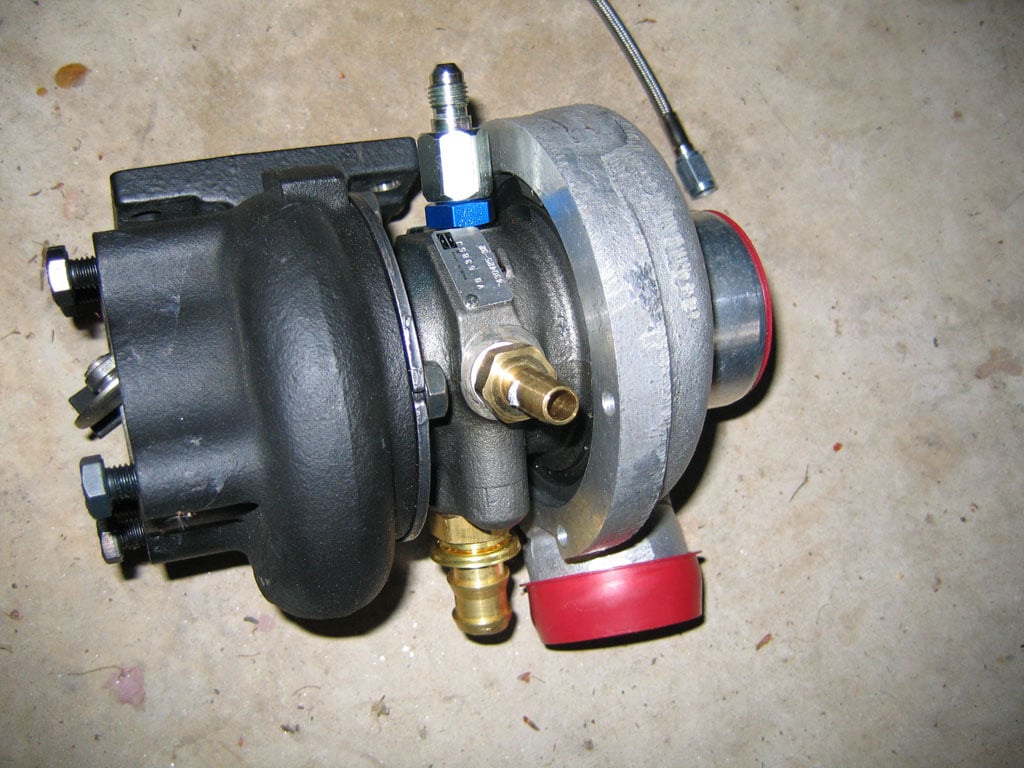
I’ve just about gotten all of my ‘fits with oil fittings’ taken care of– the final piece of the puzzle are two -4 to -3 adapters, as the vendor that I bought my line kit from advertised it as using -4 hoses, so of course I bought -4 fittings. And now I find that he really uses -3 hoses with his kits and his docs were wrong. Ah well… we’re all human, and I let him know so he can fix his ad. Anyways I found the adapters I need and ordered them in so they should be here tomorrow hopefully. Here’s the turbo just about ready to bolt in, along with the oil inlet lines with stock oil pressure sender relocated..
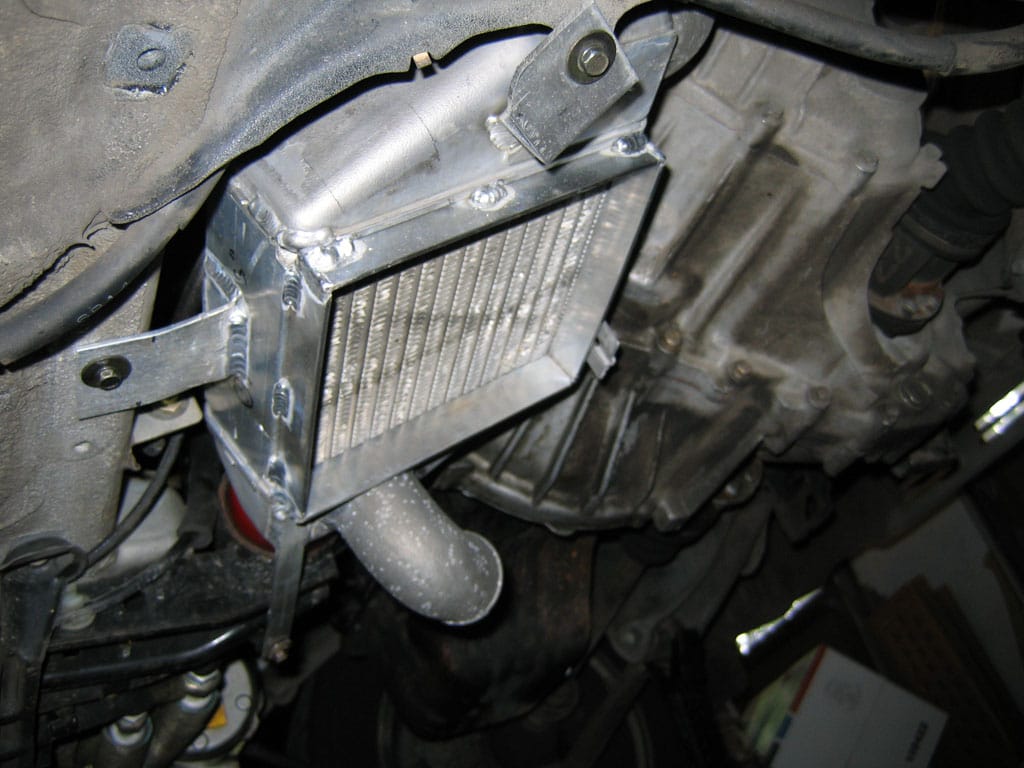
I had a new 2″ inlet and 2.5″ outlet welded onto the intercooler this week, as well as a mounting flange for the fiberglass air scoop I’ll be building for it. All welding should be complete on the intercooler now. The turbo outlet is 2″, and the throttle body is 2.5″, hence the size choices for the IC inlet/outlet. I had to make a size change somewhere so it may as well be where there is already a disturbance going on…. Here’s a pic of the intercooler in place:
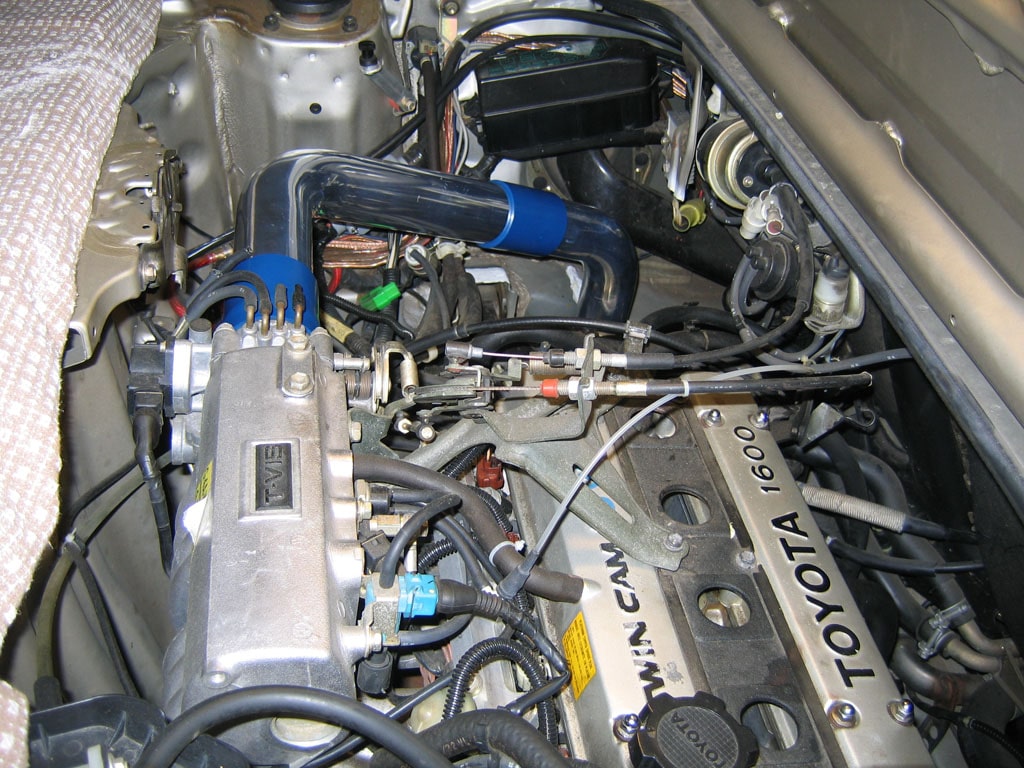
Lastly I’ve cut my IC pipes to length and put them in place now on the cold side. I’ve marked them for the IAT sensor and BOV placement and will have that bung and flange welded on soon. Here’s pics of the cold side piping:

So I’ve got to finish relocating my wastegate actuator as mentioned above. Then assuming my fittings come in by this weekend, and they are what I need, I should be able to run the oil inlet lines, re-mount the AC Pump to make sure the line clears and that my downpipe will clear it, and then mount up the turbo manifold and turbo. Then it’s down to:
- Getting the IC pipe welding done that I mentioned above
- Running the water lines to the turbo which I’ve got planned out and should be easy
- Making up the IC ‘hotpipe’ which is basically just a 2″ 90 degree pipe with a nipple for the wastegate boost reference
- Finding a suitable PCV valve to keep boost out of the crankcase, but allow vacuum scavenging still.
- Building a fiberglass air scoop for the intercooler (not ‘essential’ at first, but needs to happen quickly)
- Reinstalling the distributor and timing the engine
- Tuning it all in!
4-11-2006
I’ve actually been out in the the garage at least a bit of both of the last two weekends and just haven’t made an update here. At this point the exhaust system including the stock manifold is all gone. The distributor is out and the seals are being replaced as they were leaking a bit of oil. Thanks to www.kbox.ca for the distributor seal rebuild kit. I also pulled the AC Compressor to get to the oil pressure sending unit port where I’ll be pulling my oil supply from, which is where the holdup was. The T25 I’m using was original equipment on the late 80’s Grand Am turbo and has some crazy funky fittings that are next to impossible to find, I’ve just about pieced it all together now and have the fittings on order so they should be here soon.
Let’s see, what else…. I’ve pulled the intercooler back out and I’ll be getting the new inlet and outlet welded on this week, then I can finalize my IC lines from the IC to the throttle body. I’ll also have tabs welded on for the fiberglass air scoop I’ll build onto it.
The water lines should be easy– the MKI MR2 has a mechanical ‘fast idle’ built into the throttle body that works off of coolant that flows through the throttle body, cold coolant and it idles up, warm coolant and it idles down. I’ll just route the output from this through my turbo and then back on it’s way. The water inlet/outlet on the turbo are standard NPT fittings that were easy to find.
I’ll get off my tail and get some pics up soon…
3-27-2006
I pulled it in the garage last Saturday and started to work. The intercooler is now mounted up and most of the IC piping has been test fitted. I’ve got to make a cut or two and get it welded up. Then I’ll move on to mounting the turbo manifold and turbo, and running the oil and coolant lines. From there it’s just a couple of details and some tuning.
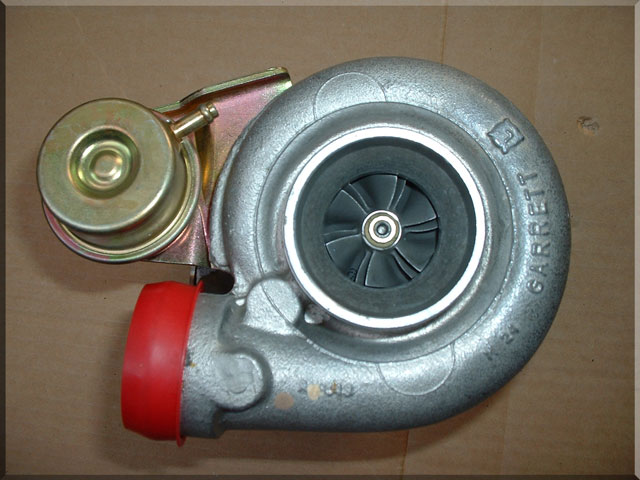
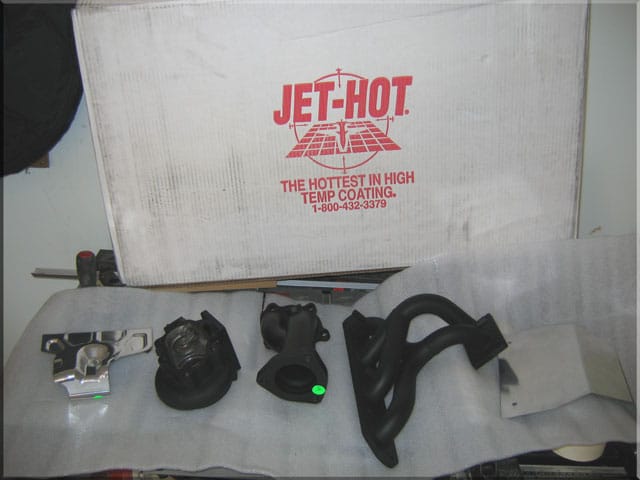
Here’s the new T25 I’m using, as well as the hot half of the turbo, the downpipe, and the exhaust manifold freshly returned from Jet-Hot. I also had the heat shield for the manifold and the starter coated by Jet-Hot as well. I’ve got the intercooler and all of the IC piping, silicone couplings, T-clamps, a knock off HKS SSQ Blow-Off Valve, and everything else that I need as well, just need those last couple of bits I mentioned earlier… At this point I’m just jumping into the project and I’ll get the pieces when I need them. I don’t need the car too bad from day to day anyways.
The Plan–
I’ve begun the process of dropping a T25 turbo on the stock engine and plan to run about 7 lbs of boost initially. Maybe upping it to 10 if all goes well. People have been known to run up to 12-13 psi on these engines with proper tuning and have them survive just fine, any more than that and I’ll need to swap to a 4AGZE motor, or at least swap to lower compression forged pistons. With the low mileage on this motor I ‘might’ stick with this block and just swap in JDM 4AGZE 8.9:1 forged pistons and call it a day. That’s all a bit down the road though as I can make this thing scoot pretty good as it is. I’ve had everything I need to make this happen except the exhaust and the oil return line for the turbo for quite a while now. Just sitting in the garage… begging me to come and play.