Got Heat Soak? We’ve got the remedy!
Have you ever been driving your car, maybe on a warm day, and all is going well. You park and shut ‘er down for a few minutes, come back to fire her up, and she runs completely different, or struggles to run at all for a few seconds? Usually, just babying the throttle to keep the engine running for a few seconds will get past this and back to normal operation. But what could be causing that first few seconds to be rougher than normal? Heat soak is a likely culprit.
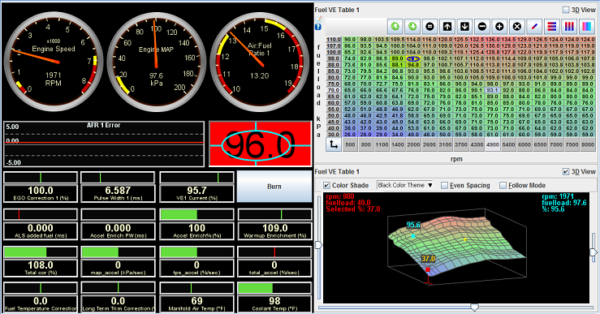
How can you know if this is your problem or not? Recreate the issue with your laptop and TunerStudio connected to the ECU. When you get it hot and then shut the engine off, does the IAT gauge in TunerStudio start to climb? When you go to restart it a few minutes later, does the IAT temp show about ambient (the temp outside right at that time), or maybe a little above ambient (mild heat soak)– or does it show WAY hotter than ambient. Like IATs of 150degF on a 95*F day? You’ve got heat soak.
Understanding Heat Soak
The Manifold Air Temperature (MAT or IAT) sensor is intended to measure the temperature of the incoming air. However, the sensor can also absorb heat from the intake manifold or intake tube – and in some cases the intake manifold transfers more heat to the sensor than it does to the incoming air– causing the sensor to ‘heat soak’ or read hot. This can cause issues particularly with hot re-starts. You drive the car hard, park it for 5 minutes, get back into it, and it will probably start, but the fueling will be off until the sensor cools off of all of the heat it absorbed sitting while the car was parked. Usually just a few seconds, but you can avoid that completely with a little tuning tweak.
The current MS2/Extra and MS3 firmware use a table called MAT / CLT Correction, under the Basic / Load Settings menu. This uses a simple model that ignores thermal mass and focuses on heat flow from the manifold, since a simple model that you can tune is often better than a perfect model that can’t be explained (or tuned) without solving differential equations. (KISS — Keep It Simple!) It uses RPM times engine load as a proxy for mass flow, and a table which tells the ECU what percentage of the MAT reading is actually heat transferred from the engine, as measured by the coolant temperature sensor. The equation used is:
Estimated intake air temperature = [MAT sensor reading - (Correction factor % * CLT sensor reading)] / (100 - correction factor)
Note that the correction factor can’t go to 100, as this would give a divide by zero. If you have some idea of what the real air temperature number is, you can rearrange the terms to solve for what correction factor you should use (multiply by 100 to make it a percent):
Correction factor = (MAT sensor reading - real air temperature) / (CLT sensor reading - real air temperature)
Here’s a real world example. You can download the data log used here.
How to tune away your Heat Soak woes…
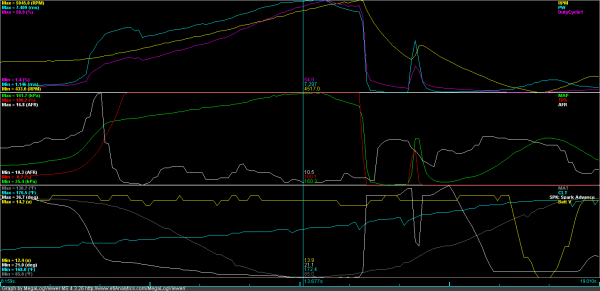
To get started, make a data log of a full throttle dyno pull, and look in the datalog to see if there’s a point the IAT sensor reading stops increasing. We’ll open the log in MegaLogViewer. You will need the registered version of MegaLogViewerMS or MegaLogViewerHD, as we’ll be using features that are not in the free version.
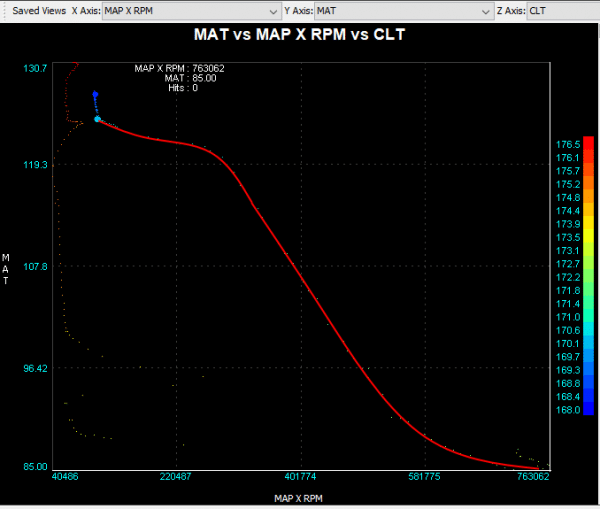
Here, the IAT reading bottoms out at 85 degrees F. This log was taken from a turbocharged Mustang with the MAT sensor threaded directly into the manifold – you’ll see the reading is closer to 125 degrees off idle. Since we can’t measure the real air temperature directly, we’ll have to assume the intercooler is doing its job reasonably well, and 85 degrees is the real incoming temperature across the board. This assumption is at its most accurate on a naturally aspirated motor, but will still give useful results here.
Next step is to make sure we have the MAP x RPM calculated field enabled, and use MegaLogViewer’s scatter plot feature to graph MAP x RPM on the X axis and MAT sensor reading on the Y axis. We’ll make the Z axis (color) the coolant temperature.
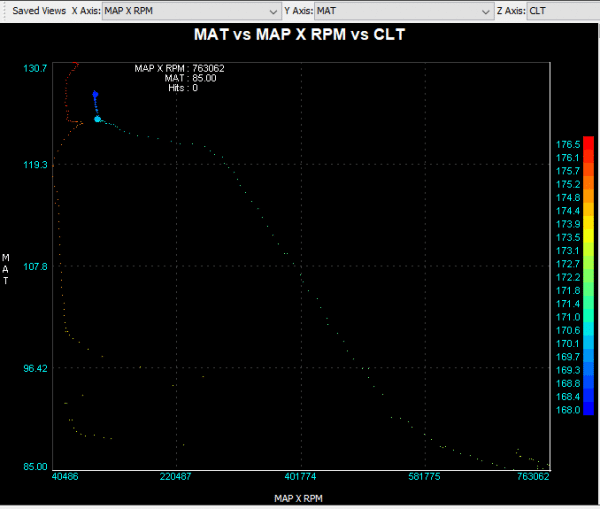
The dots may be a bit hard to see, but we can draw a curve across it, as in this image below:
Now, we’ll take the real air temperature to be 85 degrees. We’ll plug that back into the equation for several load points, and see what that gives us for a correction table.
Let’s start with the blue dot at the very top of the curve. We have a MAT reading of 124.3, a coolant temperature of 170.3, and a load number of 106,000, which we’ll need for the correction curve.
Correction factor = (124.3-85) / (170.3-85) = 39.3 / 85.3 = 46.1%
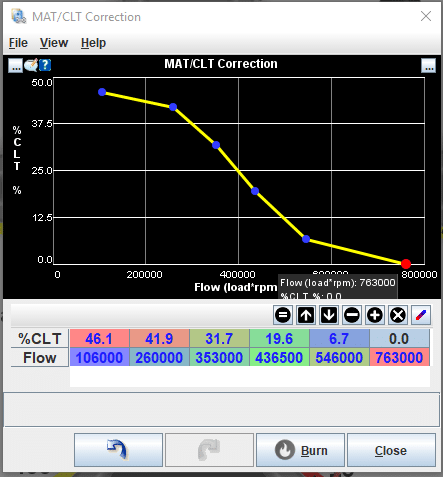
So, our first number is 46.1% CLT at a flow number of 106,000. At the high end of the curve, we have the 85 degree temperature we think is the real air temperature, and a flow number of 763,000. So that gives us a top number of 0% CLT at 763000. We work out the numbers for four points in the middle with the same math, and the final curve looks like this:
Notice that the overall shape of the curve matches the shape of the scatter plot. And that’s all there is to it! Yes it takes a little math, but it’s not difficult and we gave you the process. Take a few minutes to dial it in and enjoy being able to jump in that car and hot restart it and go!!!
