How to MegaSquirt your Nissan 240SX
Updated 4/10/2019 – notes on ECCS relay with MSPNP added
Using the stock ignition module with MegaSquirt
Application(s): 1989-1998 Nissan 240SX with KA24E or KA24DE
Other vehicles with KA series engines, such as Nissan pickup trucks, are similar. This also works for distributor equipped versions of the SR20DE and GA16DE.
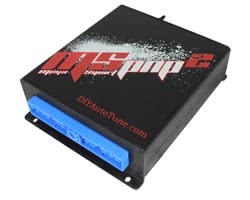
Looking for the easiest way to do this? Try the MSPNP option, currently available for S13 and S14 applications . This ECU comes fully assembled and ready to plug into the stock wiring. See this link for how to install a MSPNP in a 240SX. To buy an MSPNP for an S13, click here.
Level of control: Full Standalone EMS– Fuel and Ignition Control
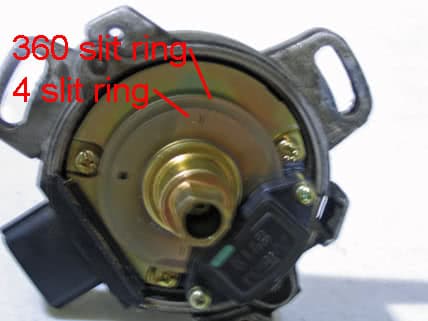
The optical trigger on a 240SX may look a bit complicated, with two rows of slits and the unequal slit sizes in the inner ring. However, setting up Megasquirt to work with this ignition is surprisingly simple. Megasquirt does not need or use the information provided by the second ring of 360 slits or the length of the inner slits, so you just need to obtain a signal from the trailing edge of the ring of 4 slits.
Note: DIYAutoTune.com has recently put together a bolt in trigger wheel to allow using this distributor for triggering distributorless ignitions. See this article for more details.
ECU Modifications
You can use the MS1, MS2, or MS3 on these engines. For MS3 use, see our page on the Nissan bolt in trigger wheel, as this trigger wheel is currently required to use the MS3 to its full capacity.
| Using the MS-I with MSnS-E firmware
MS1 V3.0 mods required:
MS1 V3.57 mods required:
|
Using the MS-II PCBv3 ECU
|
Wiring
The output is quite straightforward – you will just need to connect pin 36 of the MegaSquirt to the white wire on the ignition control module (“Power transistor” on Nissan diagrams). The specifics of the input wiring will depend on which year 240 you have; Nissan changed the wiring colors in 1991. However, the wires serve the same purpose; only the colors changed. Note that these years apply to the 240SX and are not the same for other KA-powered vehicles. For example, it appears that some Nissan pickup trucks with the KA24E engine retained the earlier color scheme for considerably longer.
Distributor Wire Colors
| ’89-’90 | ’91 and later | Purpose |
| B/W | B/W | 12v+ |
| G/B | White | MS Trigger (to Pin 24 on DB37, or Relay Board TACH terminal) |
| G/Y | Black | not used |
| Black | Black | Ground |
Fast idle valves, relays and other components
The 240SX used a thermal type fast idle valve that just needs to be supplied with 12 volt power when the engine is turned on; the fuel pump relay can drive this (and does in Nissan’s factory wiring arrangement). The valve Nissan refers to as the “Air Regulator” will open on its own, so you do not need to set up any sort of idle control with Megasquirt. However, there’s two other fast idle valves on there. One is an on/off valve that opens when the air conditioning is on, which also could be run without the MS. Nissan calls this the FICD valve. There is yet another IAC valve that works as a PWM valve and can be controlled with our MK-PWMIAC mod kit, refered to as the AAC valve.
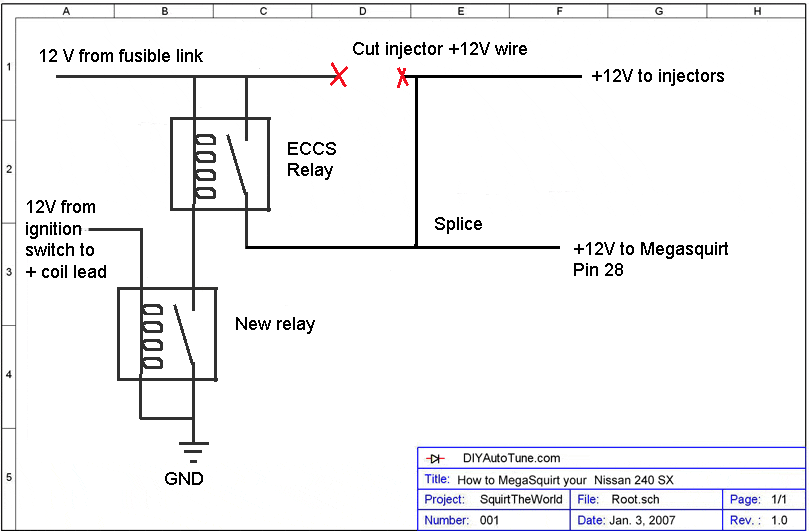
The stock Nissan ECCS relay is grounded through a circuit in the ECU. Also, the stock S13 wiring harness is set up to send the injectors 12 volts at all times, even when the ignition is turned off. When converting to Megasquirt, the injectors must not have 12 volt power unless the Megasquirt is also powered up. Sending the injectors 12 volt power with the Megasquirt ECU off can result in damage to the flyback circuits. The wiring diagram below shows one way of modifying the stock wiring so that the ECU and injectors power up at the same time, and also allows the other components drawing power from the ECCS relay to work as normal. Note: The MSPNP uses different injector drivers that shut off on key-off, and has its own circuit for controlling the ECCS relay. These notes on the ECCS relay only apply to traditional MegaSquirts. It does not apply to the MSPNP.
An alternate method of dealing with this is to use the Megasquirt relay board instead of the stock ECCS relay to power the Megasquirt, injectors, and crank angle sensor.
The ECU controls the fuel pump relay; taking this over with Megasquirt is simply a matter of taking the wire from the fuel pump relay to the stock ECU, and running it to the Megasquirt’s pin 37.
The gauges operate on their own, except for the tachometer, which is ECU driven.
While the transmission is connected to the stock ECU, this connection only tells the ECU what gear you’re in if you have a manual transmission. The Megasquirt doesn’t need this connection, and the car should work without this just fine.
TunerStudio Configuration for MSnS-E
On the ‘Spark’ menu choose ‘Spark Settings’ and set ‘Spark Output Inverted’ to NO when driving the stock power transistor. It is critical to get the Spark Output Inverted setting correct, as setting this wrong can result in damage to the power transistor. Dwell settings will depend on the coil used. A typical rule of thumb is to back off the dwell until you can just barely detect a misfire under lean cruising conditions, then add 0.2 ms of dwell time.
If you use someone else’s .msq file, I recommend you check the MSnS-E firmware version the .msq file was built on as you cannot always use a file built on one version of MSnS_E with a different version– it’s best to use the .msq files with the same version of the MSnS-E firmware that it was built on.
TunerStudio Configuration for MS-II
Visit MSExtra.com MS2 Manuals for TunerStudio configutration of MS2.
Set ignition capture to “Falling Edge.”
Important when using the stock power transistor: On the ‘Ignition Settings’ menu make sure to set ‘Spark Output’ to ‘Going High’ and set ‘Coil Charging Scheme’ to ‘Standard Coil Charge’ when using the mods in this article.
We’d like to hear from you!
If you have any further information, contributions, or questions about this article, please contact us.