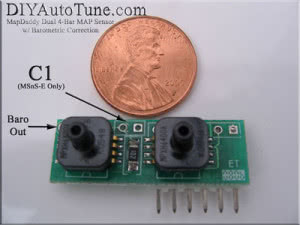
These notes cover the original MapDaddy with a hose barb on both sensors and a green circuit board. It has since been replaced by a new design that used a 4 bar MAP and a 1 bar barometric pressure sensor. The new design has a blue circuit board, and the barometric pressure sensor does not have a hose barb.
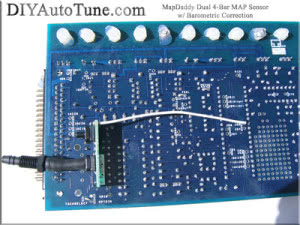
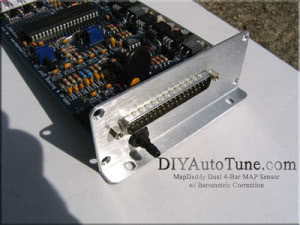
Installation is simple, it just solders right in where the standard MPXH4250 would normally go. One sensor’s nipple lines right up where the 4250’s output would have been, so it will line right up with the hole in your case. A small washer is included for PCBv3 cases that have a larger MAP hole, to be placed on the bulkhead fitting inside the endplate as shown. Then solder the wire from the hole labled ‘Baro Out’ in the corner of the PCB over to JS5 on PCB3 or 3.57 units, X7 on PCB2.2 units. This is the same whether you’re running MS1, MS2, or MS3.
NOTE: You will need about 1/2″ of clearance between the PCB and the case. All of DIYAutoTune.com’s ECU cases shipped since early 2006 have the proper case, some older kits/ECUs may have a different case without the proper amount of clearance. (Look at the endplates, if the endplate with the DB37 is cutout for the shape of the connector it should fit fine, the older cases just had a rectangle cutout for the DB37 connector and will not fit.)
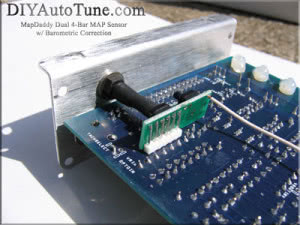
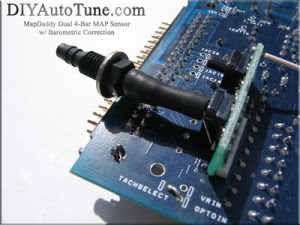
If you’re running a MegaSquirt-II or III that’s all you need to do for the hardware install! You won’t need to do anything with the .22uf capacitor included with the kit.
If you’re running the MS-I with MSnS-E you’ll need that .22uf cap. Just solder it into the C1 holes in between the two MAP sensors. That’s it! If you ever upgrade to MS-II you can remove it then (I tested the capacitor with MS-II/III with no ill effect, though it’s not needed so I don’t recommend it with MS-II and later).
Software Configuration Changes for MS-II and MS-III
If you’re using MegaTune (MS2 only):
- Expand SETTINGS.INI, then SETTINGS, then MAP_SENSOR and set it to ”MPXH6400A – MPXH6400 – 400 kPa”
- Save and exit the Configurator
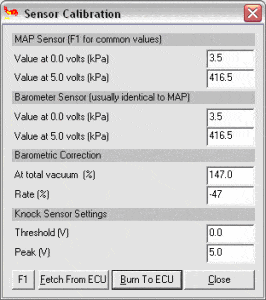
- Open Tools> Sensor Calibration and set to these values:
Burn to ECU and click close.
For B&G code:
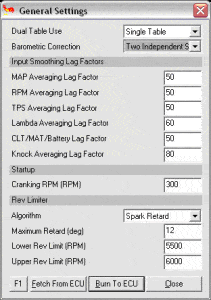
Open Settings>General and set ‘Barometric Correction’ to ‘Two Independent Sensors’ and set to these values:
Other firmware variants put the setting elsewhere. In MS2/Extra, this is found under Basic Setup -> General, Lags, and you also need to set the Realtime Baro Port to MS2 AD6/JS5. MS3 puts these under Basic / Load Settings -> General Settings.
Burn to ECU and click close. Power the ECU off and then back on.
If you plan on running the engine above 6500 feet (2000 meters), you will need to reduce the minimum baro correction value from 80 kPa, as this is the point where normal atmospheric pressure drops to 80 kPa. A value of 60 kPa will be good for up to 13000 feet / 4000 meters.
That’s it! Realtime baro correction is enabled on your MS-II!
Software Configuration for MSnS-E (pre-029)
-
- Before opening MegaTune, open the Megatune Configurator
- Expend SETTINGS.INI, then SETTINGS, then MAP_SENSOR and set it to ”MPXH6400A – MPXH6400 – 400 kPa”
- Save and exit the Configurator
- Open MegaTune.
- Under ‘Contants’ turn Barometric Correction ‘ON’. BURN TO ECU and click Close.
- Under ‘Code Config > MAP Sensor Settings’ set:
- Type of Sensor = 400Kpa
- Baro Correction Factor % = 78
- Kpa correction Factor % = 50
- BURN TO ECU and click Close.
- Under ‘Code Config > Barometric Correction’:
- The defaults for ‘Max and Min KPA for Baro correction’are normally fine.
- Set ‘Constant Baro Correction’ to ‘Extra MAP fitted to X7’
- BURN TO ECU and click Close.
- Power your MegaSquirt OFF and back on—this is required before several of those settings will take effect.
- Before opening MegaTune, open the Megatune Configurator
Software Configuration for MSnS-E (029 and newer)
- Before opening MegaTune, open the Megatune Configurator
- Expand SETTINGS.INI, then SETTINGS, then MAP_SENSOR and set it to ”MPXH6400A – MPXH6400 – 400 kPa”
- Save and exit the Configurator
- Open MegaTune.
- Under ‘Basic Settings > Engine Contants 1’ turn Barometric Correction ‘ON’. Also set the MAP sensor type to 400kpa. BURN TO ECU and click Close.
- Under ‘More Settings > Barometric Correction’:
- The defaults for ‘Max and Min KPA for Baro correction’ are normally fine.
- If you plan on running the engine above 6500 feet (2000 meters), you will need to reduce the minimum baro correction value from 80 kPa, as this is the point where normal atmospheric pressure drops to 80 kPa. A value of 60 kPa will be good for up to 13000 feet/4000 meters.
- Set ‘Constant Baro Correction’ to ‘Extra MAP fitted to X7’
- BURN TO ECU and click Close.
- Power your MegaSquirt OFF and back on—this is required before several of those settings will take effect.
That should be it!
Note: With MSnS-E 024s9 and earlier (and possibly some later versions) there is no ‘realtime’ baro correction, the barometric correction exists in the case of processor resets, so that the ECU will get a clean reading of the true atmospheric pressure if there is a MS processor reset. Without this feature the MegaSquirt uses the single onboard MAP sensor to get it’s baro reading in the event of the reset while the engine is running, the value it gets will be WAY off since the engine will likely have a vacuum, or possibly even boost on this sensor at the time. This can case the ECU to think it’s ‘correcting’ your fuel mixture by leaning it out or richening it up when it shouldn’t be. Adding this second sensor for barometric correction will prevent this from being an issue, as it will take a fresh reading from the second sensor, which isn’t under vacuum/boost but is reading atmospheric pressure, in the event of a processor reset and this issue will never be a problem. Resets should not normally occur anyways and if you have a problem with them you should investigate, they can usually be traced to a power surge on the incoming power supply, or to an interference or a power surge on the ignition input wire.
However, with later versions of the MSnS-E code, 026h and above I’ve confirmed, you’ll get REALTIME Barometric correction, so all the time the fueling is being adjusted based on altitude and the resulting barometric pressure. This is the ideal situation, it covers the reset issue as well as all altitude changes.
