The DIYPNP has one proto area on the main board, and some versions have additional proto space on the adapter board. The holes in these proto areas are interconnected to make building circuits easier; connected holes are indicated by white dots in between the holes. These proto areas give you room to build model specific circuits your application may need, or just to get creative and try out new circuits. Here, we’ll show you a couple examples of circuits you may find useful on certain cars. It’s also possible to make circuits in the proto area for applications such as nitrous control, EGT logging, speed sensor inputs – the possibilities are only limited by the code and your imagination.
This picture shows the connections on the proto area on the main board in blue-green lines. The N42 board has similar, extra proto areas on it for even more circuitry if you should happen to need it. We have also provided a strip of grounds alongside the proto area connected to the main (not sensor) ground plane. The two holes marked 3 and 4 in the proto area connect to the holes marked 3 and 4 above the Inj2 header.
Here is an example of an add-on circuit you might use the proto area for: A voltage regulator circuit for ’99-’00 Miatas. This circuit has been passed around on Miata forums for a while and we believe it was originally designed by Jason Cuadra. We’ve modified it to fit the DIYPNP proto area.
Click on the picture for a larger view. This circuit requires a switched 12V input, ground, and connection of the circuit’s output to the “Field” terminal. Switched 12V can be taken from one of the three 12V terminals on the DIYPNP mainboard, ground can be used from the terminal just above the Proto Area, and the “Field” output can be jumpered to the connector board.
Here’s another circuit possibility: Stepper IAC control. The MicroSquirt Module can do this with 3.0.3 or higher MS2/Extra code. This is a through hole version of the MS2’s built in stepper driver circuit.
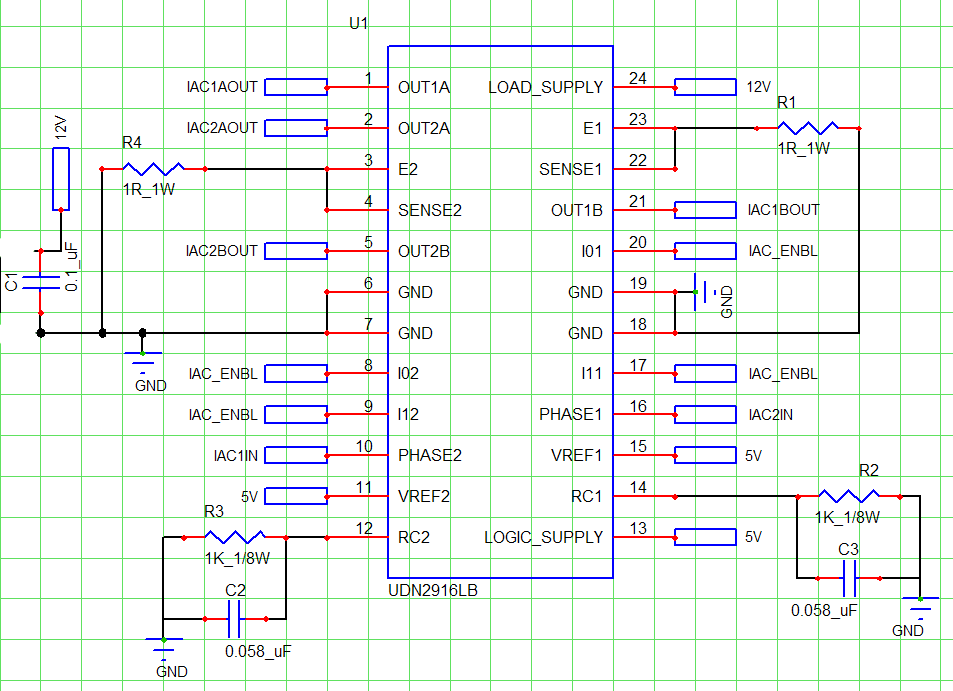
To use this circuit, you’ll need the through hole version of the UDN2916; it can be ordered from Digi-Key as part number 620-1118-ND. Connect IAC1IN to PT6, IAC2IN to PT7, and IAC_ENBL to PB4, and you can use the four outputs to drive a stepper motor. Note that if you use this circuit, you give up sequential injection.
Note: This proto area is not the same as the proto area on a V3.0 board. V3.0 boards do not have the holes connected like a DIYPNP.