MegaSquirt Carb to EFI Conversion: Part 3: MPFI Conversion
From TBI to Multi-Port EFI, with Ignition Control…
Objective of this Article
This article will focus on the process of converting our 1977 Chevy Nova test vehicle from the very functional and affordable GM TBI fuel injection hardware to a much more modern multi-port fuel injection (MPFI) design utilizing a Holley Stealth Ram MPFI Intake and the same MegaSquirt-II EFI system we’d previously installed in Part 1 and Part 2 of this Carb-To-EFI conversion series of articles. If you haven’t already viewed those articles and the videos that are a part of each then they’re a good place to start particularly if you’re new to EFI and looking to convert a carb’d vehicle to EFI, whether it’s a SBC or not. The first article covers taking control of the fuel system and the second covers taking control of the ignition for a fully computer controlled engine. The goal of the first two articles was to get you up and going on a setup using as many junkyard available parts as possible, keeping the total bill as low as we could and showing just what can be done, what gains could be made not only in power but also in mileage and in drivability, which is where the biggest gain was in the TBI setup over the previously tested carb configurations. But we didn’t want to stop there, we wanted to continue on in an attempt to show you just how good it could be. With the conversion to multi-port fuel injection we should see a bigger improvement in fuel economy, along with more power potential. It should also be as just about as well mannered as any new vehicle on the road, definitely a far cry from a typical 60’s or 70’s era carb’d motor. So here’s what we did, and what we found…
We chose a 1977 Chevy Nova with a 350 small block as our subject, but with the proper intake the principles laid out here can be used just the same on a big block Chevy, or a Ford or Dodge small or big block engine, inline engine, a foreign motor… a motor is a motor is a motor. The SBC has the benefit of a large aftermarket making off the shelf aftermarket MPFI intake systems readily available, but truth be told we could have gone back to the junkyard to find a modern MPFI intake system that would have fit our motor with minimal modification (a couple bolt holes on the intake manifold need to be modified to fit the early Chevy heads). So yes, you can do this cheaper than we did it, your driveability and economy results should remain much the same if you do, though ultimate power potential is likely to be higher on the aftermarket unit we chose, and we have some plans for this car when we’re finished with these articles so we went ahead and went for the higher dollar induction setup. We will likely continue on in this series of articles, in fact very soon we have plans to add forced induction to this beater of a motor to see just what we can get out of a 70’s smog era 2-bolt 350.
As always, we highly recommend you dig into the MSExtra.com in addition to these articles. It’s a big read, but it’s a valuable resource that our guides are meant to supplement and not replace.
What we did: Holley Stealth Ram MPFI
Ordering ‘The Big Kit’
So no digging at the junkyard this time, we ordered up Holley part#81504001. This is a direct bolt on Stealth Ram MPFI setup. Two piece intake with lower manifold and upper plenum. Comes with the fuel rails regulator which directly attaches to the rails for easy mounting. This kit came with 30lb-hr injectors which is more than enough for our extremely mild 350 Chevy at this stage. It will give us a bit of room to grow and we can always swap in bigger injectors when we’re ready. FYI They do offer the kit with several different injector size options though. It also came with an LT1 style 58mm throttle body complete with TPS sensor and Stepper Motor Idle Valve (IAC)
Now, as this is Holley’s ‘big kit’ it also comes with some items we didn’t really need, and depending on where you are in your EFI adventures you may or may not. For one, the fuel pump. We already had this in place from our previous EFI conversion and since we used an MPFI capable pump with our TBI conversion it was already ready for MPFI action now. It also came with IAT and CLT sensors which we would be reusing from the TBI conversion. Lastly, it came with a GM 3-bar MAP sensor, which though we could use with the MegaSquirt EFI system, there’s really no need to as the MegaSquirt has it’s own internal MAP sensor that does the job just fine and simplifies things a bit.
So what didn’t come in the kit?
K&N Air Filter p/n RC-5050 which — with little effort slips right on the inlet of the throttle body and clamps down.
Spectre Alternator Bracket p/n 47293 — needed because this intake moves the mounting point forward from where the stock intake bolted.
Lokar TPI Throttle Bracket p/n TCB-40TP2
Lokar TPI Throttle cable p/n TC-1000TP
Lokar TPI + TH-350 Kickdown cable p/n KD-2350TP
We could probably have gotten away with junkyard TPI cables and bracket, so to save a few bucks you can likely go that route. But the Lokar cables are sexy, move incredibly smoothly, and didn’t cost that much.
Installing the Stealth Ram MPFI Setup
This is basically a bolt on affair. First we removed the GM TBI setup we had on the vehicle and the wiring that was run to this we simply stuck out of the way for now. We managed to reuse the coolant temperature sensor and IAT sensor wiring. The IAC wiring needed to be extended, and of course the injector wiring had to be redone from scratch. The TPS on the Stealth Ram also needed its own connector.
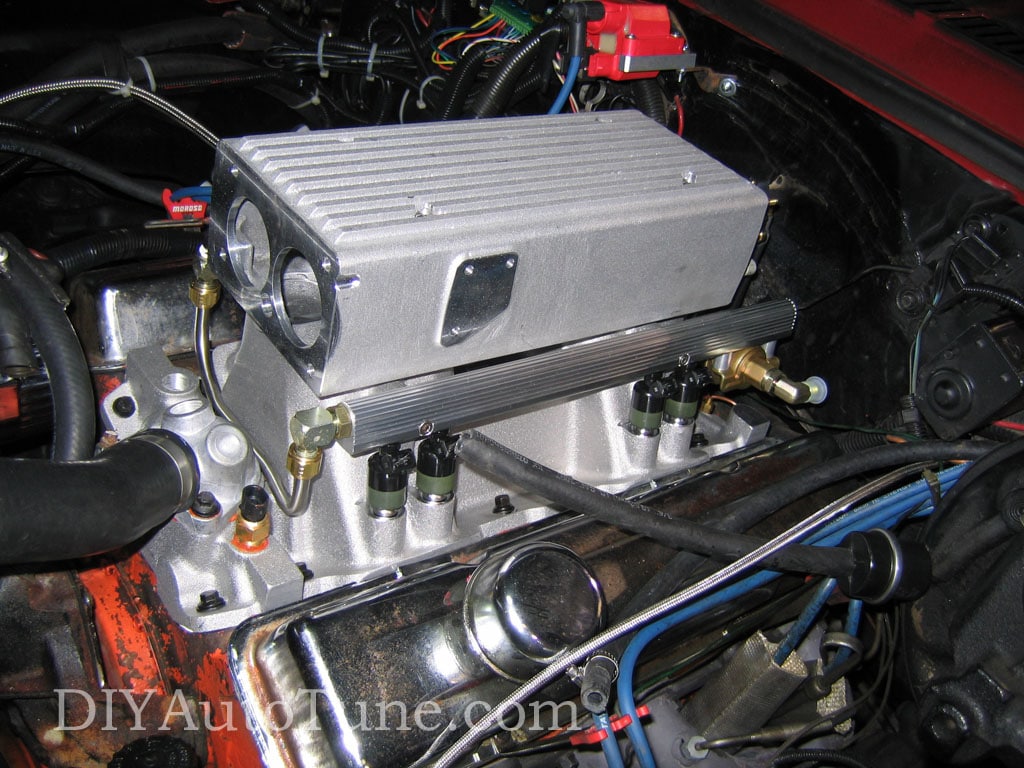
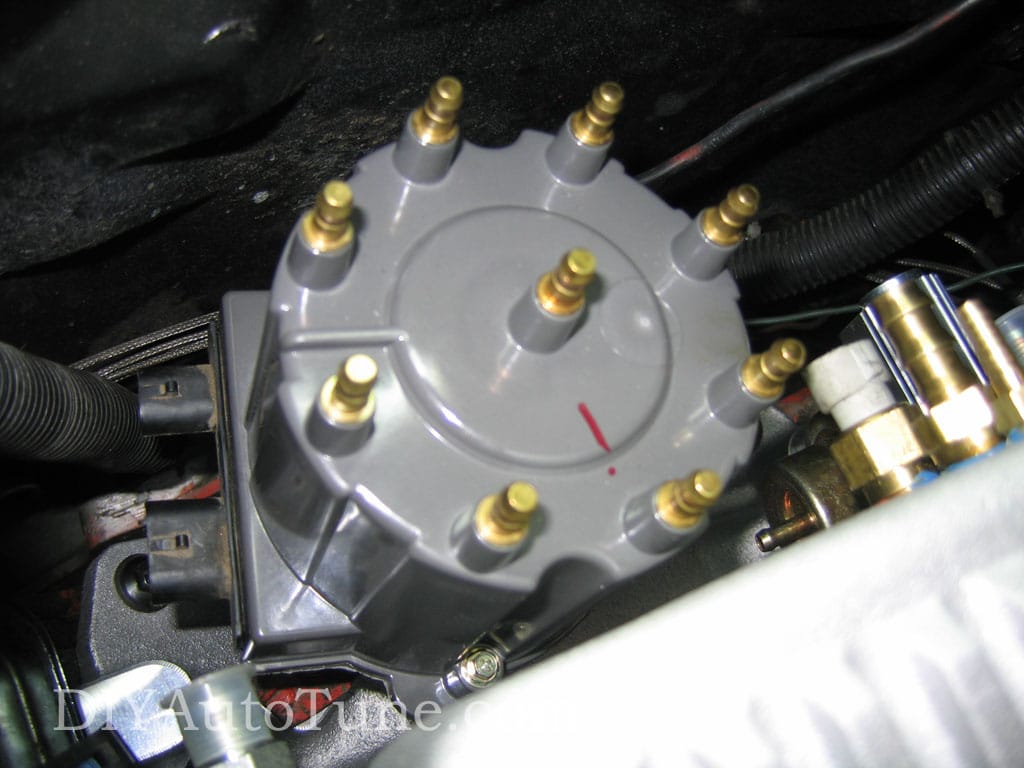
The manifold drops into place with very little drama. It’s a two piece design, much like a classic tunnel ram. In fact, the lower section is closely related to a Weiand Hi-Ram. The upper section is a boxy plenum with several pipe thread ports. We used the two small ports on the back for the MAP sensor and fuel pressure regulator, used one of the large ports on the back for the brake booster, and plugged the other port. We installed the IAT sensor in the port on the underside of the plenum. We were able to reuse our small cap HEI distributor; a cap-in-coil distributor would not have worked with the upper intake. The Stealth Ram kit included a TPI type throttle body with ports for PCV on the throttle, so you don’t need to use the ports on the plenum for your PCV valve. The package even included a built in fuel pressure regulator on the fuel rails.
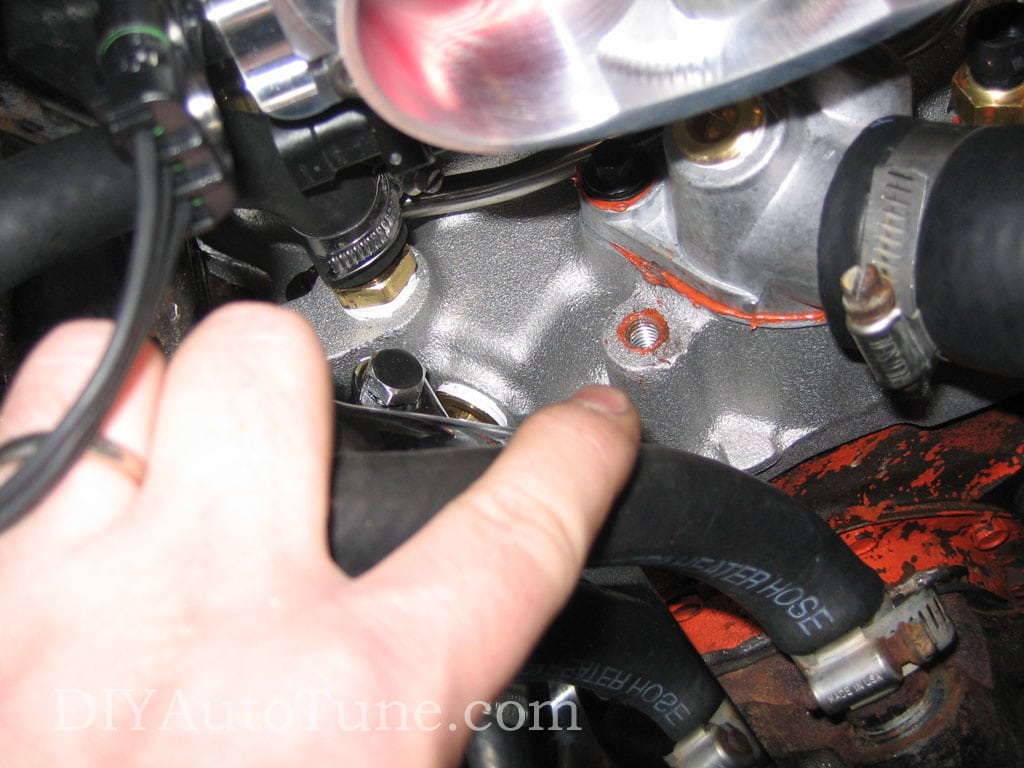
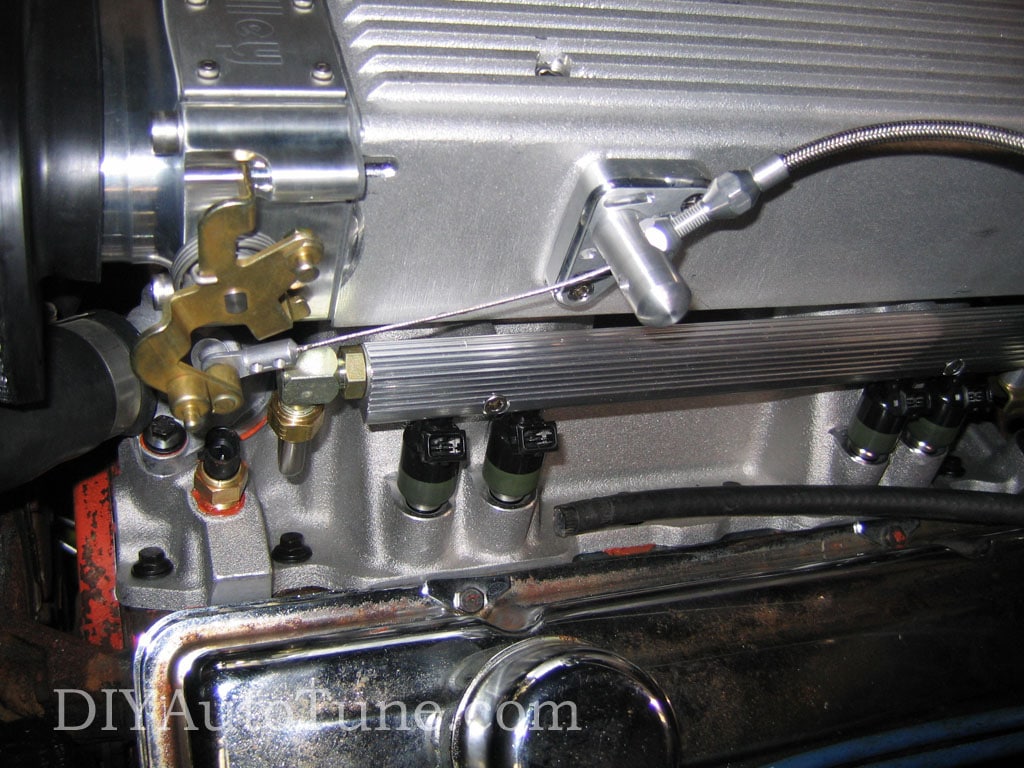
The one area where this package is not a straight bolt on, as we noted before, is the alternator bracket. The stock bracket mounted to a hole next to the thermostat housing. The Stealth Ram moves this hole forward about an inch. We solved this using a Spectre bracket that bolts to one of the main manifold bolts. It’s also nice and shiny ;).
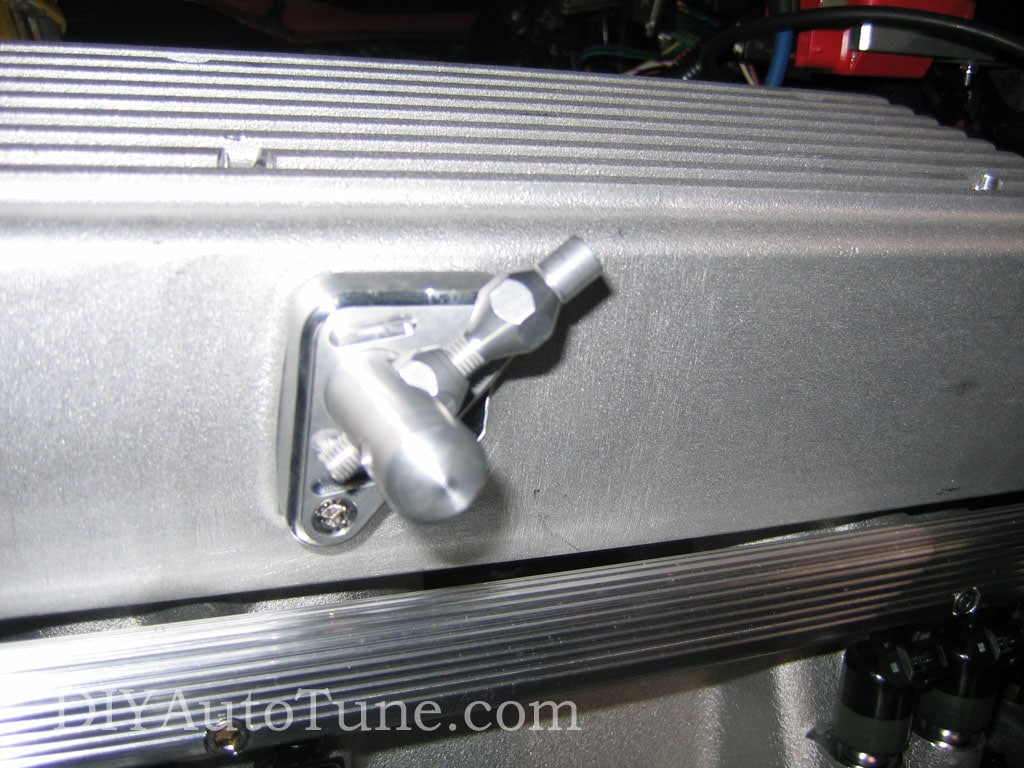
We used a Lokar kit for the throttle cable bracket, transmission kickdown, and throttle cable. These need a bit of trimming to fit, being universal cables. The throttle cable fit our accelerator pedal after removing the clevis, while the transmission kickdown cable is a direct fit but took some finesse to install because of the headers.
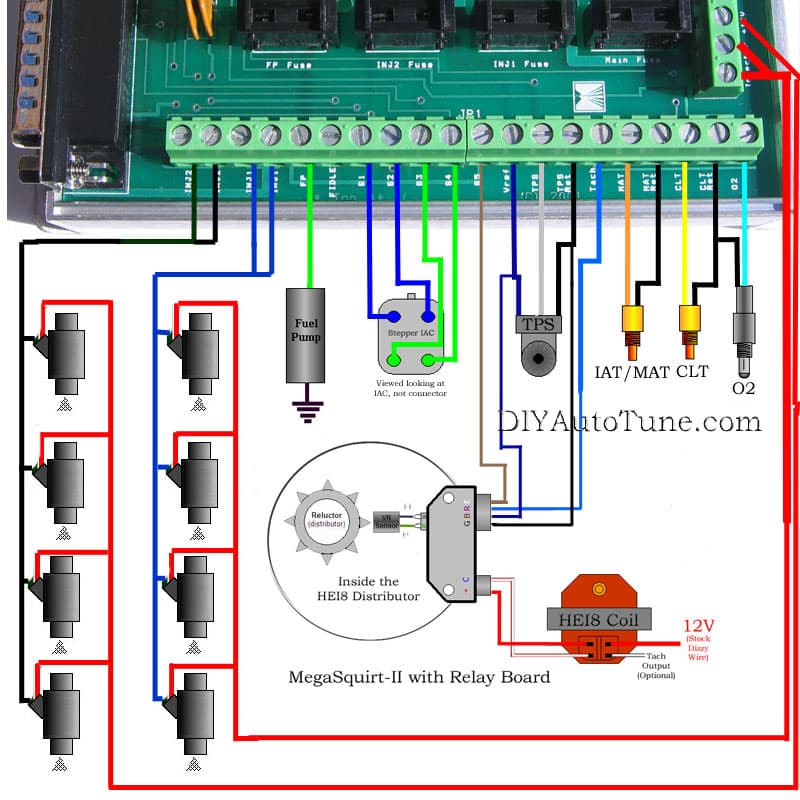
How do I wire it up?
We ended up making a new harness that used the temperature sensor and ignition wiring of the old harness, combined with new wiring for the IAC, TPS, and injectors.
Pretty straightforward setup here– it’s much the same as the setup used for Part 2, where we converted to computer controlled HEI ignition.The only major difference is that there are now eight injectors instead of two. Even the IAC valve wires up with the same connector and pinout.
Starting the car for the first time
If all you have changed is the induction system and your ignition system and timing are unchanged, then chances are the car will fire right up, or at least try to, off of your current map. You may find that the idle is rich or lean, so be ready to adjust the tables for this quickly. You’ll also need to adjust your warmup enrichments, and your afterstart enrichments, for the new induction system. Generally speaking your new MPFI setup should need LESS fuel for both Warmup Enrichments and for Afterstart. This is because the fuel enters the cylinders better atomized, as it has not had to travel the length of the intake runner mixed with the air like it did with the TBI. Less of it will stick to the walls and puddle, and more will enter the combustion chamber, allowing you to start and warmup the car on less fuel than before.
Tuning your EMS
Now you’re ready to retune the Fuel/VE table on your EMS. The timing should not have changed any, though if you’d like to be cautious you could pull a few degrees while retuning the fuel in case you run it a bit lean at some point, this will help make things a bit more forgiving. Then you’d put the timing back in when the fuel is right. The easiest way to do this is to pull approximately 4-5 degrees from the entire table at once, then add it back when you’re done. As we’ve mentioned in previous articles the MS2 Manual on MSExtra.com covers some tuning basics. There are several books that go into more detail although to be quite honest, ignition tuning has always been somewhat of a closely guarded secret (by professional tuners, who tend to write the books) than fuel tuning and as such there is much less specific information out there about it currently targeted towards the average DIYer, part of this is for good reason as to fully tune every cell in your ignition table properly you really need access to a steady state load bearing dyno. There are books available now that provide at least ‘some’ information on the topic, or (Click this link if you’d like to check out/purchase our book.) Lastly you can always take it to a pro.
This time on the dyno, I left the ignition timing right where it was after part2 of this series, and I retuned fuel for the new MPFI setup. This motor definitely had a little more in it that was being restricted by both the earlier carb and the recent TBI setup. Part of this is surely due to to the manifold design.
So we basically picked up about 12whp peak, and made more power everywhere after peak as well. We lost a tiny bit of torque down low (5-6 ft-lbs), but when you’re in the loud pedal, how much time do you spend under 2600rpms anyways?
Impressions
The TBI ran the car good, but this MPFI setup has the car running even better. I can run the engine leaner, cleaner, at cruise getting better fuel economy (1-2 mpg is all we could eek out over the TBI setup, but it ran much smoother when leaned out to get this). Other than that my impressions haven’t changed much. Basically everything I said before about the TBI, but things just ran that little bit better now, and on a little less fuel. As I said before the drivability is amazing for a classic car like this. Properly tuned you can reach in the window, turn the key, and it’ll pop right off, doesn’t matter how cold it is. It’ll idle up and warm itself up just like a much newer OEM car. You can hop right in without wasting any time and drive off. Car runs great. We’re making more power than it’s ever made. There’s just no negative. Stayed tuned though, this series isn’t over, there’s more to come. It’s time to make this motor put out some better numbers in a bigger way.
Parts Used in this Article
This is not a complete list of every little bit part you’ll need, but rather what we offer as well as the major TBI components
This time around we haven’t posted a new tuning map, we could, but it likely wouldn’t be any more helpful than the map from the end of article part2. The ignition table didn’t change any, the fuel did but no matter what we give you you’re going to have to dial the fuel in for your vehicle anyways, this map will get you started and very close to where you need to be if your motor is similar to ours.
Note, this was built on a Small Block 350 Chevy motor from a 76 Monte Carlo (swapped into this Nova). Edlebrock Performer Intake. GM TBI from a 350 Chevy (65lb injectors). GM HEI8 Small Cap Distributor installed as per the above article. MS2 ECU Configured as per the above article. Headers into 3″ Exhaust and Flowmasters. Stock heads and cam. This was built, and should only be used on, a MegaSquirt-II with firmware 2.888.
I DO NOT recommend you drop this file on your car and go any more than I would with the base map. Each individual tuner, whether that’s you or a professional, is responsible for making sure the EMS is properly tuned before driving!
Want to learn more about EFI Systems? Matt Cramer (lead tech here) and Jerry Hoffmann (founder/owner) wrote a book on it! Check it out on Amazon.com!
BONUS: What about the Holley 900cfm TBI?
In our testing, on our weak motor, the Holley 900cfm TBI did not make more power, but instead made less (yes this surpised me too). I suspect this TBI just doesn’t flow quite as well at the lower CFM’s demanded by this motor, on a built/bigger motor that needed the additional capacity I expect we’d see the Holley 900 do much better than the GM TBI with it’s somewhat limited flow rating. We didn’t do enough testing on enough configurations to be sure, but I don’t think we’d find the Holley a loser in circumstances where it’s flow capability was needed more.
What’s coming in future articles?
More Ignition Control Options — You don’t have to do what we did here though if you’re running a Chevy, this is easy and hence what we recommended. We’ll show you some other options though as well that will work on a Chevy or any number of other engines.
Turbos. Yes, two of them.
Links to all Articles in this Series:
Carb-To-EFI Conversion: One Step at a Time – 1977 Chevy Nova with SBC 350